> ## Documentation Index
> Fetch the complete documentation index at: https://explore.airia.com/llms.txt
> Use this file to discover all available pages before exploring further.
# Tool & MCP Interface
> Expose your agent as a callable tool that can be used by other agents through the Airia MCP server
The Tool & MCP interface allows you to expose your agent as a reusable tool that can be called by other agents. When configured, your agent becomes available through the **Airia Deployed Agents MCP** server, enabling agent-to-agent interactions and tool composition.
For an overview of managing all interface types, see [Managing Agent Interfaces](/building-and-deploying-agents/interface-options/managing-interfaces).
## What is the Tool & MCP Interface?
The Tool & MCP interface exposes your agent as a callable tool through the **Airia Deployed Agents MCP** server, so other agents can discover and call it using MCP standards. Most teams can use the defaults; optionally, you can add structured input/output schemas and tool annotations for stricter, machine-readable contracts.
## Prerequisites
* Your agent must have an **Active version** published
* You need appropriate permissions (admin, project-admin, or security-admin) to configure tool interfaces
## Configuration Steps
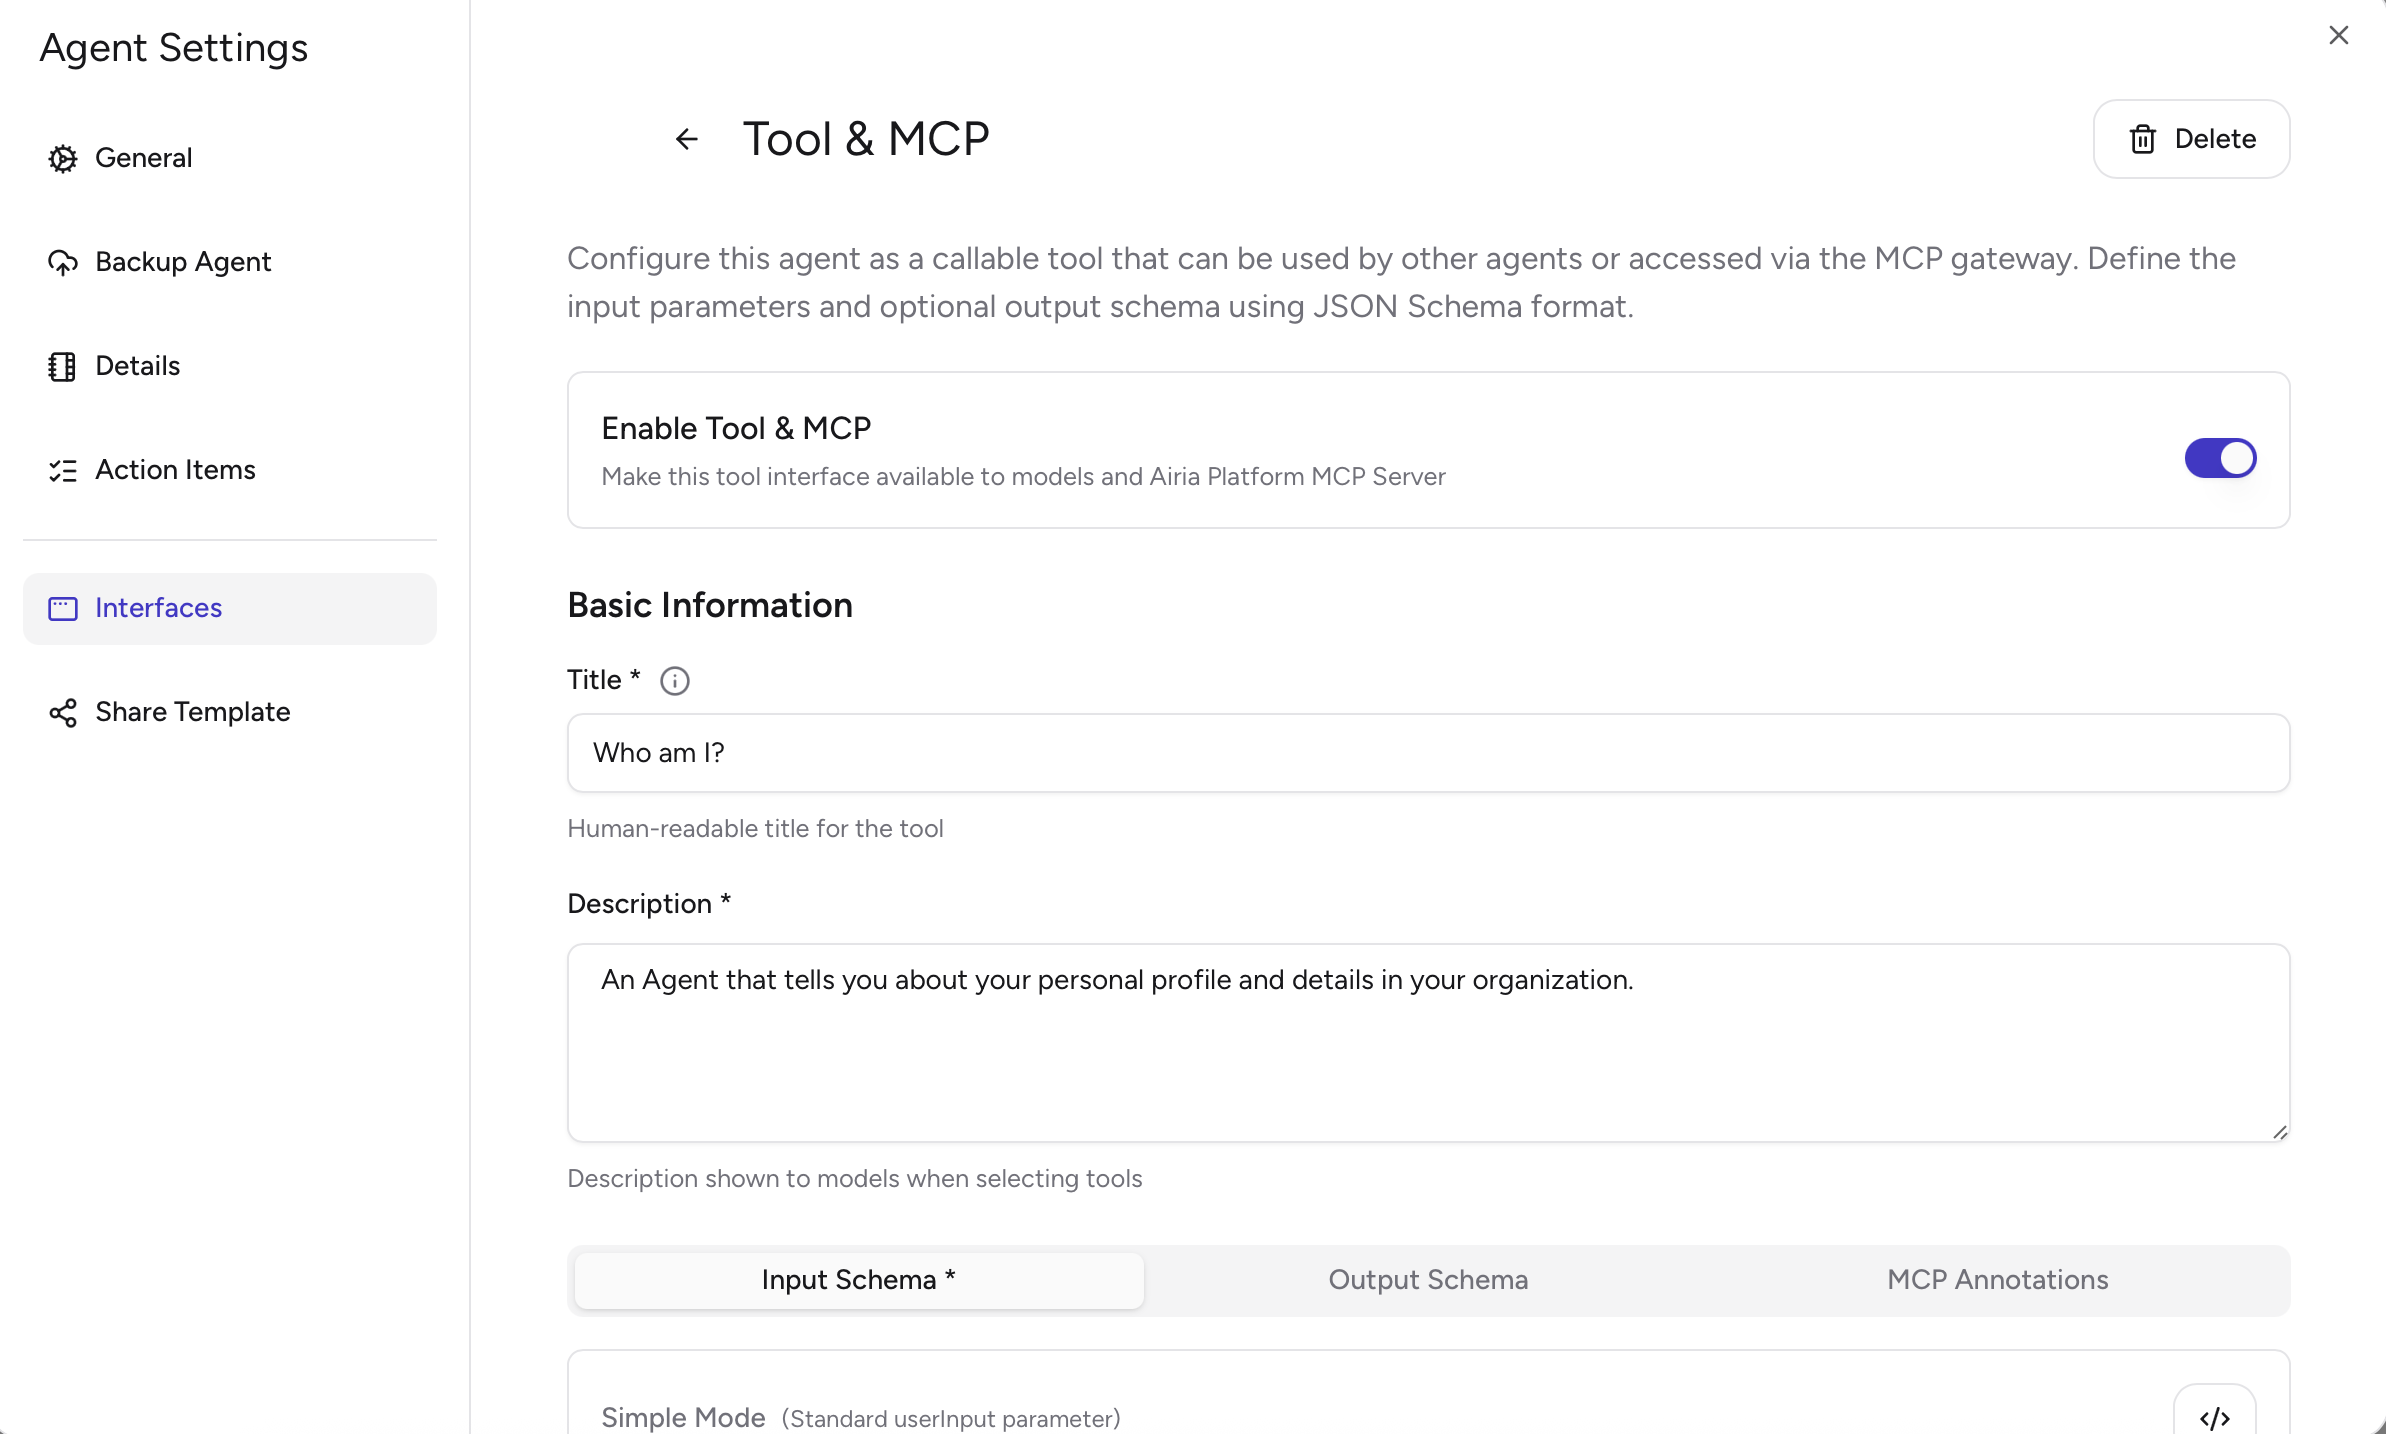
Most teams can get started by setting a **name** and **description** only. Airia will automatically provide a default input format so you don’t need to define schemas.
Access the interfaces panel by either:
* Clicking the **ellipsis (…)** menu to the right of your Agent and selecting **Interfaces**
* Opening the Agent in Studio and clicking **Settings > Interfaces**
In the interfaces panel, click **"+ Add Interface"** and select **Tool & MCP** from the available interface types.
Enter a unique tool name that will be used to identify your agent as a tool:
* Example: `customer_support_agent`, `data_analyzer`, `email_processor`
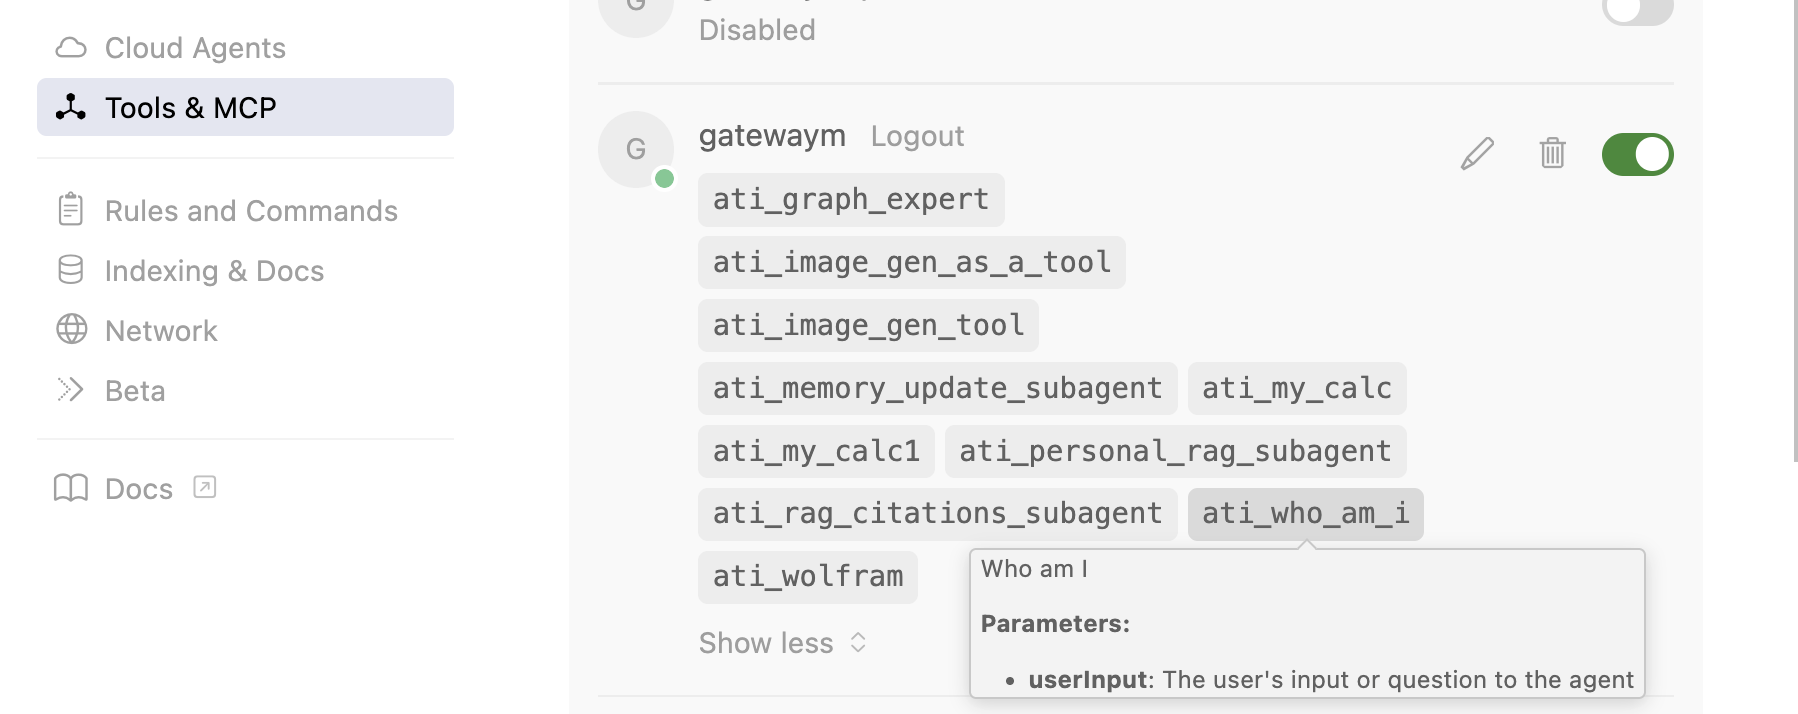
The tool name is automatically generated from the name of the Agent, but you can customize it. This name will appear with the `ati_` prefix when exposed through the MCP server (e.g., `ati_customer_support_agent`).
Create a clear description of what your agent tool does. This description helps other agents understand when and how to use your tool
* Example: "Analyzes customer support tickets and provides recommended responses based on ticket content and customer history"
Ensure the **Enabled** toggle is turned on. When enabled, your agent tool will be:
* Discoverable through the Airia Deployed Agents MCP server
* Available to other agents that connect to the MCP server
You can disable it later without deleting the configuration.
**Screenshot placeholder**: Interfaces panel showing **Tool & MCP** configured for an agent.\
Replace the image path below with your screenshot.
 ## Using Your Agent Tool
Once configured, your agent tool can be used by other agents through an **MCP Gateway** connection to the **Airia Deployed Agents MCP** server.
Navigate to **MCP Gateway** and create a new gateway.
When selecting the MCP server, choose **Airia Deployed Agents MCP**.
**Screenshot placeholder**: MCP Gateway server selection showing **Airia Deployed Agents MCP**.\
Replace the image path below with your screenshot.
## Using Your Agent Tool
Once configured, your agent tool can be used by other agents through an **MCP Gateway** connection to the **Airia Deployed Agents MCP** server.
Navigate to **MCP Gateway** and create a new gateway.
When selecting the MCP server, choose **Airia Deployed Agents MCP**.
**Screenshot placeholder**: MCP Gateway server selection showing **Airia Deployed Agents MCP**.\
Replace the image path below with your screenshot.
 Configure the gateway using one of the following authentication options:
* **Passthrough bearer token (recommended)**: the gateway will pass your **Gateway OAuth access token** through to the MCP server, and tools will automatically authenticate.
* **API key**: you must provide the API key during gateway setup.
With passthrough, agents and tool calls run **on behalf of the signed-in user** represented by the access token.
**Screenshot placeholder**: Gateway auth configuration showing **Bearer passthrough** enabled.\
Replace the image path below with your screenshot.
Configure the gateway using one of the following authentication options:
* **Passthrough bearer token (recommended)**: the gateway will pass your **Gateway OAuth access token** through to the MCP server, and tools will automatically authenticate.
* **API key**: you must provide the API key during gateway setup.
With passthrough, agents and tool calls run **on behalf of the signed-in user** represented by the access token.
**Screenshot placeholder**: Gateway auth configuration showing **Bearer passthrough** enabled.\
Replace the image path below with your screenshot.
 The agents you see (and can call) depend on your **level of access**. Tool discovery and tool execution are scoped to the user and permissions represented by the access token.
**Screenshot placeholder**: “Agents as tools” list returned from tool discovery (showing `ati_` tools).\
Replace the image path below with your screenshot.
The agents you see (and can call) depend on your **level of access**. Tool discovery and tool execution are scoped to the user and permissions represented by the access token.
**Screenshot placeholder**: “Agents as tools” list returned from tool discovery (showing `ati_` tools).\
Replace the image path below with your screenshot.
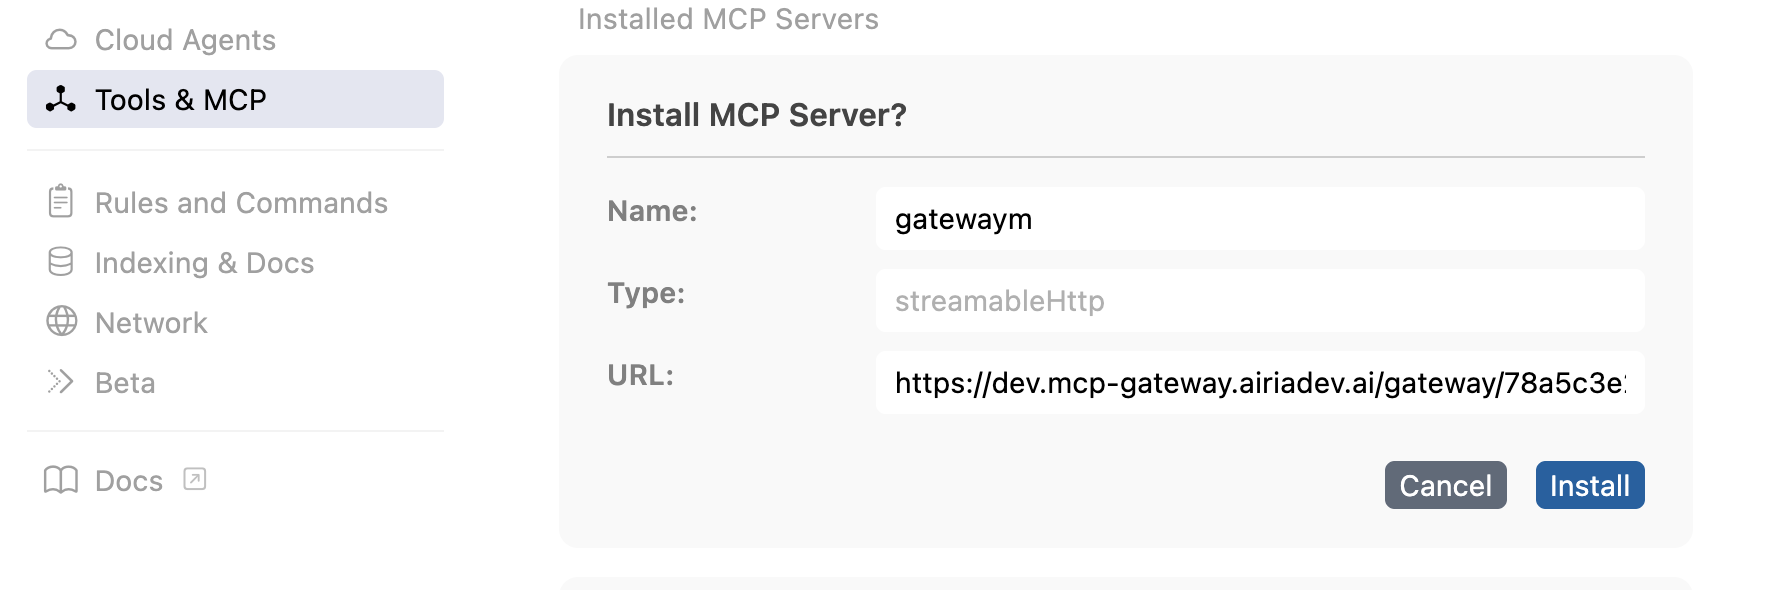
 Once connected, your agent tool will appear in the list of available tools with the `ati_` prefix. Call it from your agent workflow like any other tool.
**Screenshot placeholder**: Using **Airia Deployed Agents MCP** from a 3rd-party MCP client (example: Postman).\
Replace the image path below with your screenshot.
Once connected, your agent tool will appear in the list of available tools with the `ati_` prefix. Call it from your agent workflow like any other tool.
**Screenshot placeholder**: Using **Airia Deployed Agents MCP** from a 3rd-party MCP client (example: Postman).\
Replace the image path below with your screenshot.
 ## Advanced setup (structured input & output)
If you want strict, machine-readable parameters (recommended for complex tools or multi-team reuse), define **JSON schemas** for input and output and optionally add tool behavior annotations.
Define the JSON schema for input parameters your tool should accept:
* Use the schema builder to visually create your schema, or paste a JSON schema directly
* Define required vs optional fields, types, and descriptions
* Example schema:
```json theme={null}
{
"type": "object",
"properties": {
"query": {
"type": "string",
"description": "The search query to process"
},
"max_results": {
"type": "number",
"description": "Maximum number of results to return",
"default": 10
}
},
"required": ["query"]
}
```
If you don’t define schemas, Airia will use a default input format (recommended for most teams).
Optionally define a JSON schema for the response structure so callers know what to expect.
```json theme={null}
{
"type": "object",
"properties": {
"results": {
"type": "array",
"items": {
"type": "object",
"properties": {
"title": { "type": "string" },
"score": { "type": "number" }
}
}
},
"total_count": { "type": "number" }
}
}
```
Tool annotations provide hints about behavior:
* **Destructive Hint**: tool performs destructive operations (default: false)
* **Idempotent Hint**: repeated calls with same input produce the same result (default: true)
* **Open World Hint**: tool can handle inputs beyond training data (default: true)
* **Read Only Hint**: tool only reads data (default: true)
## Related Documentation
* [Managing Agent Interfaces](/building-and-deploying-agents/interface-options/managing-interfaces) - Overview of all interface types
* [API Interface Configuration](/building-and-deploying-agents/interface-options/api-deployment) - REST API access
* [MCP Tools Documentation](/integrations/Tools/) - Learn about MCP tools and integrations
## Advanced setup (structured input & output)
If you want strict, machine-readable parameters (recommended for complex tools or multi-team reuse), define **JSON schemas** for input and output and optionally add tool behavior annotations.
Define the JSON schema for input parameters your tool should accept:
* Use the schema builder to visually create your schema, or paste a JSON schema directly
* Define required vs optional fields, types, and descriptions
* Example schema:
```json theme={null}
{
"type": "object",
"properties": {
"query": {
"type": "string",
"description": "The search query to process"
},
"max_results": {
"type": "number",
"description": "Maximum number of results to return",
"default": 10
}
},
"required": ["query"]
}
```
If you don’t define schemas, Airia will use a default input format (recommended for most teams).
Optionally define a JSON schema for the response structure so callers know what to expect.
```json theme={null}
{
"type": "object",
"properties": {
"results": {
"type": "array",
"items": {
"type": "object",
"properties": {
"title": { "type": "string" },
"score": { "type": "number" }
}
}
},
"total_count": { "type": "number" }
}
}
```
Tool annotations provide hints about behavior:
* **Destructive Hint**: tool performs destructive operations (default: false)
* **Idempotent Hint**: repeated calls with same input produce the same result (default: true)
* **Open World Hint**: tool can handle inputs beyond training data (default: true)
* **Read Only Hint**: tool only reads data (default: true)
## Related Documentation
* [Managing Agent Interfaces](/building-and-deploying-agents/interface-options/managing-interfaces) - Overview of all interface types
* [API Interface Configuration](/building-and-deploying-agents/interface-options/api-deployment) - REST API access
* [MCP Tools Documentation](/integrations/Tools/) - Learn about MCP tools and integrations