> ## Documentation Index
> Fetch the complete documentation index at: https://explore.airia.com/llms.txt
> Use this file to discover all available pages before exploring further.
# Setting Up Atlassian OAuth App
## Overview
This guide walks you through creating an OAuth 2.0 app in Atlassian Developer Console for use with Airia. This enables secure integration with Jira and Confluence Tools, and the Atlassian MCP Server.
## Prerequisites
Before you begin, ensure you have:
* [ ] **Atlassian account** - Any user can create OAuth apps in the Developer Console
* [ ] **Access to your organization's Atlassian sites** - Jira and/or Confluence
* [ ] **Airia callback URL** - Available in the Airia platform OAuth configuration page
***
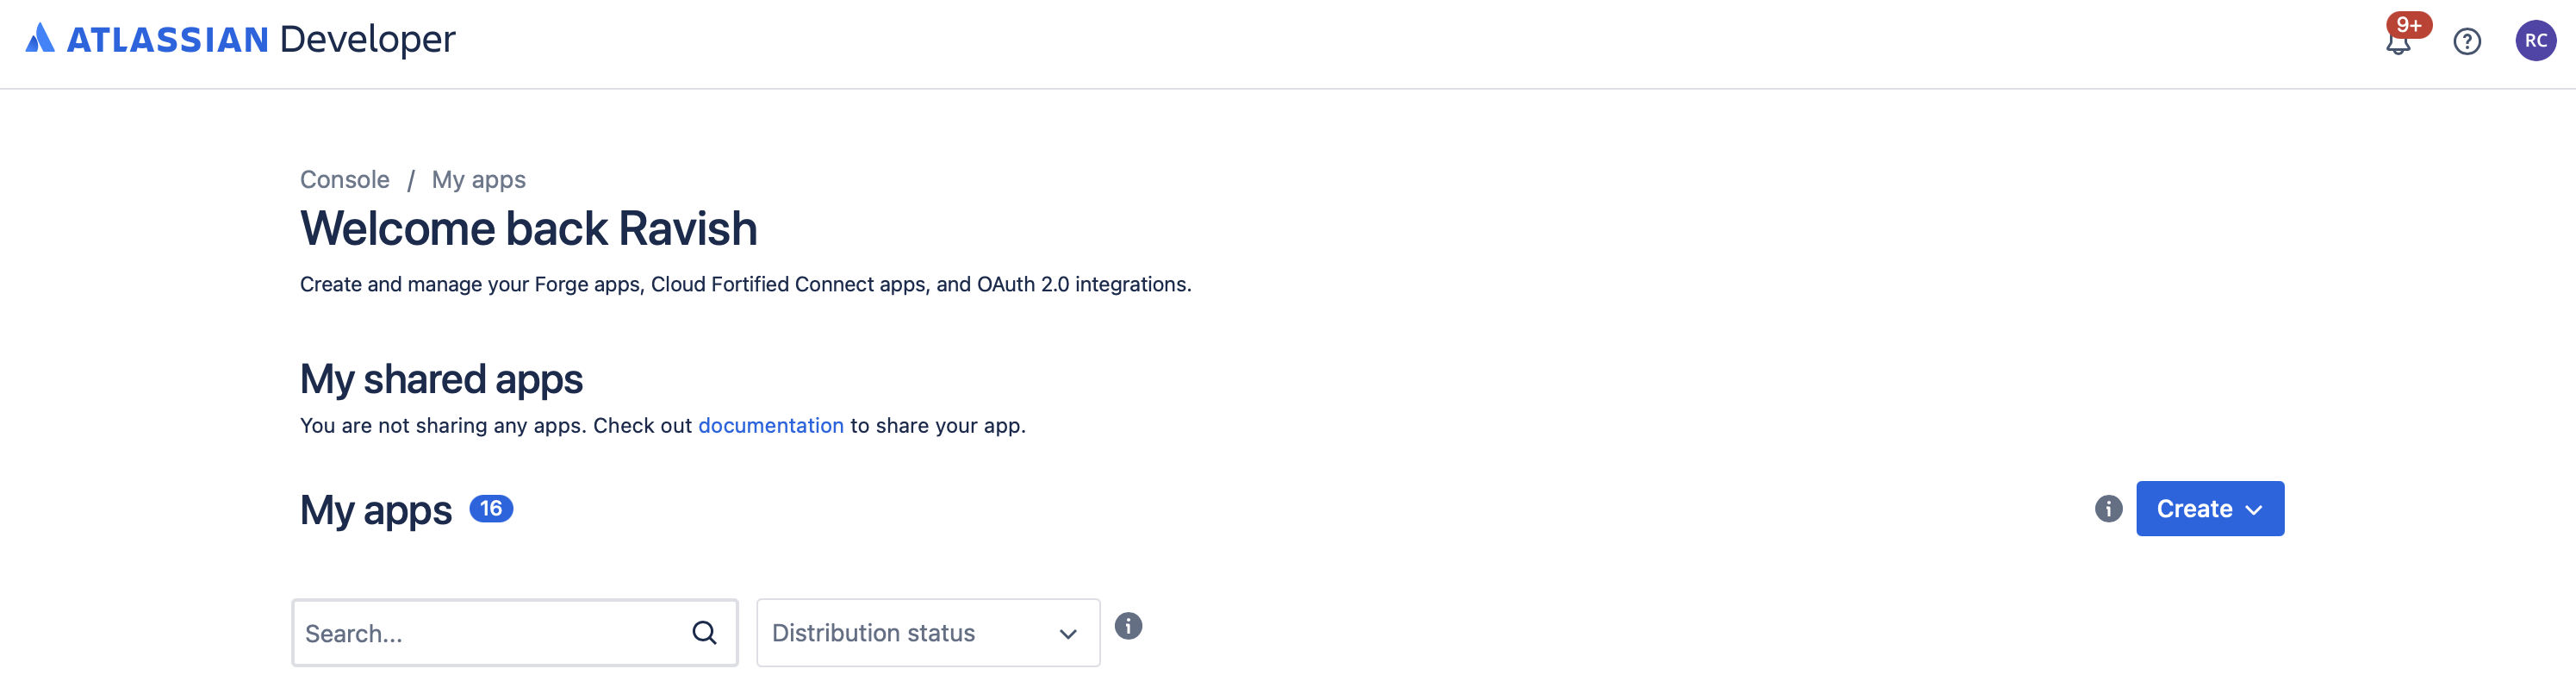
## Step 1: Access Atlassian Developer Console
1. Navigate to [Atlassian Developer Console](https://developer.atlassian.com/console/myapps/)
2. Sign in with your Atlassian account
 ***
## Step 2: Create a New App
1. Click the **Create** button (top-right corner)
2. Select **OAuth 2.0 integration**
***
## Step 3: Configure Basic App Information
1. **App name**: Enter a descriptive name (e.g., "Airia OAuth Integration")
2. The app is automatically saved after entering the name
***
## Step 2: Create a New App
1. Click the **Create** button (top-right corner)
2. Select **OAuth 2.0 integration**
***
## Step 3: Configure Basic App Information
1. **App name**: Enter a descriptive name (e.g., "Airia OAuth Integration")
2. The app is automatically saved after entering the name
 ***
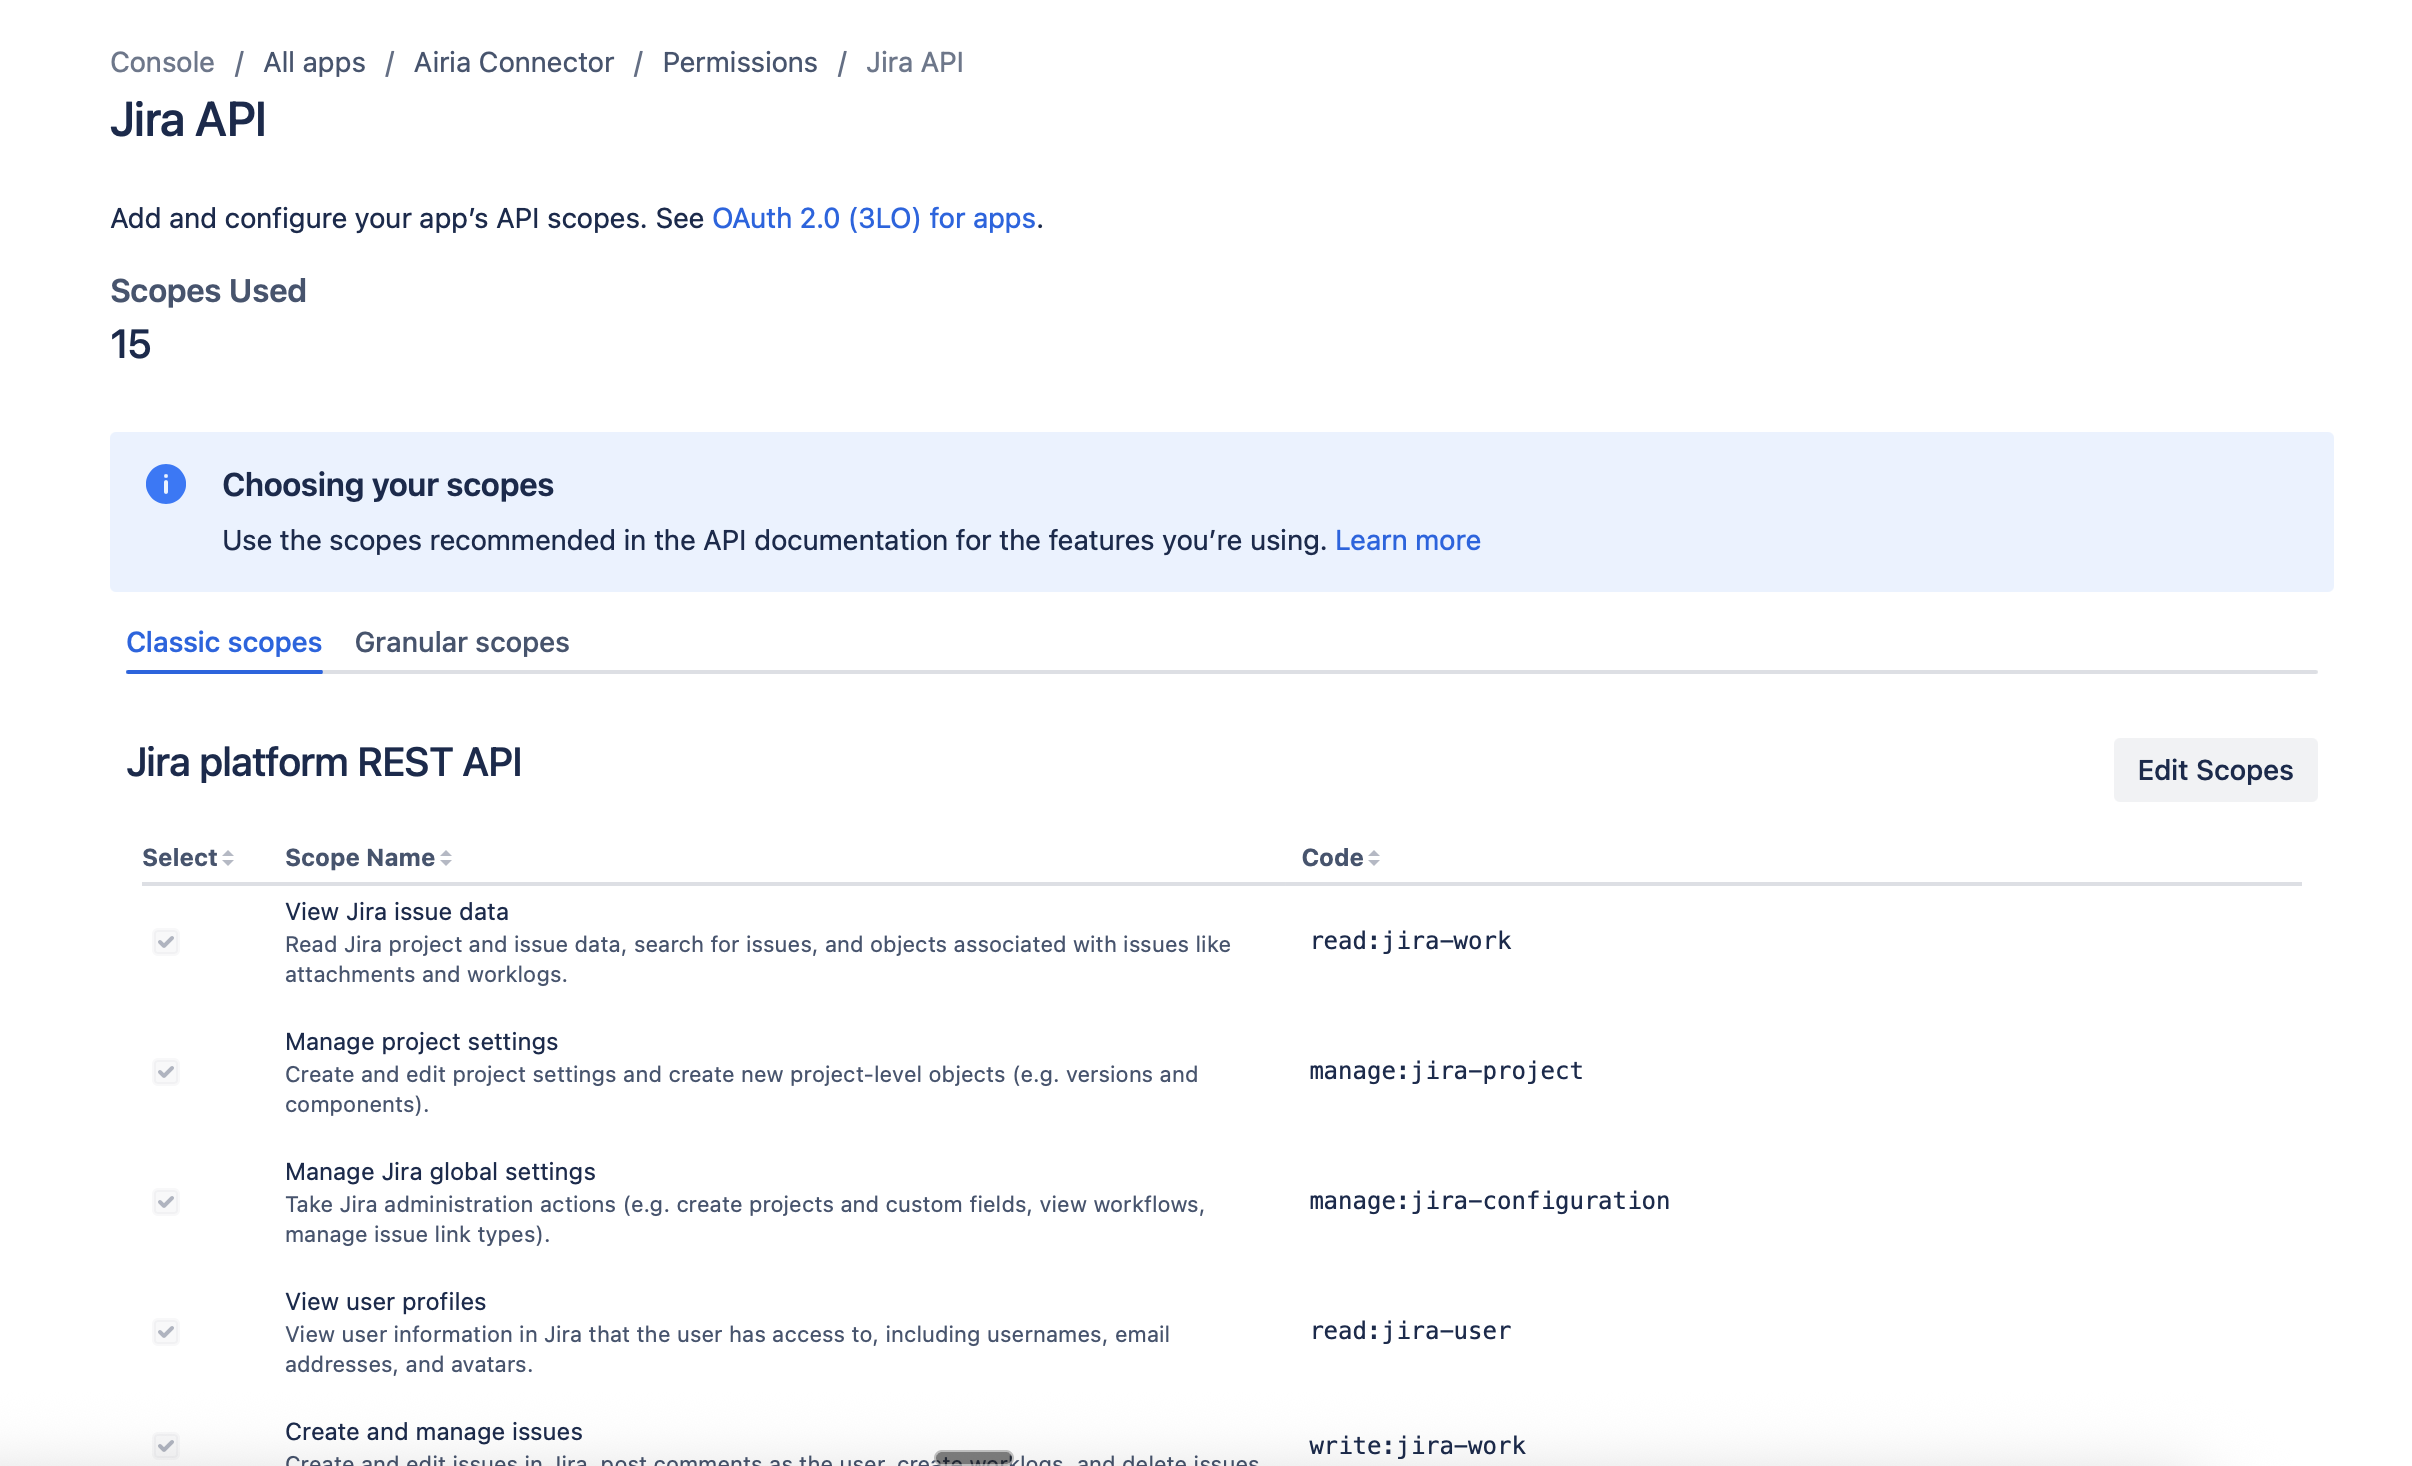
## Step 4: Configure App Permissions (Scopes)
1. In the left sidebar, click **Permissions**
2. You'll see sections for **Jira API** and **Confluence API**
### Jira API Scopes
Expand the **Jira API** section and add the following scopes:
#### Jira - Read Permissions
* `read:jira-work` - Read project and issue data, search for issues
* `read:jira-user` - Read user data
* `read:user:jira` - Read user information
#### Jira - Write Permissions
* `write:jira-work` - Create and edit issues, comments, and worklogs
#### Jira - Project Management
* `manage:jira-project` - Create and manage projects
* `manage:jira-configuration` - Administer Jira projects and settings
* `manage:jira-webhook` - Manage webhooks
* `manage:jira-data-provider` - Manage data providers
***
## Step 4: Configure App Permissions (Scopes)
1. In the left sidebar, click **Permissions**
2. You'll see sections for **Jira API** and **Confluence API**
### Jira API Scopes
Expand the **Jira API** section and add the following scopes:
#### Jira - Read Permissions
* `read:jira-work` - Read project and issue data, search for issues
* `read:jira-user` - Read user data
* `read:user:jira` - Read user information
#### Jira - Write Permissions
* `write:jira-work` - Create and edit issues, comments, and worklogs
#### Jira - Project Management
* `manage:jira-project` - Create and manage projects
* `manage:jira-configuration` - Administer Jira projects and settings
* `manage:jira-webhook` - Manage webhooks
* `manage:jira-data-provider` - Manage data providers
 ### Confluence API Scopes
Expand the **Confluence API** section and add the following scopes:
#### Confluence - Read Permissions
* `read:confluence-content.all` - View all content
* `read:confluence-content.summary` - View content summaries
* `read:confluence-space.summary` - View information about spaces
* `read:page:confluence` - Read pages
* `read:attachment:confluence` - Read attachments
* `read:comment:confluence` - Read comments
* `read:confluence-user` - Read user information
* `read:user:confluence` - Read user data
* `read:confluence-groups` - Read group information
* `read:space:confluence` - Read space information
* `read:confluence-content.permission` - View content permissions
* `read:confluence-props` - Read content properties
* `readonly:content.attachment:confluence` - Read-only access to attachments
* `read:content-details:confluence` - Read detailed content information
* `read:space-details:confluence` - Read detailed space information
#### Confluence - Write Permissions
* `write:confluence-content` - Create and edit content
* `write:confluence-space` - Create and manage spaces
* `write:confluence-file` - Upload and manage files
* `write:confluence-props` - Write content properties
* `write:page:confluence` - Create and edit pages
* `write:confluence-groups` - Manage groups
#### Confluence - Management
* `manage:confluence-configuration` - Manage Confluence configuration
* `search:confluence` - Search Confluence content
**About Atlassian Scopes**
These are the recommended scopes for full Airia integration. You can:
* **Add more scopes** if additional functionality is needed
* **Remove scopes** you don't need (though this may limit Airia functionality)
3. After adding all scopes, click **Save changes** at the bottom
***
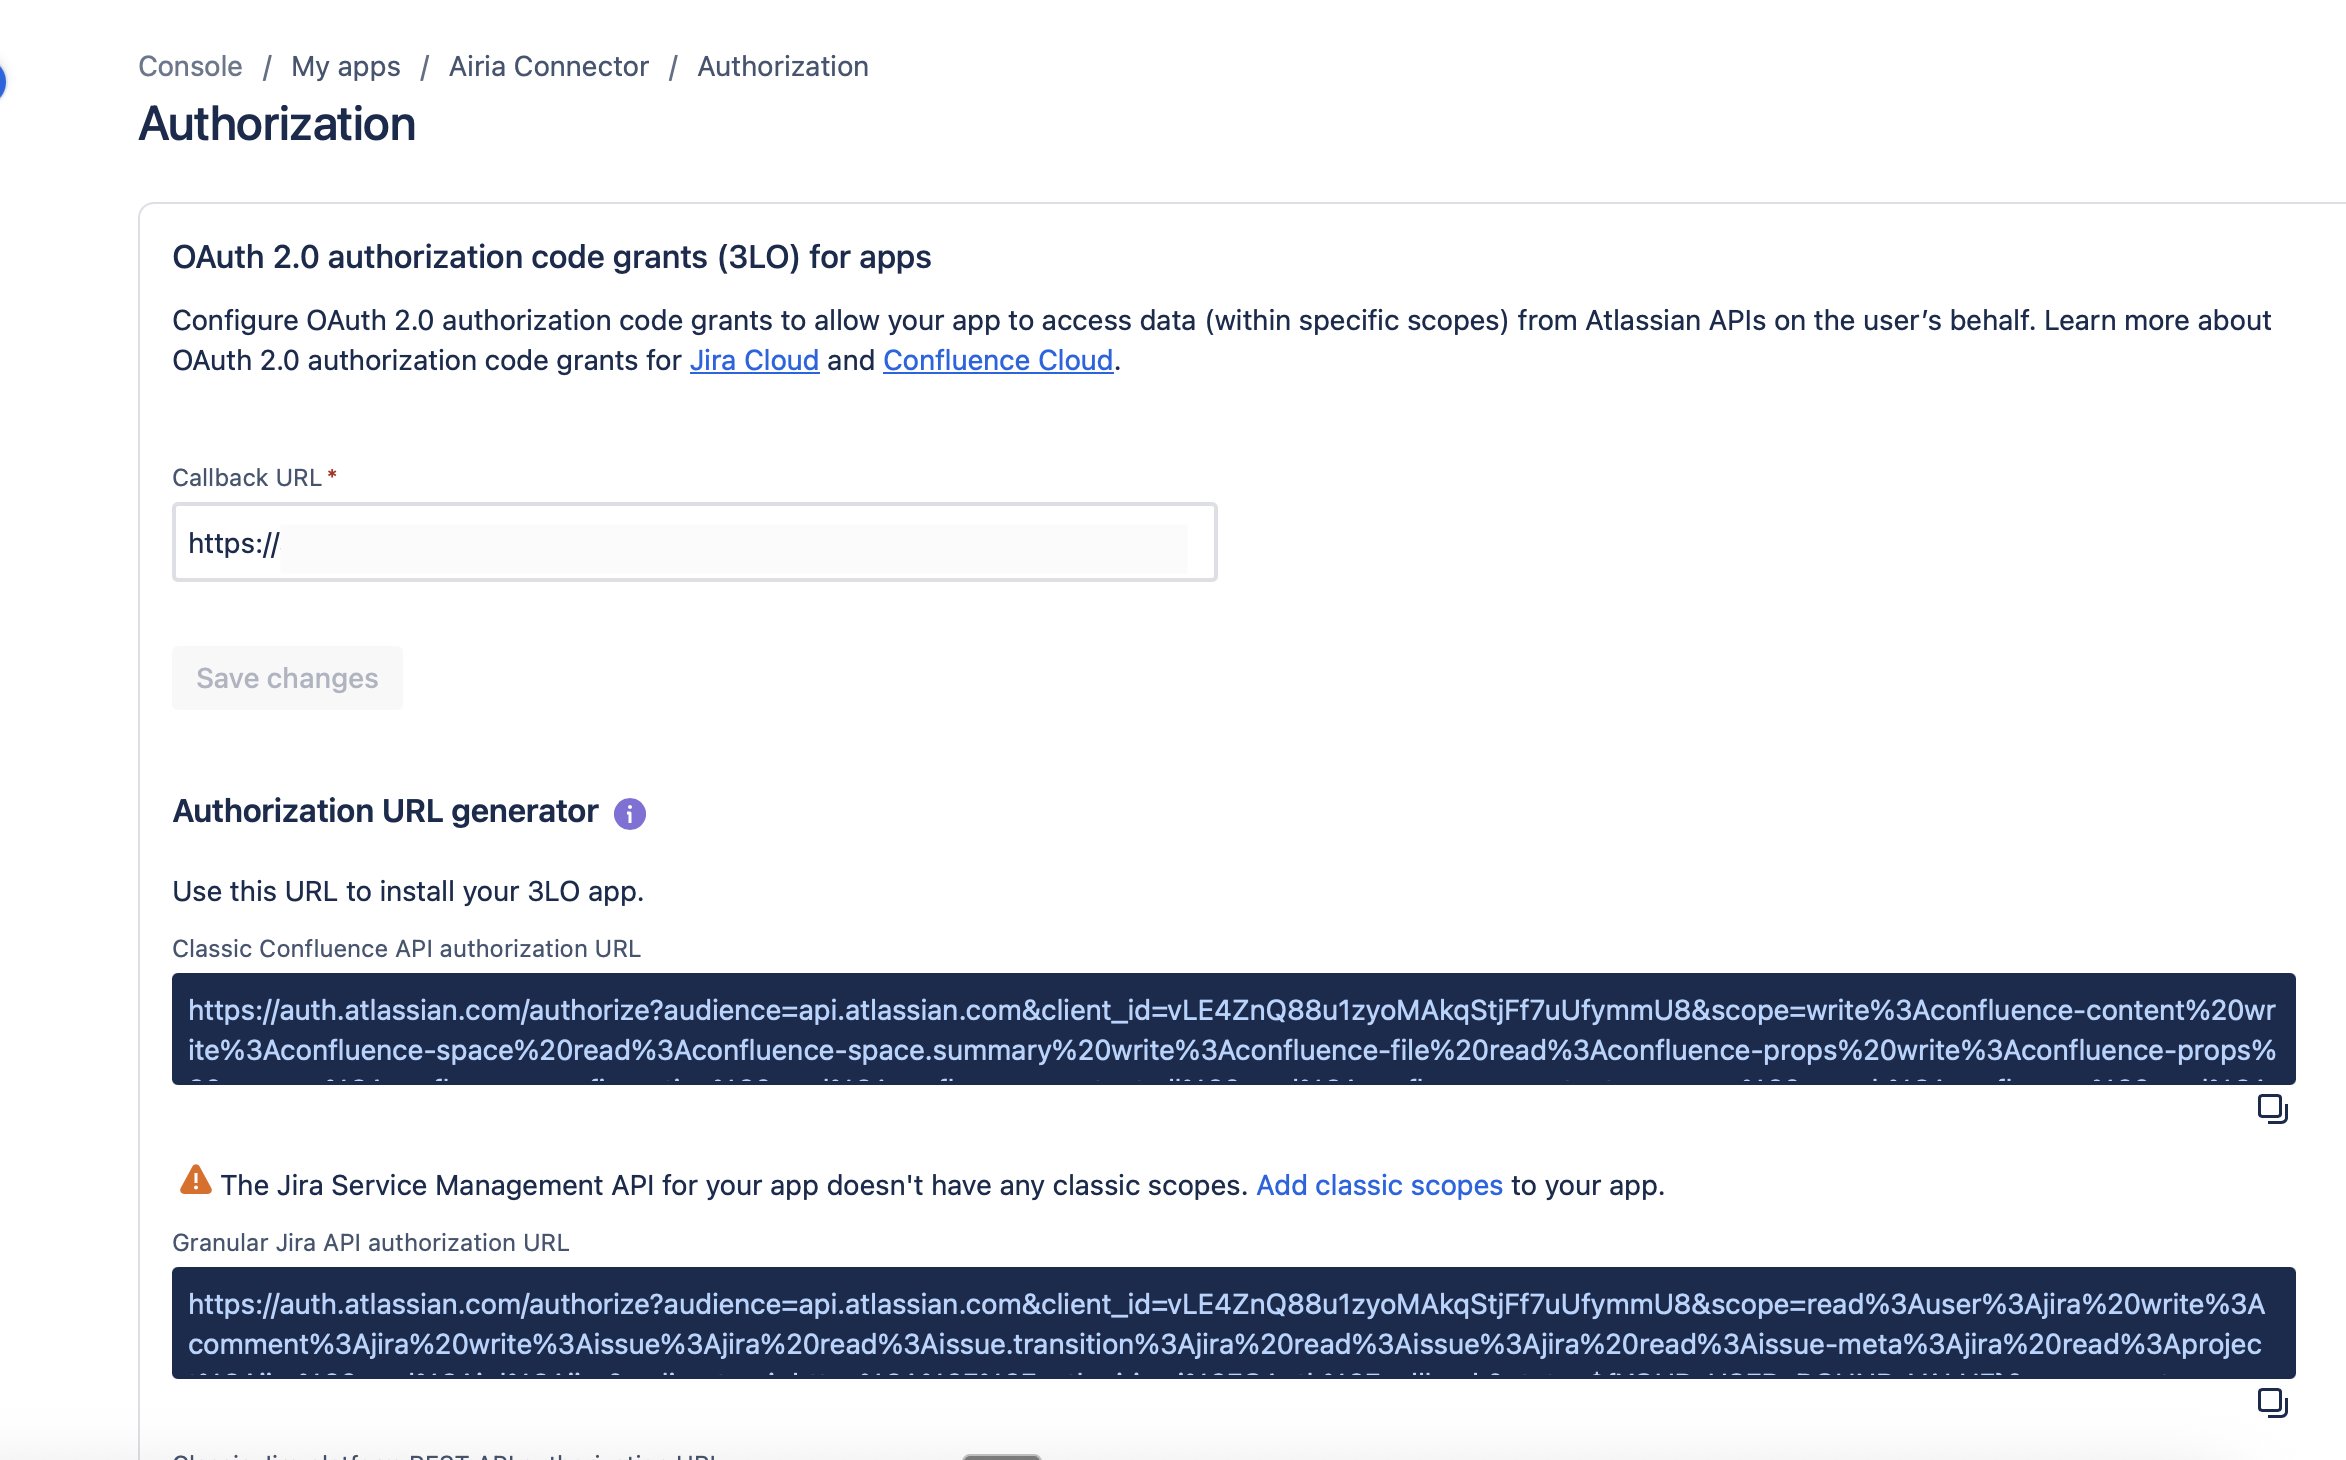
## Step 5: Configure OAuth 2.0 (3LO) Settings
1. In the left sidebar, click on **Authorization** (or it may auto-expand)
### Callback URL
2. Under **OAuth 2.0 (3LO)**, find the **Callback URL** section
3. Click **Add** to add a callback URL
4. Enter your Airia callback URL as shown on the OAuth configuration page in Airia. This should default to `https://auth.airia.ai/OAuth/callback`.
5. Click **Save changes** at the bottom of the page
### Confluence API Scopes
Expand the **Confluence API** section and add the following scopes:
#### Confluence - Read Permissions
* `read:confluence-content.all` - View all content
* `read:confluence-content.summary` - View content summaries
* `read:confluence-space.summary` - View information about spaces
* `read:page:confluence` - Read pages
* `read:attachment:confluence` - Read attachments
* `read:comment:confluence` - Read comments
* `read:confluence-user` - Read user information
* `read:user:confluence` - Read user data
* `read:confluence-groups` - Read group information
* `read:space:confluence` - Read space information
* `read:confluence-content.permission` - View content permissions
* `read:confluence-props` - Read content properties
* `readonly:content.attachment:confluence` - Read-only access to attachments
* `read:content-details:confluence` - Read detailed content information
* `read:space-details:confluence` - Read detailed space information
#### Confluence - Write Permissions
* `write:confluence-content` - Create and edit content
* `write:confluence-space` - Create and manage spaces
* `write:confluence-file` - Upload and manage files
* `write:confluence-props` - Write content properties
* `write:page:confluence` - Create and edit pages
* `write:confluence-groups` - Manage groups
#### Confluence - Management
* `manage:confluence-configuration` - Manage Confluence configuration
* `search:confluence` - Search Confluence content
**About Atlassian Scopes**
These are the recommended scopes for full Airia integration. You can:
* **Add more scopes** if additional functionality is needed
* **Remove scopes** you don't need (though this may limit Airia functionality)
3. After adding all scopes, click **Save changes** at the bottom
***
## Step 5: Configure OAuth 2.0 (3LO) Settings
1. In the left sidebar, click on **Authorization** (or it may auto-expand)
### Callback URL
2. Under **OAuth 2.0 (3LO)**, find the **Callback URL** section
3. Click **Add** to add a callback URL
4. Enter your Airia callback URL as shown on the OAuth configuration page in Airia. This should default to `https://auth.airia.ai/OAuth/callback`.
5. Click **Save changes** at the bottom of the page
 ***
## Step 6: Copy Your OAuth Credentials
1. In the left sidebar, click on **Settings**
2. Under **Authentication details**, you'll find your credentials
### Client ID
1. **Client ID**: This is displayed directly
2. Click the **Copy** icon to copy it
### Client Secret
1. **Secret**: Click **Generate secret** if you haven't already
2. The secret will be displayed **once**
3. Click the **Copy** icon to copy it immediately
***
## Step 7: Configure OAuth in Airia
Now you'll enter these credentials into the Airia platform:
1. Log in to your Airia platform
2. Navigate to **Settings** → **Ecosystem** → **App Connections**
3. Select **Atlassian** as the provider
4. Enter your credentials:
* **Client ID**: Paste the Client ID you copied
* **Client Secret**: Paste the Client Secret you copied
5. The callback URL should be pre-filled and visible on the configuration page
6. Click **Save** or **Connect**
***
## Step 6: Copy Your OAuth Credentials
1. In the left sidebar, click on **Settings**
2. Under **Authentication details**, you'll find your credentials
### Client ID
1. **Client ID**: This is displayed directly
2. Click the **Copy** icon to copy it
### Client Secret
1. **Secret**: Click **Generate secret** if you haven't already
2. The secret will be displayed **once**
3. Click the **Copy** icon to copy it immediately
***
## Step 7: Configure OAuth in Airia
Now you'll enter these credentials into the Airia platform:
1. Log in to your Airia platform
2. Navigate to **Settings** → **Ecosystem** → **App Connections**
3. Select **Atlassian** as the provider
4. Enter your credentials:
* **Client ID**: Paste the Client ID you copied
* **Client Secret**: Paste the Client Secret you copied
5. The callback URL should be pre-filled and visible on the configuration page
6. Click **Save** or **Connect**
 ***
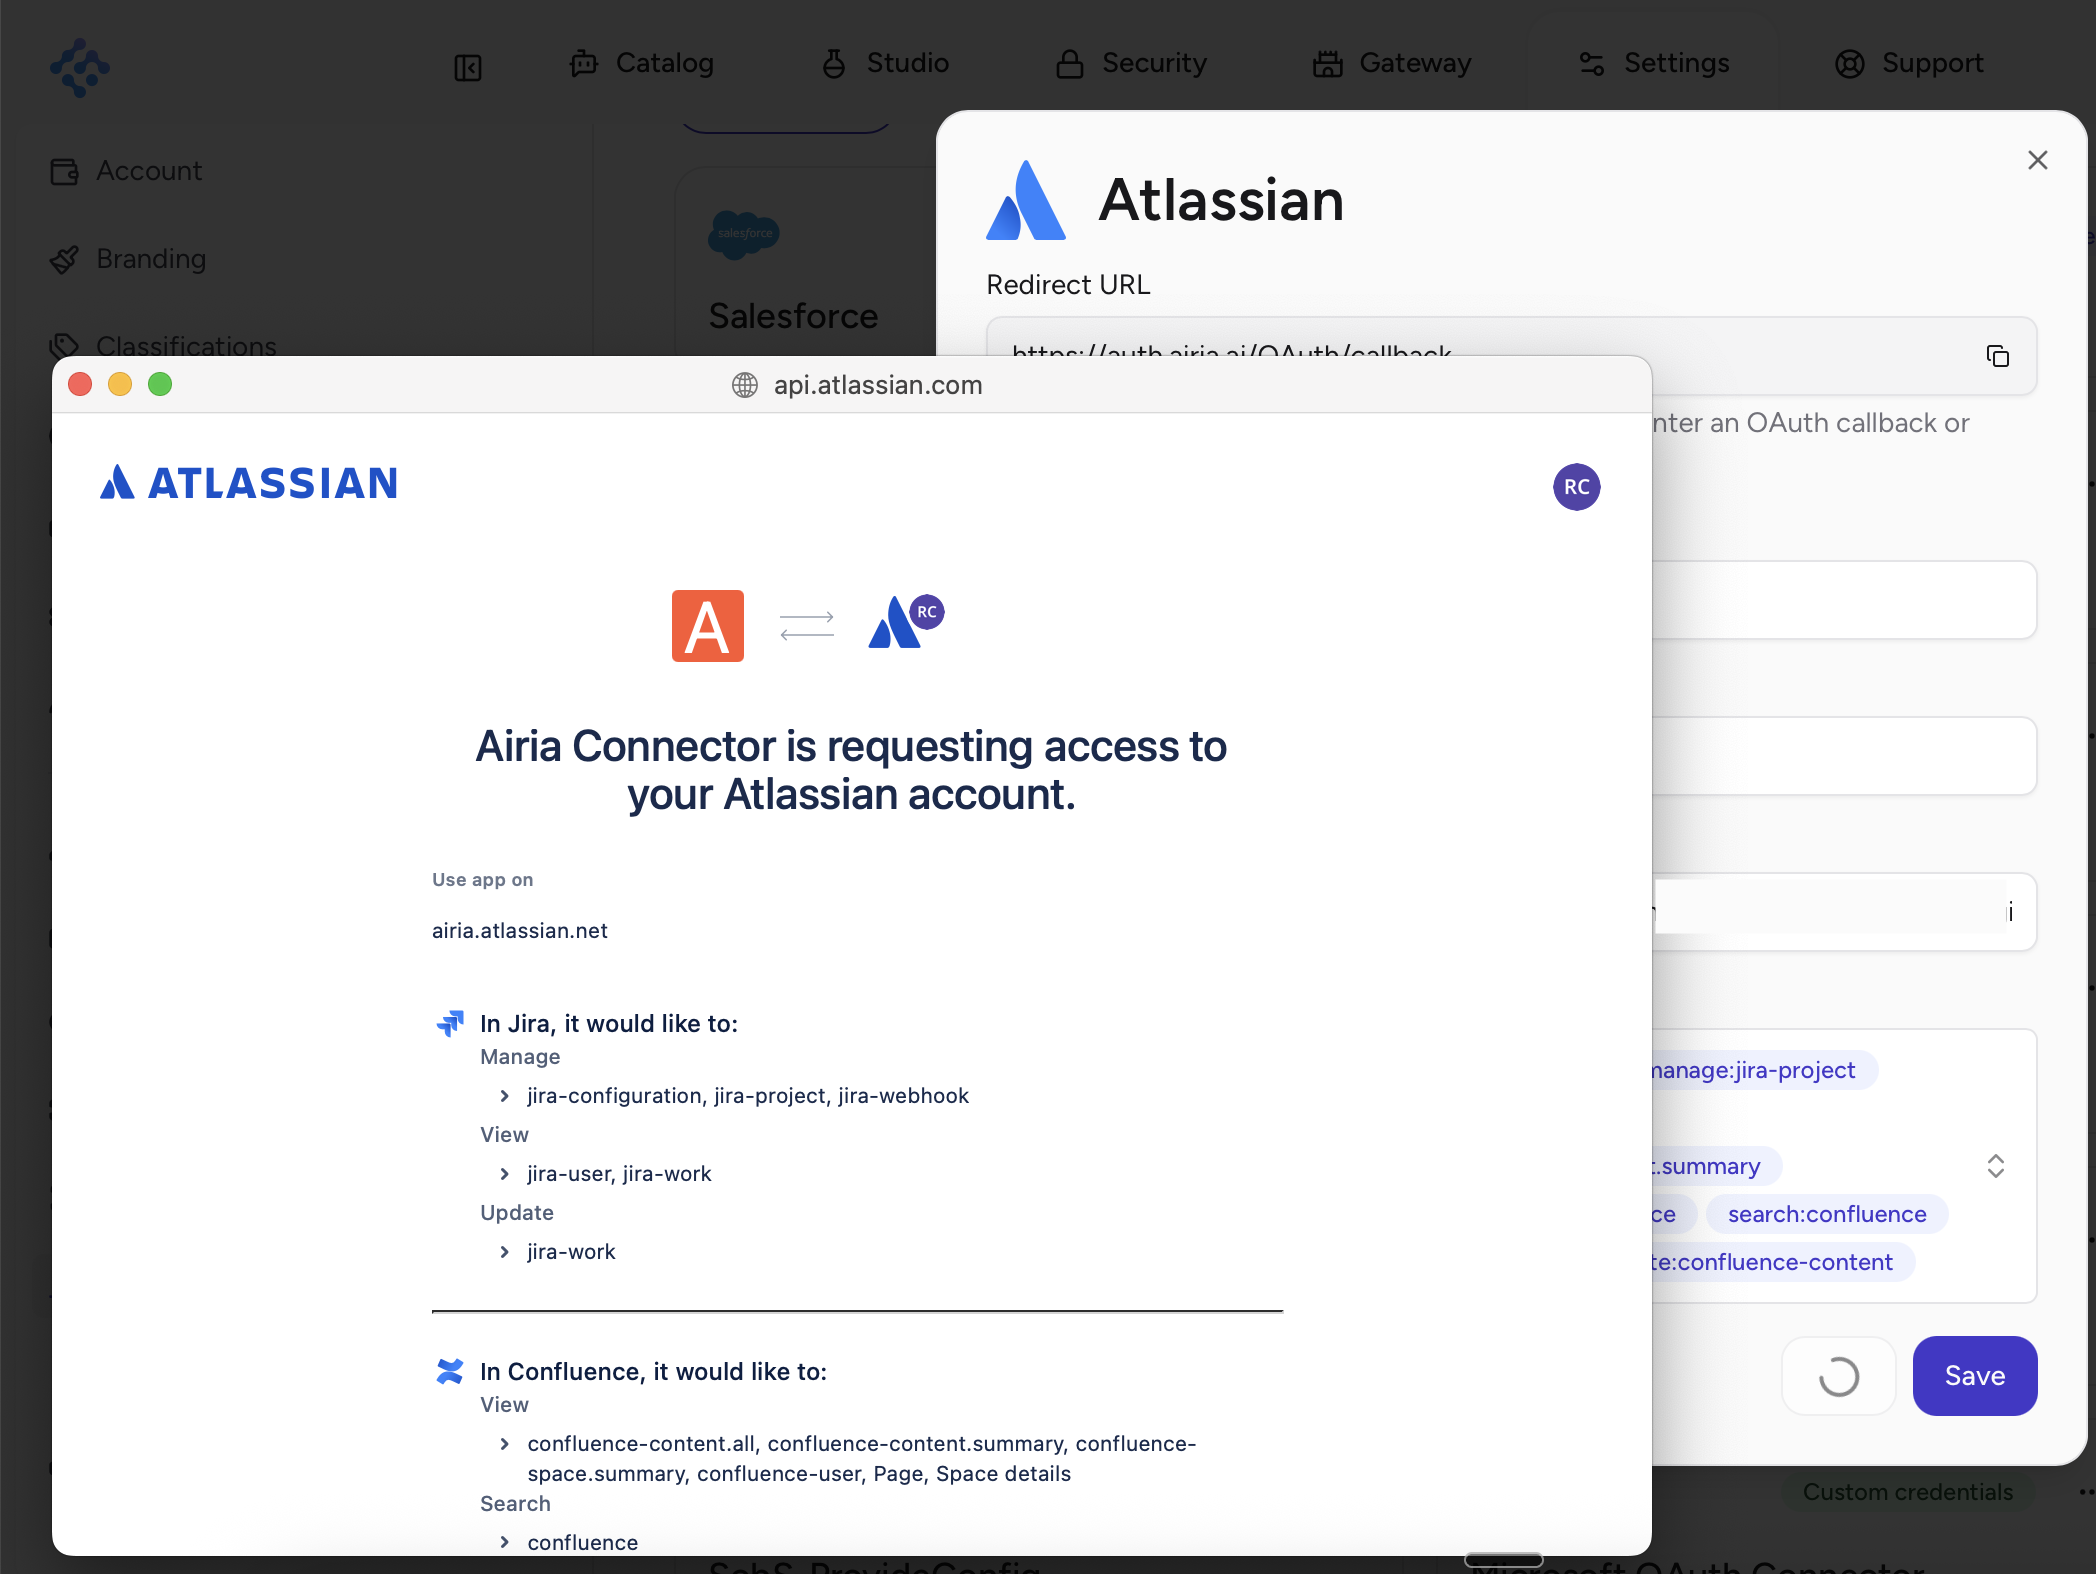
## Step 8: Test the Connection
1. After saving, click **Connect Account** in Airia
2. You'll be redirected to Atlassian's authorization page
3. Sign in with your Atlassian account (if not already logged in)
4. Review the permission screen showing the scopes being requested
5. Select the Atlassian site(s) you want to authorize (Jira, Confluence, etc.)
6. Click **Accept** to grant permissions
7. You should be redirected back to Airia with a success message
***
## Step 8: Test the Connection
1. After saving, click **Connect Account** in Airia
2. You'll be redirected to Atlassian's authorization page
3. Sign in with your Atlassian account (if not already logged in)
4. Review the permission screen showing the scopes being requested
5. Select the Atlassian site(s) you want to authorize (Jira, Confluence, etc.)
6. Click **Accept** to grant permissions
7. You should be redirected back to Airia with a success message
 ***
## Additional Resources
* [Atlassian Developer Console](https://developer.atlassian.com/console/myapps/)
* [Jira REST API Reference](https://developer.atlassian.com/cloud/jira/platform/rest/v3/intro/)
* [Confluence REST API Reference](https://developer.atlassian.com/cloud/confluence/rest/v2/intro/)
***
Need help? Contact Airia support or your Atlassian administrator for assistance with OAuth app configuration.
***
## Additional Resources
* [Atlassian Developer Console](https://developer.atlassian.com/console/myapps/)
* [Jira REST API Reference](https://developer.atlassian.com/cloud/jira/platform/rest/v3/intro/)
* [Confluence REST API Reference](https://developer.atlassian.com/cloud/confluence/rest/v2/intro/)
***
Need help? Contact Airia support or your Atlassian administrator for assistance with OAuth app configuration.