> ## Documentation Index
> Fetch the complete documentation index at: https://explore.airia.com/llms.txt
> Use this file to discover all available pages before exploring further.
# Setting Up Microsoft Entra Service Account with a service mailbox
## Overview
This guide walks you through configuring your Microsoft Entra tenant to allow Airia to access a designated service mailbox using a secure OAuth flow. No browser-based login is required — Airia authenticates directly using an app registration and client secret.
***
## Prerequisites
Before you begin, ensure you have:
* [ ] **Azure admin access** - An account with **Global Administrator** or **Application Administrator** role
* [ ] **Exchange Online PowerShell access** - Required for the mailbox access policy step
* [ ] **Service mailbox** - A designated service mailbox that Airia will read from (e.g., `airia-service@yourcompany.com`)
***
## Step 1: Create an App Registration
1. Go to the [Microsoft Entra admin center](https://entra.microsoft.com) and sign in with your admin account
2. In the left nav, go to **Applications** → **App registrations**
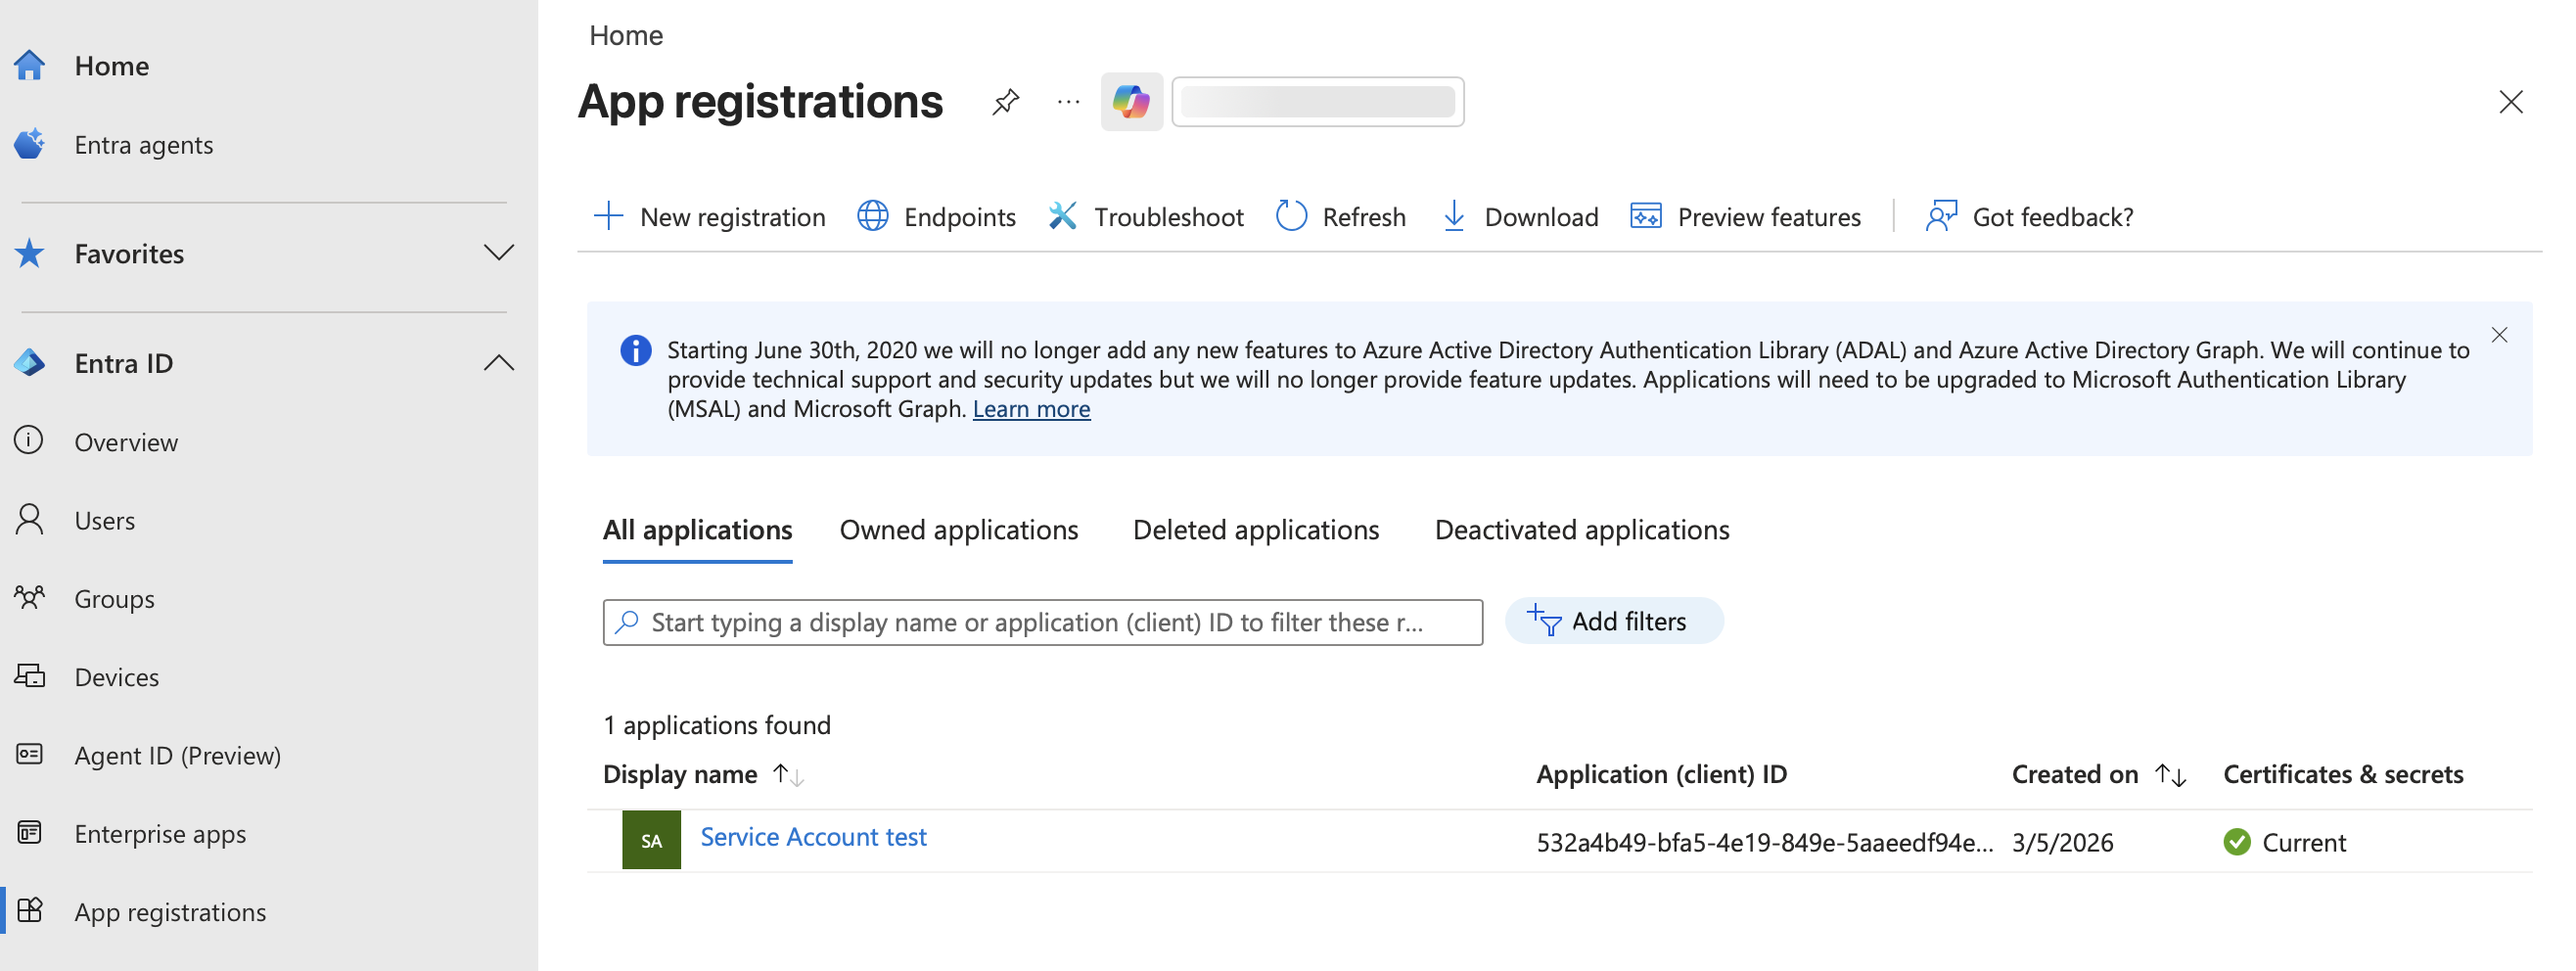 3. Click **+ New registration**
4. Fill in the following:
* **Name**: `Airia Service Account` (or any descriptive name)
* **Supported account types**: `Accounts in this organizational directory only (Single tenant)`
* **Redirect URI**: Leave blank
5. Click **Register**
Once registered, you'll land on the app overview page. **Save the following values — you'll need them for Airia configuration:**
* **Application (client) ID**
* **Directory (tenant) ID**
***
## Step 2: Create a Client Secret
1. In the left nav under **Manage**, click **Certificates & secrets**
2. Click **+ New client secret**
3. Give it a description (e.g., `Airia secret`) and set an expiry (24 months recommended)
4. Click **Add**
5. **Immediately copy the Value**
**Secret Visibility**
Azure will never show the secret value again after you leave this page. Treat this secret like a password and share it with Airia securely (e.g., via an encrypted channel, not plain email).
***
## Step 3: Add API Permissions
1. In the left nav under **Manage**, click **API permissions**
2. Click **+ Add a permission**
3. Select **Microsoft Graph**
4. Select **Application permissions** (not Delegated)
3. Click **+ New registration**
4. Fill in the following:
* **Name**: `Airia Service Account` (or any descriptive name)
* **Supported account types**: `Accounts in this organizational directory only (Single tenant)`
* **Redirect URI**: Leave blank
5. Click **Register**
Once registered, you'll land on the app overview page. **Save the following values — you'll need them for Airia configuration:**
* **Application (client) ID**
* **Directory (tenant) ID**
***
## Step 2: Create a Client Secret
1. In the left nav under **Manage**, click **Certificates & secrets**
2. Click **+ New client secret**
3. Give it a description (e.g., `Airia secret`) and set an expiry (24 months recommended)
4. Click **Add**
5. **Immediately copy the Value**
**Secret Visibility**
Azure will never show the secret value again after you leave this page. Treat this secret like a password and share it with Airia securely (e.g., via an encrypted channel, not plain email).
***
## Step 3: Add API Permissions
1. In the left nav under **Manage**, click **API permissions**
2. Click **+ Add a permission**
3. Select **Microsoft Graph**
4. Select **Application permissions** (not Delegated)
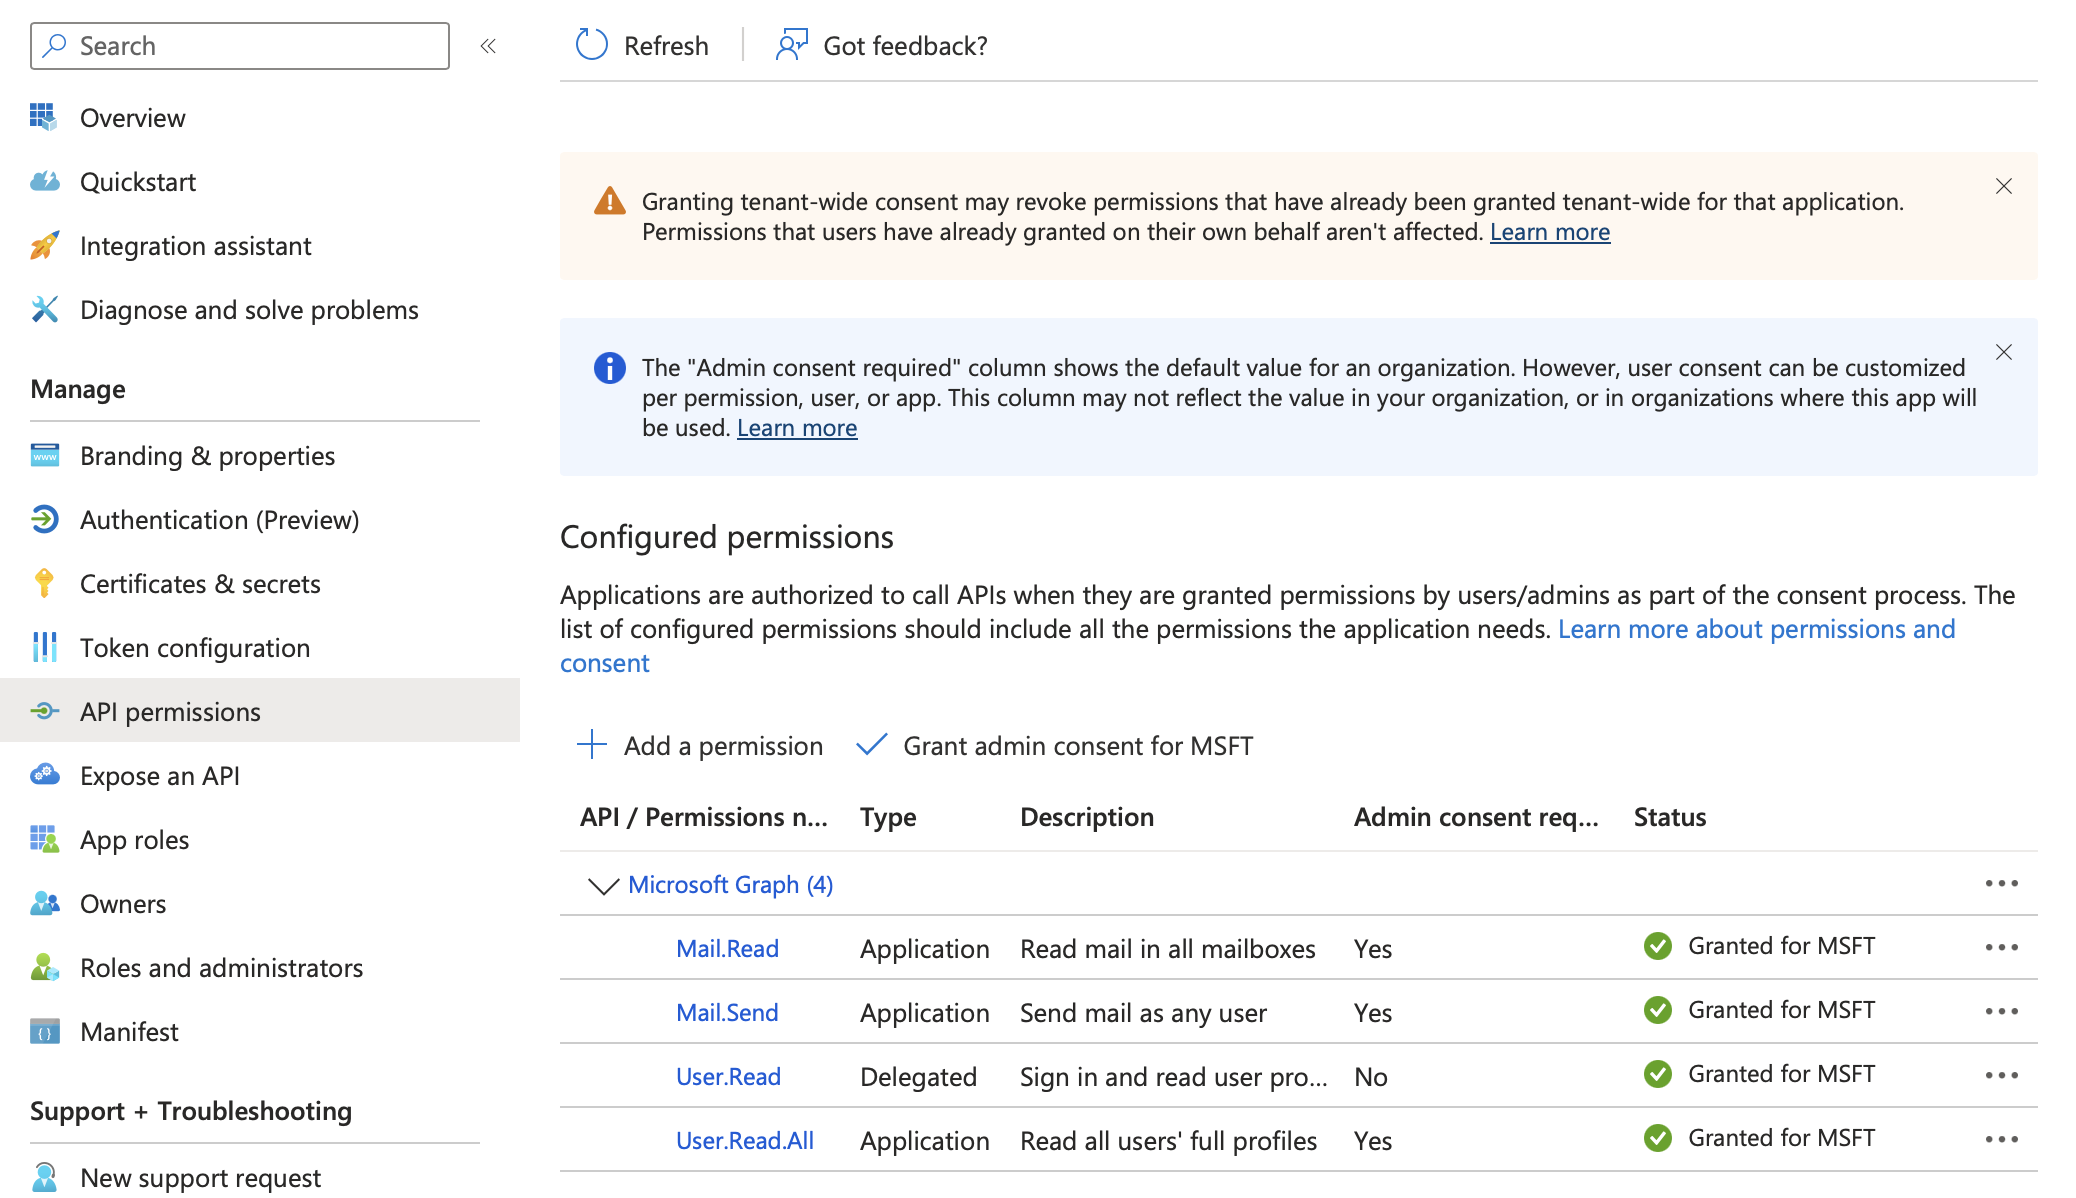 ### Required Permissions
Search for and add the permissions based on what you want Airia to do. You can refer to common permissions in the [Microsoft Entra ID OAuth App Setup guide](/integrations/oauth-setup/microsoft-entra#required-permissions).
5. Click **Add permissions**
### Grant Admin Consent
1. Click **Grant admin consent for \[your organization]** and confirm
2. All permissions should show a green checkmark with "Granted for \[your org]" status
***
## Step 4: Restrict Access to the Service Mailbox Only
**Important Security Step**
By default, Application-level permissions grant access to **all mailboxes** in your tenant. This step locks it down to only the designated service mailbox using an Exchange Application Access Policy.
### 1. Install Exchange Online PowerShell (if not already installed)
```powershell theme={null}
Install-Module -Name ExchangeOnlineManagement -Force
Import-Module ExchangeOnlineManagement
```
### 2. Connect to Exchange Online
```powershell theme={null}
Connect-ExchangeOnline
```
Sign in with your admin account when the browser prompt appears.
You must use an M365 organizational account, not a personal Microsoft account.
### 3. Create the Access Policy
Run the following command to restrict access:
```powershell theme={null}
New-ApplicationAccessPolicy `
-AppId `
-PolicyScopeGroupId `
-AccessRight RestrictAccess `
-Description "Restrict Airia to service mailbox only"
```
Replace:
* `` with the client ID from Step 1
* `` with your designated service mailbox address
### 4. Verify the Policy
```powershell theme={null}
Test-ApplicationAccessPolicy `
-AppId `
-Identity
```
You should see `AccessCheckResult: Granted`.
You can also confirm the app **cannot** access other mailboxes:
```powershell theme={null}
Test-ApplicationAccessPolicy `
-AppId `
-Identity
```
This should return `AccessCheckResult: Denied`.
***
## Step 5: Configure Service Account in Airia
With your credentials gathered, you can now configure the Service Account in your Airia platform:
1. Log in to your Airia platform as an administrator
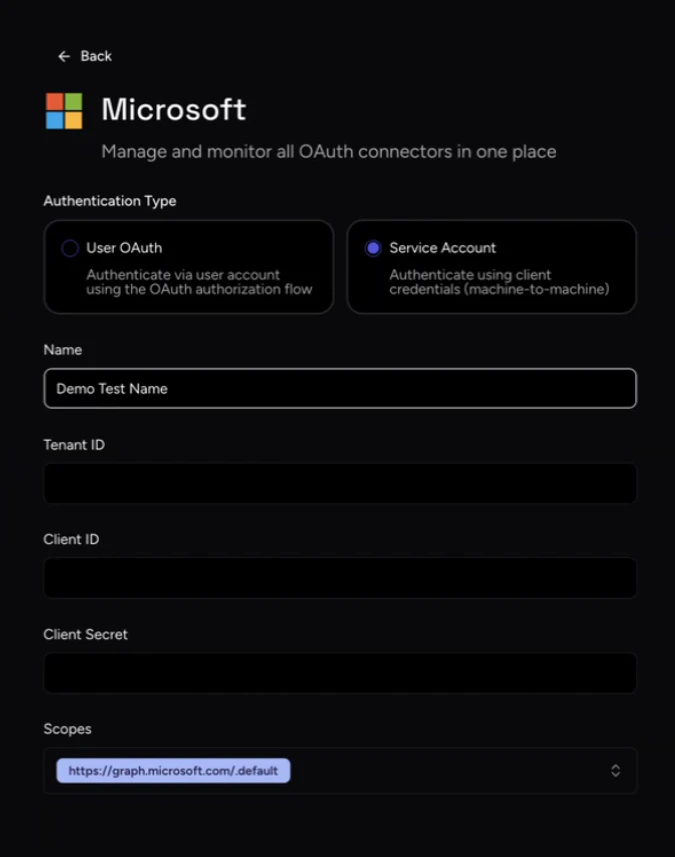
2. Navigate to **Settings** → **Ecosystem** → **App Connections** → **Microsoft**
3. Select the **Service Account** authentication method
4. Enter the credentials you gathered in the previous steps:
* **Tenant ID**: The Directory (tenant) ID from the app overview
* **Client ID**: The Application (client) ID from the app overview
* **Client Secret**: The secret value you copied in Step 2
### Required Permissions
Search for and add the permissions based on what you want Airia to do. You can refer to common permissions in the [Microsoft Entra ID OAuth App Setup guide](/integrations/oauth-setup/microsoft-entra#required-permissions).
5. Click **Add permissions**
### Grant Admin Consent
1. Click **Grant admin consent for \[your organization]** and confirm
2. All permissions should show a green checkmark with "Granted for \[your org]" status
***
## Step 4: Restrict Access to the Service Mailbox Only
**Important Security Step**
By default, Application-level permissions grant access to **all mailboxes** in your tenant. This step locks it down to only the designated service mailbox using an Exchange Application Access Policy.
### 1. Install Exchange Online PowerShell (if not already installed)
```powershell theme={null}
Install-Module -Name ExchangeOnlineManagement -Force
Import-Module ExchangeOnlineManagement
```
### 2. Connect to Exchange Online
```powershell theme={null}
Connect-ExchangeOnline
```
Sign in with your admin account when the browser prompt appears.
You must use an M365 organizational account, not a personal Microsoft account.
### 3. Create the Access Policy
Run the following command to restrict access:
```powershell theme={null}
New-ApplicationAccessPolicy `
-AppId `
-PolicyScopeGroupId `
-AccessRight RestrictAccess `
-Description "Restrict Airia to service mailbox only"
```
Replace:
* `` with the client ID from Step 1
* `` with your designated service mailbox address
### 4. Verify the Policy
```powershell theme={null}
Test-ApplicationAccessPolicy `
-AppId `
-Identity
```
You should see `AccessCheckResult: Granted`.
You can also confirm the app **cannot** access other mailboxes:
```powershell theme={null}
Test-ApplicationAccessPolicy `
-AppId `
-Identity
```
This should return `AccessCheckResult: Denied`.
***
## Step 5: Configure Service Account in Airia
With your credentials gathered, you can now configure the Service Account in your Airia platform:
1. Log in to your Airia platform as an administrator
2. Navigate to **Settings** → **Ecosystem** → **App Connections** → **Microsoft**
3. Select the **Service Account** authentication method
4. Enter the credentials you gathered in the previous steps:
* **Tenant ID**: The Directory (tenant) ID from the app overview
* **Client ID**: The Application (client) ID from the app overview
* **Client Secret**: The secret value you copied in Step 2
 ***
## Step 6: Use the Service Account with Microsoft Graph MCP
Once configured, you can use this Service Account to power Microsoft tools via an MCP Server:
1. Set up a new **Microsoft Graph MCP server** in your Airia platform
2. During setup, select the **Microsoft Service Account** connection you just configured, then save it
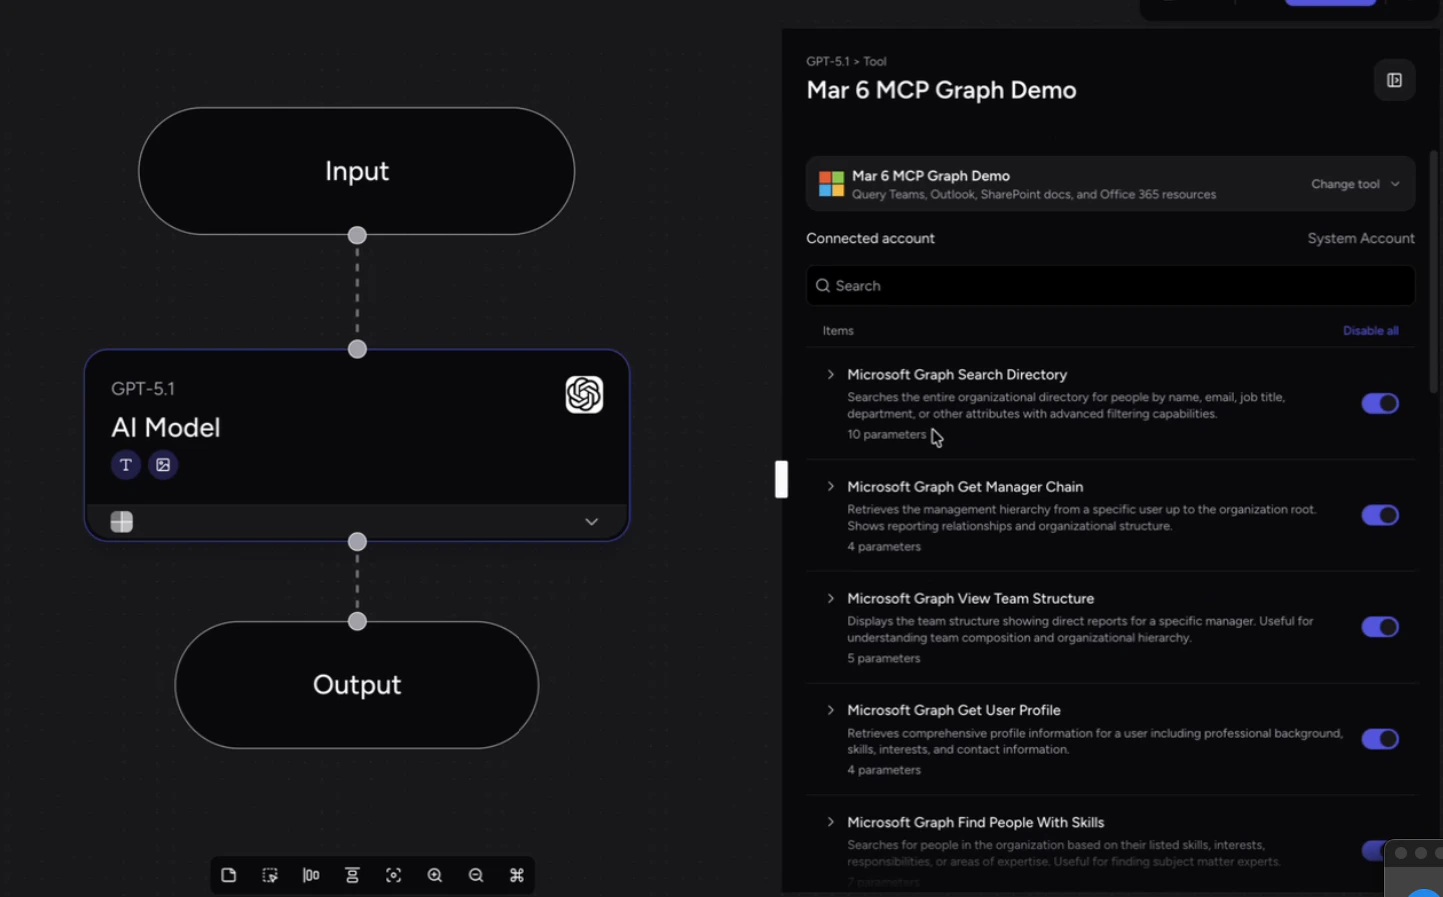
3. Create a new **Agent** and attach this Microsoft Graph MCP server to it
4. Based on the scopes and roles you assigned, the agent will automatically discover and display the available Microsoft Graph tools
***
## Step 6: Use the Service Account with Microsoft Graph MCP
Once configured, you can use this Service Account to power Microsoft tools via an MCP Server:
1. Set up a new **Microsoft Graph MCP server** in your Airia platform
2. During setup, select the **Microsoft Service Account** connection you just configured, then save it
3. Create a new **Agent** and attach this Microsoft Graph MCP server to it
4. Based on the scopes and roles you assigned, the agent will automatically discover and display the available Microsoft Graph tools
 ### Additional Resources
* **\[Microsoft Authentication Guide]\(/integrations/Tools/Microsoft\ Authentication)**: Learn more about different ways to authenticate Microsoft services in Airia.
* **[Understanding MCP Servers](/integrations/Tools/mcp)**: Discover how the Model Context Protocol enables seamless integrations between your AI agents and enterprise tools.
### Additional Resources
* **\[Microsoft Authentication Guide]\(/integrations/Tools/Microsoft\ Authentication)**: Learn more about different ways to authenticate Microsoft services in Airia.
* **[Understanding MCP Servers](/integrations/Tools/mcp)**: Discover how the Model Context Protocol enables seamless integrations between your AI agents and enterprise tools.