> ## Documentation Index
> Fetch the complete documentation index at: https://explore.airia.com/llms.txt
> Use this file to discover all available pages before exploring further.
# Setting Up Microsoft Entra ID OAuth App
## Overview
This guide walks you through creating an OAuth application in Microsoft Entra ID for use with Airia. This enables secure integration with Microsoft 365 Tools including Outlook, Teams, OneDrive, SharePoint, and the Graph MCP Server.
## Prerequisites
Before you begin, ensure you have:
* [ ] **Azure admin access** - You need permissions to register applications in Azure AD
* [ ] **Active Azure/Microsoft 365 subscription** - Your organization's Azure tenant
* [ ] **Airia callback URL** - Available in the Airia platform OAuth configuration page
If you don't have permission to register applications in Azure AD, contact your IT administrator to either grant you the necessary permissions or complete this setup on your behalf.
***
## Step 1: Access the Azure Portal
1. Navigate to the [Azure Portal](https://portal.azure.com)
2. Sign in with your organizational account that has admin privileges
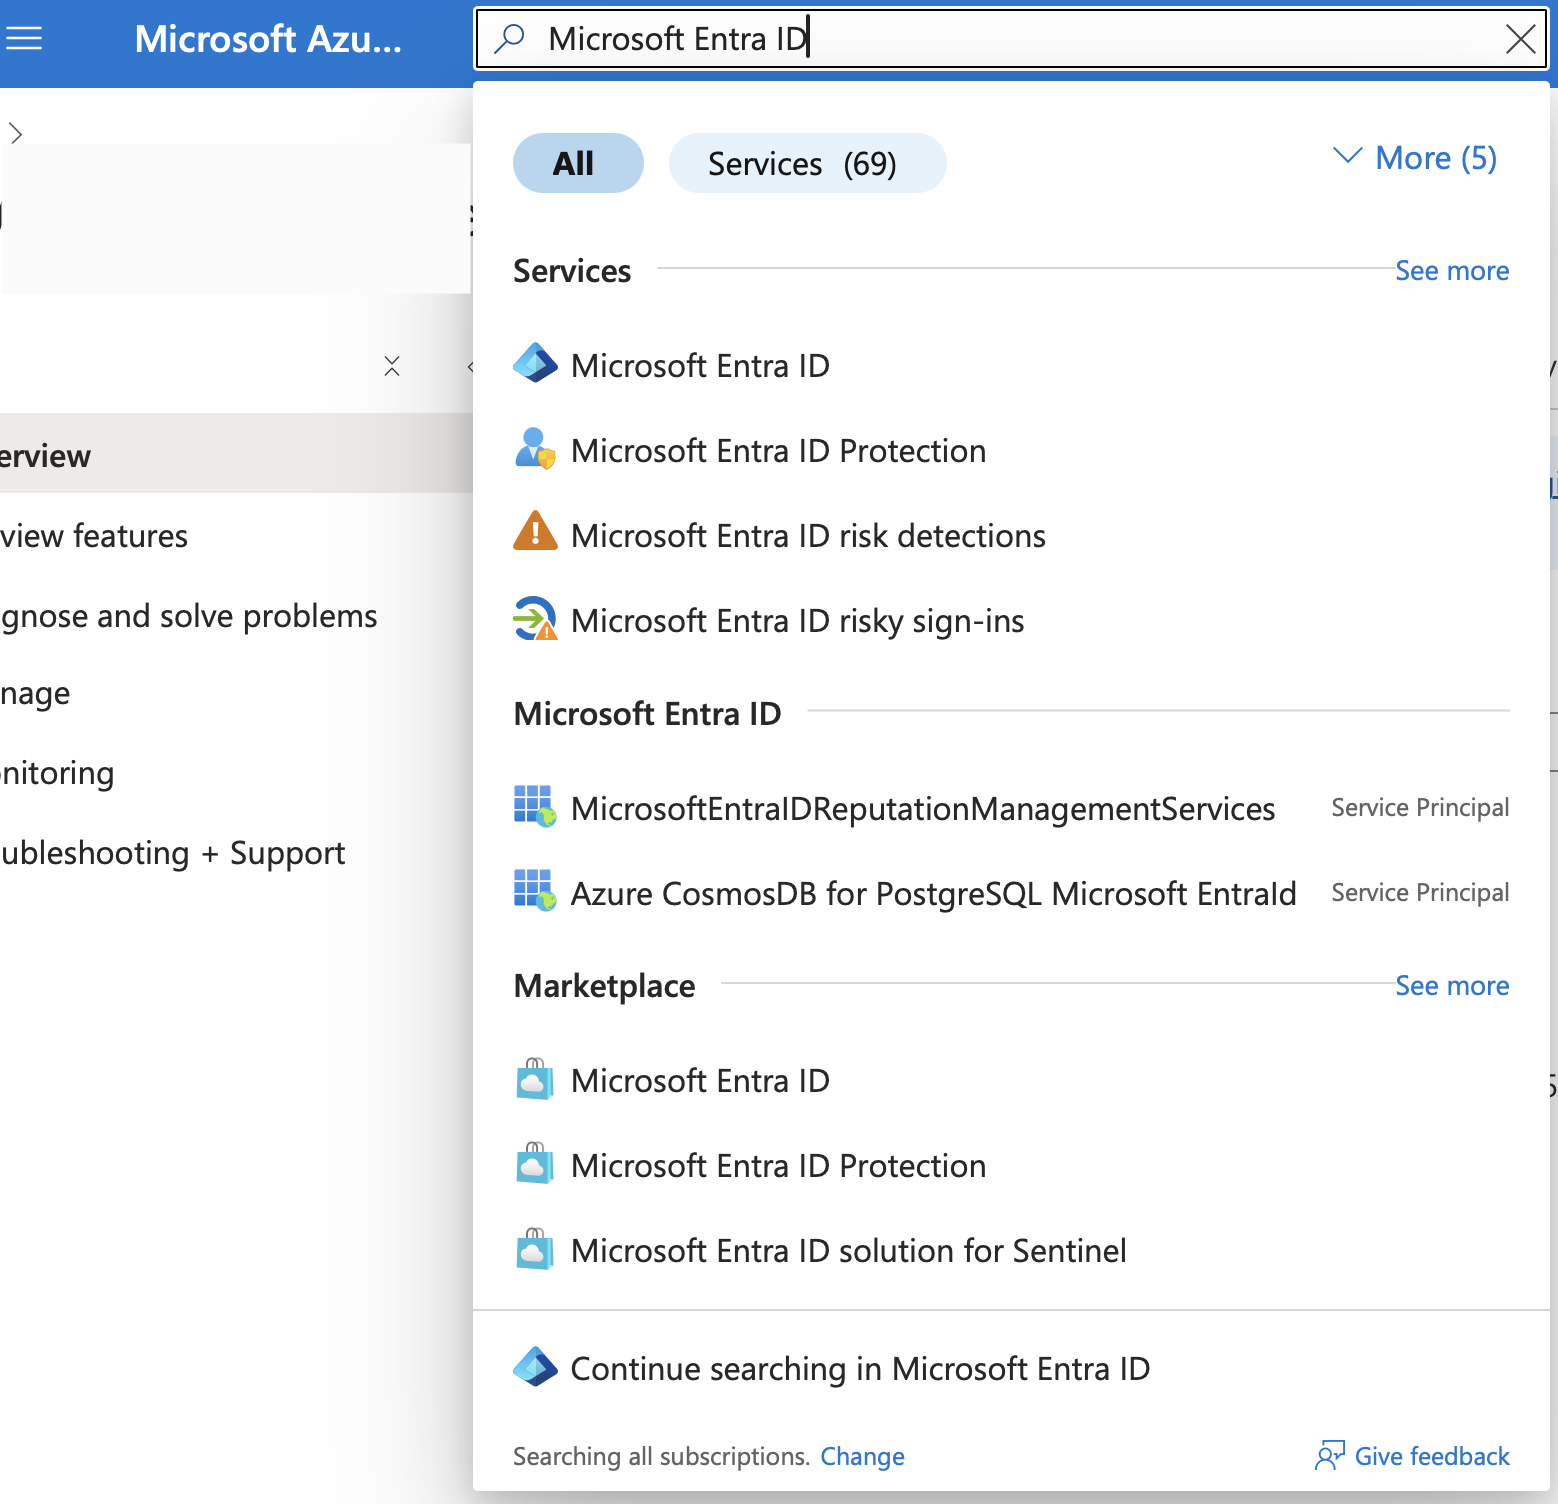
3. In the search bar at the top, type **"Microsoft Entra ID"** or **"Azure Active Directory"**
4. Select **Microsoft Entra ID** from the results
 If your organization uses multiple Azure tenants, ensure you're in the correct tenant by checking the directory name in the top-right corner of the portal.
***
## Step 2: Register a New Application
1. In the Microsoft Entra ID overview page, look for **Manage** in the left sidebar
2. Click on **App registrations**
3. Click the **+ New registration** button at the top
If your organization uses multiple Azure tenants, ensure you're in the correct tenant by checking the directory name in the top-right corner of the portal.
***
## Step 2: Register a New Application
1. In the Microsoft Entra ID overview page, look for **Manage** in the left sidebar
2. Click on **App registrations**
3. Click the **+ New registration** button at the top
 ***
## Step 3: Configure Application Registration
Fill out the application registration form:
### Basic Information
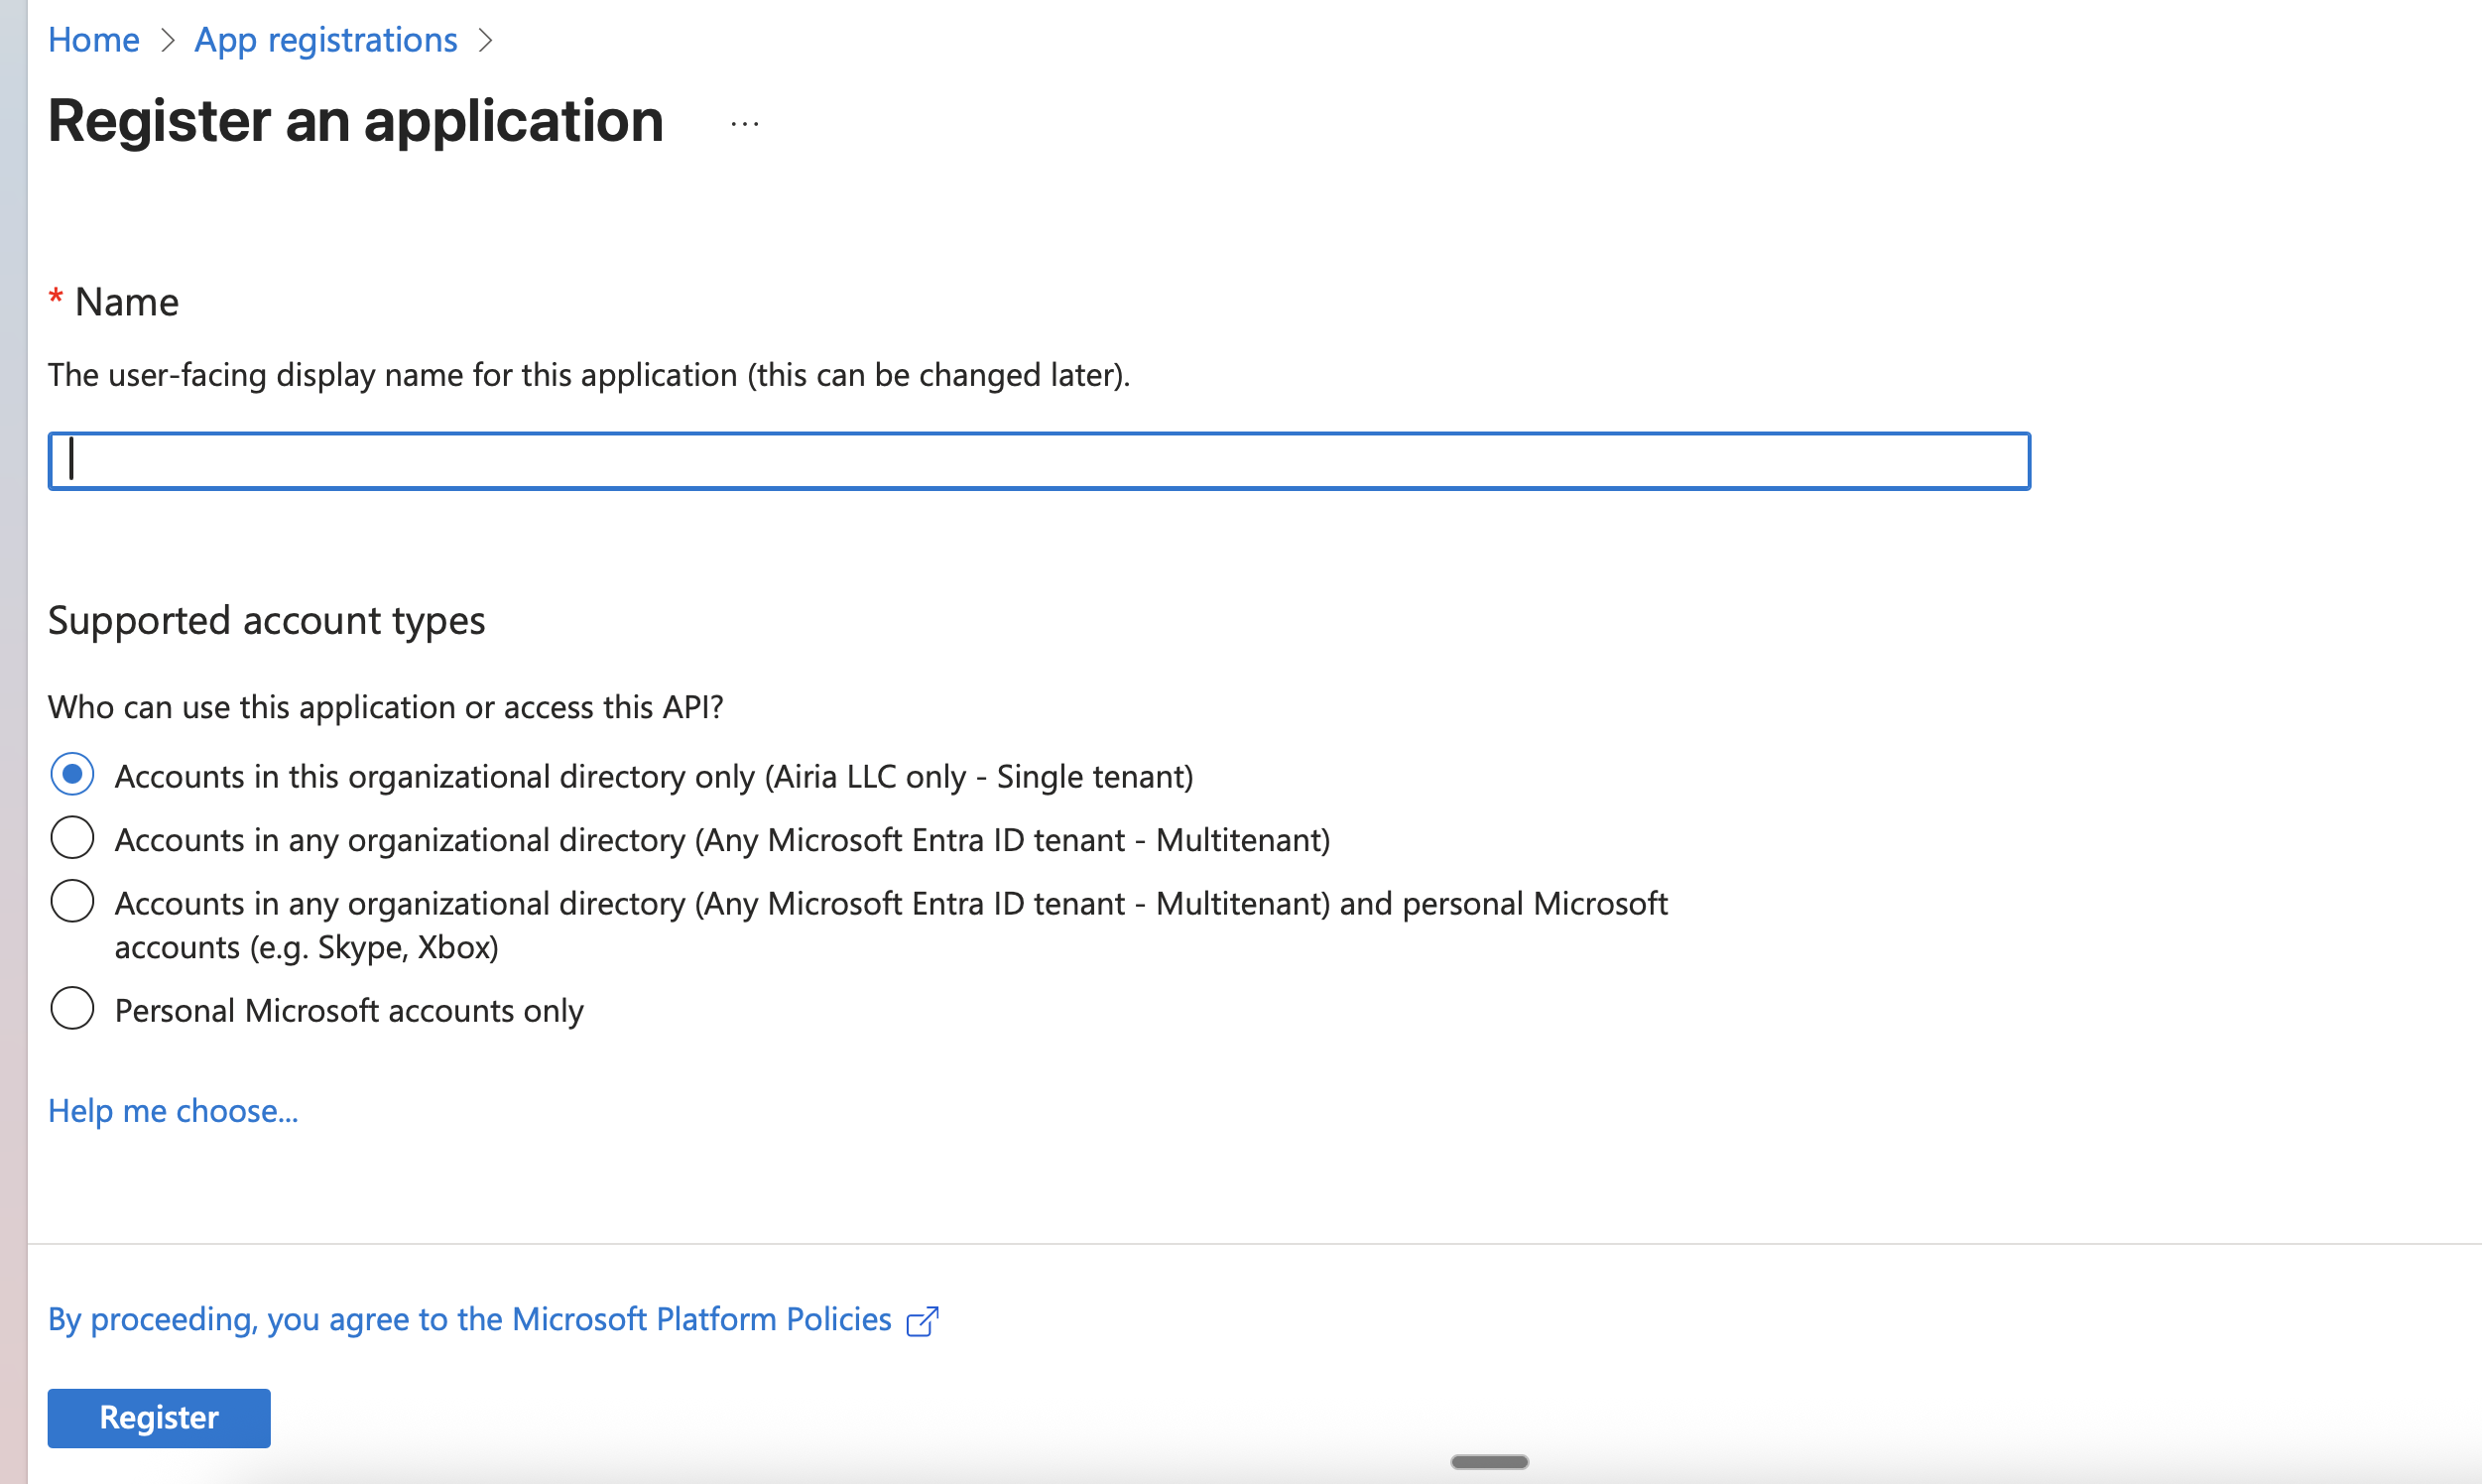
1. **Name**: Enter a descriptive name for your application
* Example: `Airia OAuth Integration` or `Airia - Microsoft Services`
* This name will be visible to users during the consent process
2. **Supported account types**: Choose based on your needs
* **Recommended**: "Accounts in this organizational directory only (Single tenant)"
* This is more secure and appropriate for most enterprise use cases
**Single Tenant vs. Multi-Tenant**
* **Single tenant**: Only users from your organization can authenticate (recommended)
* **Multi-tenant**: Users from any Azure AD organization can authenticate
For most BYO OAuth use cases, single tenant is the appropriate choice.
3. **Redirect URI**:
* Select **Web** from the dropdown
* Enter your Airia callback URL(s) as shown on the OAuth configuration page
4. Click **Register** to create the application
***
## Step 3: Configure Application Registration
Fill out the application registration form:
### Basic Information
1. **Name**: Enter a descriptive name for your application
* Example: `Airia OAuth Integration` or `Airia - Microsoft Services`
* This name will be visible to users during the consent process
2. **Supported account types**: Choose based on your needs
* **Recommended**: "Accounts in this organizational directory only (Single tenant)"
* This is more secure and appropriate for most enterprise use cases
**Single Tenant vs. Multi-Tenant**
* **Single tenant**: Only users from your organization can authenticate (recommended)
* **Multi-tenant**: Users from any Azure AD organization can authenticate
For most BYO OAuth use cases, single tenant is the appropriate choice.
3. **Redirect URI**:
* Select **Web** from the dropdown
* Enter your Airia callback URL(s) as shown on the OAuth configuration page
4. Click **Register** to create the application
 ***
## Step 4: Copy Your Application (Client) ID
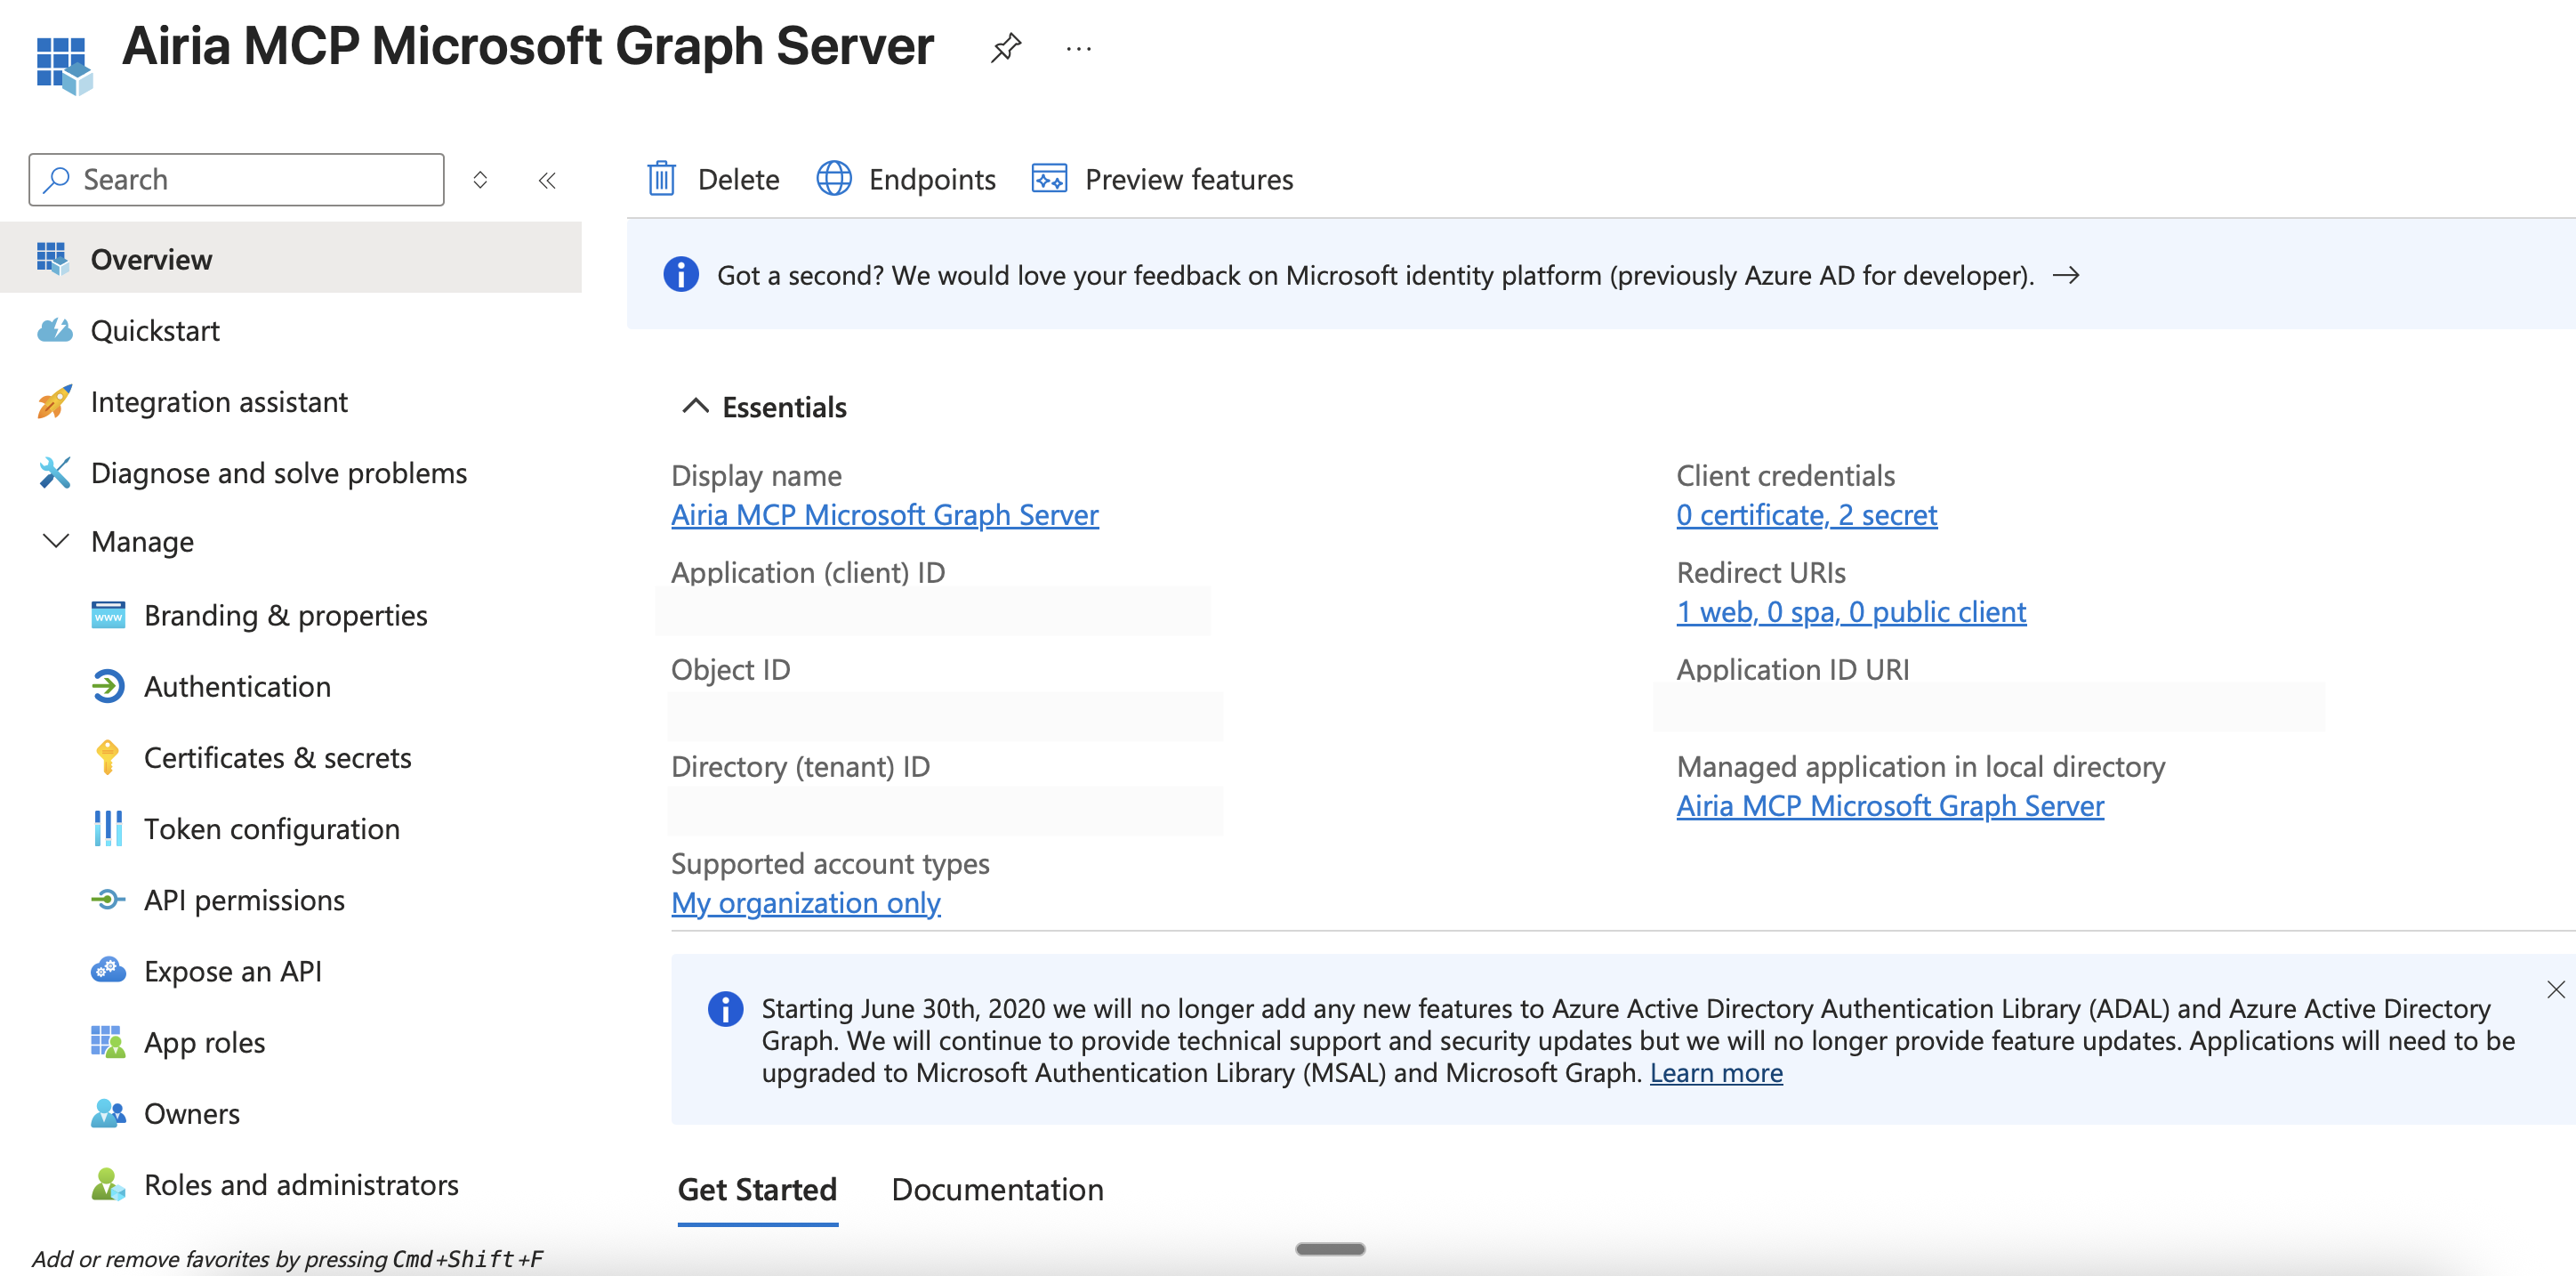
1. In the left sidebar, click on **Overview**
2. You'll see the **Application (client) ID** prominently displayed
3. Click the **copy** icon next to the Client ID to copy it
4. **Save this ID** - you'll need it for Airia configuration
The Application (client) ID is a public identifier and is safe to share within your organization. However, keep track of where you paste it.
***
## Step 6: Generate a Client Secret
1. In the left sidebar under **Manage**, click **Certificates & secrets**
2. Click on the **Client secrets** tab
3. Click **+ New client secret**
4. In the dialog that appears:
* **Description**: Enter a meaningful description (e.g., "Airia OAuth Integration")
5. Click **Add**
***
## Step 7: Configure API Permissions
Now you'll configure which Microsoft Graph APIs your application can access.
1. In the left sidebar under **Manage**, click **API permissions**
2. You'll see **Microsoft Graph** → **User.Read** is already added by default
3. Click **+ Add a permission**
***
## Step 4: Copy Your Application (Client) ID
1. In the left sidebar, click on **Overview**
2. You'll see the **Application (client) ID** prominently displayed
3. Click the **copy** icon next to the Client ID to copy it
4. **Save this ID** - you'll need it for Airia configuration
The Application (client) ID is a public identifier and is safe to share within your organization. However, keep track of where you paste it.
***
## Step 6: Generate a Client Secret
1. In the left sidebar under **Manage**, click **Certificates & secrets**
2. Click on the **Client secrets** tab
3. Click **+ New client secret**
4. In the dialog that appears:
* **Description**: Enter a meaningful description (e.g., "Airia OAuth Integration")
5. Click **Add**
***
## Step 7: Configure API Permissions
Now you'll configure which Microsoft Graph APIs your application can access.
1. In the left sidebar under **Manage**, click **API permissions**
2. You'll see **Microsoft Graph** → **User.Read** is already added by default
3. Click **+ Add a permission**
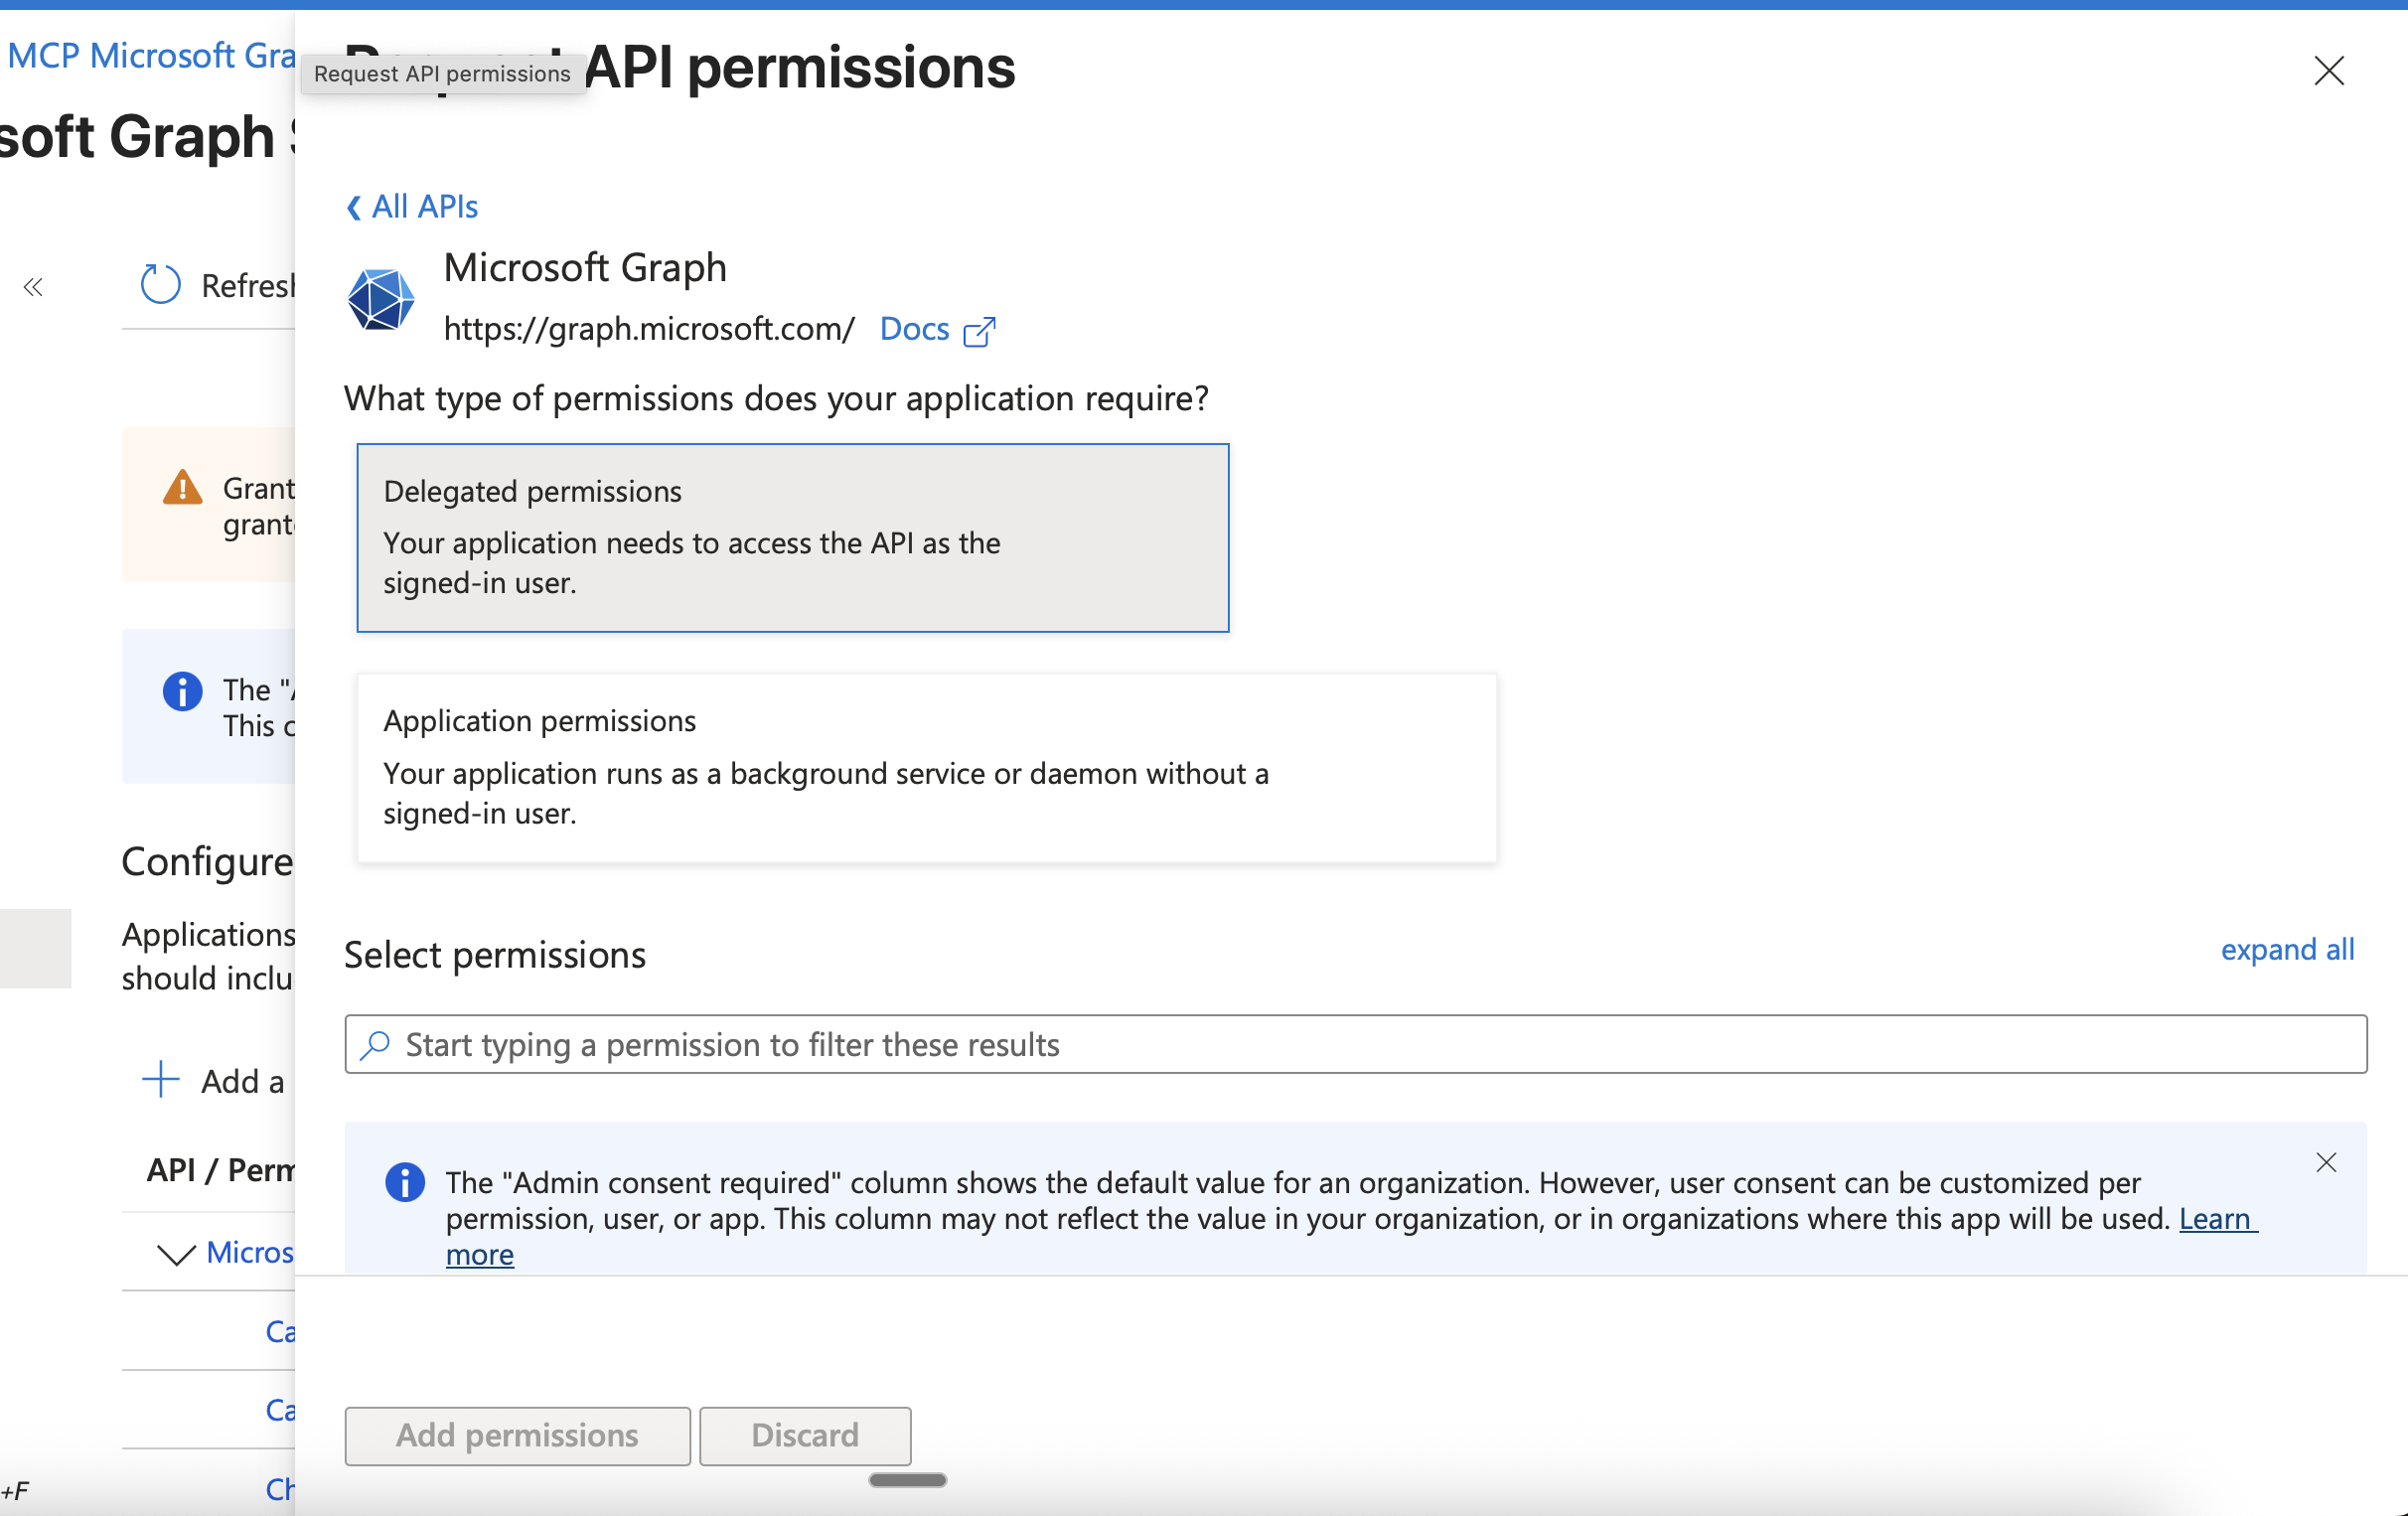 4. Select **Microsoft Graph**
5. Choose **Delegated permissions** (not Application permissions)
### Required Permissions
Add the following delegated permissions by searching for each one and checking its checkbox:
#### Mail Permissions
* `Mail.Read` - Read user mail
* `Mail.Read.Shared` - Read mail in shared folders
* `Mail.ReadWrite` - Read and write user mail
* `Mail.Send` - Send mail as a user
#### Calendar Permissions
* `Calendars.Read` - Read user calendars
* `Calendars.Read.Shared` - Read shared calendars
* `Calendars.ReadWrite` - Read and write user calendars
#### Contacts Permissions
* `Contacts.Read` - Read user contacts
* `Contacts.ReadWrite` - Read and write user contacts
#### Files & SharePoint Permissions
* `Files.Read` - Read user files
* `Files.Read.All` - Read all files user can access
* `Files.ReadWrite` - Read and write user files
* `Sites.Read.All` - Read items in all site collections
#### Teams Permissions
* `Team.ReadBasic.All` - Read the names and descriptions of teams
* `Channel.ReadBasic.All` - Read channel names and descriptions
* `ChannelMessage.Send` - Send messages in channels
#### OneNote Permissions
* `Notes.Read` - Read user OneNote notebooks
* `Notes.ReadWrite` - Read and write user OneNote notebooks
* `Notes.Create` - Create user OneNote notebooks
#### User & Directory Permissions
* `User.Read` - Sign in and read user profile (already added)
* `User.Read.All` - Read all users' basic profiles
* `People.Read` - Read users' relevant people lists
* `Presence.Read` - Read user's presence information
* `Group.Read.All` - Read all groups
* `Directory.Read.All` - Read directory data
#### Tasks Permissions
* `Tasks.Read` - Read user tasks
* `Tasks.ReadWrite` - Create, read, update and delete user tasks
#### Essential Permissions
* `email` - View users' email address
* `openid` - Sign users in
* `offline_access` - Maintain access to data you have given it access to
**About Permission Scopes**
These are the recommended scopes that Airia uses by default. You can:
* **Add more permissions** if you need additional functionality
* **Remove permissions** that you don't need (though this may limit Airia functionality)
* **Add permissions later** if you discover you need them
Each time you modify permissions, users may need to re-consent to the application.
7. After adding all permissions, click **Add permissions** at the bottom
8. You'll see all permissions listed on the API permissions page
***
## Step 8: Grant Admin Consent
Some of the permissions you add may require administrator consent before users can use them.
1. On the **API permissions** page, review your added permissions
2. Look for the **Status** column - you may see "Not granted for \[Your Organization]"
3. Click the **Grant admin consent for \[Your Organization]** button
4. In the confirmation dialog, click **Yes**
5. After granting consent, the Status column should show green checkmarks with "Granted for \[Your Organization]"
**Admin Consent Required**
If you don't grant admin consent:
* Individual users will be prompted to consent
* Some permissions may fail because they require admin-level consent
* Users may see "unverified app" warnings
Granting admin consent provides a smoother experience for all users in your organization.
***
## Step 9: Gather Your OAuth Credentials
You now have everything you need to configure Airia. Gather the following information:
| Credential | Where to Find It | Example |
| ------------------------ | --------------------------------------------- | -------------------------------------- |
| **Client ID** | Overview page → Application (client) ID | `12345678-1234-1234-1234-123456789abc` |
| **Client Secret** | The value you copied when creating the secret | `abc123XYZ~...` |
| **Tenant ID** (optional) | Overview page → Directory (tenant) ID | `87654321-4321-4321-4321-987654321xyz` |
**About Tenant ID**
For single-tenant applications, you may need the Tenant ID for certain configurations. It's displayed on the Overview page. Copy it for reference even if not immediately needed.
***
## Step 10: Configure OAuth in Airia
Now you'll enter these credentials into the Airia platform:
1. Log in to your Airia platform
2. Navigate to **Settings** → **Ecosystem** → **App Connections**
3. Select **Microsoft** as the provider
4. Enter your credentials:
* **Client ID**: Paste the Application (client) ID
* **Client Secret**: Paste the client secret value
* **Tenant ID**: (if required) Paste the Directory (tenant) ID
5. The callback URL should be pre-filled and visible on the configuration page. This should default to `https://auth.airia.ai/OAuth/callback`
6. Click **Save** or **Connect**
4. Select **Microsoft Graph**
5. Choose **Delegated permissions** (not Application permissions)
### Required Permissions
Add the following delegated permissions by searching for each one and checking its checkbox:
#### Mail Permissions
* `Mail.Read` - Read user mail
* `Mail.Read.Shared` - Read mail in shared folders
* `Mail.ReadWrite` - Read and write user mail
* `Mail.Send` - Send mail as a user
#### Calendar Permissions
* `Calendars.Read` - Read user calendars
* `Calendars.Read.Shared` - Read shared calendars
* `Calendars.ReadWrite` - Read and write user calendars
#### Contacts Permissions
* `Contacts.Read` - Read user contacts
* `Contacts.ReadWrite` - Read and write user contacts
#### Files & SharePoint Permissions
* `Files.Read` - Read user files
* `Files.Read.All` - Read all files user can access
* `Files.ReadWrite` - Read and write user files
* `Sites.Read.All` - Read items in all site collections
#### Teams Permissions
* `Team.ReadBasic.All` - Read the names and descriptions of teams
* `Channel.ReadBasic.All` - Read channel names and descriptions
* `ChannelMessage.Send` - Send messages in channels
#### OneNote Permissions
* `Notes.Read` - Read user OneNote notebooks
* `Notes.ReadWrite` - Read and write user OneNote notebooks
* `Notes.Create` - Create user OneNote notebooks
#### User & Directory Permissions
* `User.Read` - Sign in and read user profile (already added)
* `User.Read.All` - Read all users' basic profiles
* `People.Read` - Read users' relevant people lists
* `Presence.Read` - Read user's presence information
* `Group.Read.All` - Read all groups
* `Directory.Read.All` - Read directory data
#### Tasks Permissions
* `Tasks.Read` - Read user tasks
* `Tasks.ReadWrite` - Create, read, update and delete user tasks
#### Essential Permissions
* `email` - View users' email address
* `openid` - Sign users in
* `offline_access` - Maintain access to data you have given it access to
**About Permission Scopes**
These are the recommended scopes that Airia uses by default. You can:
* **Add more permissions** if you need additional functionality
* **Remove permissions** that you don't need (though this may limit Airia functionality)
* **Add permissions later** if you discover you need them
Each time you modify permissions, users may need to re-consent to the application.
7. After adding all permissions, click **Add permissions** at the bottom
8. You'll see all permissions listed on the API permissions page
***
## Step 8: Grant Admin Consent
Some of the permissions you add may require administrator consent before users can use them.
1. On the **API permissions** page, review your added permissions
2. Look for the **Status** column - you may see "Not granted for \[Your Organization]"
3. Click the **Grant admin consent for \[Your Organization]** button
4. In the confirmation dialog, click **Yes**
5. After granting consent, the Status column should show green checkmarks with "Granted for \[Your Organization]"
**Admin Consent Required**
If you don't grant admin consent:
* Individual users will be prompted to consent
* Some permissions may fail because they require admin-level consent
* Users may see "unverified app" warnings
Granting admin consent provides a smoother experience for all users in your organization.
***
## Step 9: Gather Your OAuth Credentials
You now have everything you need to configure Airia. Gather the following information:
| Credential | Where to Find It | Example |
| ------------------------ | --------------------------------------------- | -------------------------------------- |
| **Client ID** | Overview page → Application (client) ID | `12345678-1234-1234-1234-123456789abc` |
| **Client Secret** | The value you copied when creating the secret | `abc123XYZ~...` |
| **Tenant ID** (optional) | Overview page → Directory (tenant) ID | `87654321-4321-4321-4321-987654321xyz` |
**About Tenant ID**
For single-tenant applications, you may need the Tenant ID for certain configurations. It's displayed on the Overview page. Copy it for reference even if not immediately needed.
***
## Step 10: Configure OAuth in Airia
Now you'll enter these credentials into the Airia platform:
1. Log in to your Airia platform
2. Navigate to **Settings** → **Ecosystem** → **App Connections**
3. Select **Microsoft** as the provider
4. Enter your credentials:
* **Client ID**: Paste the Application (client) ID
* **Client Secret**: Paste the client secret value
* **Tenant ID**: (if required) Paste the Directory (tenant) ID
5. The callback URL should be pre-filled and visible on the configuration page. This should default to `https://auth.airia.ai/OAuth/callback`
6. Click **Save** or **Connect**
 ***
## Step 11: Test the Connection
1. After saving, click **Connect Account** in Airia
2. You'll be redirected to Microsoft's login page
3. Sign in with your Microsoft account
4. Review the permissions consent screen
5. Click **Accept** to grant permissions
6. You should be redirected back to Airia with a success message
***
## Step 11: Test the Connection
1. After saving, click **Connect Account** in Airia
2. You'll be redirected to Microsoft's login page
3. Sign in with your Microsoft account
4. Review the permissions consent screen
5. Click **Accept** to grant permissions
6. You should be redirected back to Airia with a success message
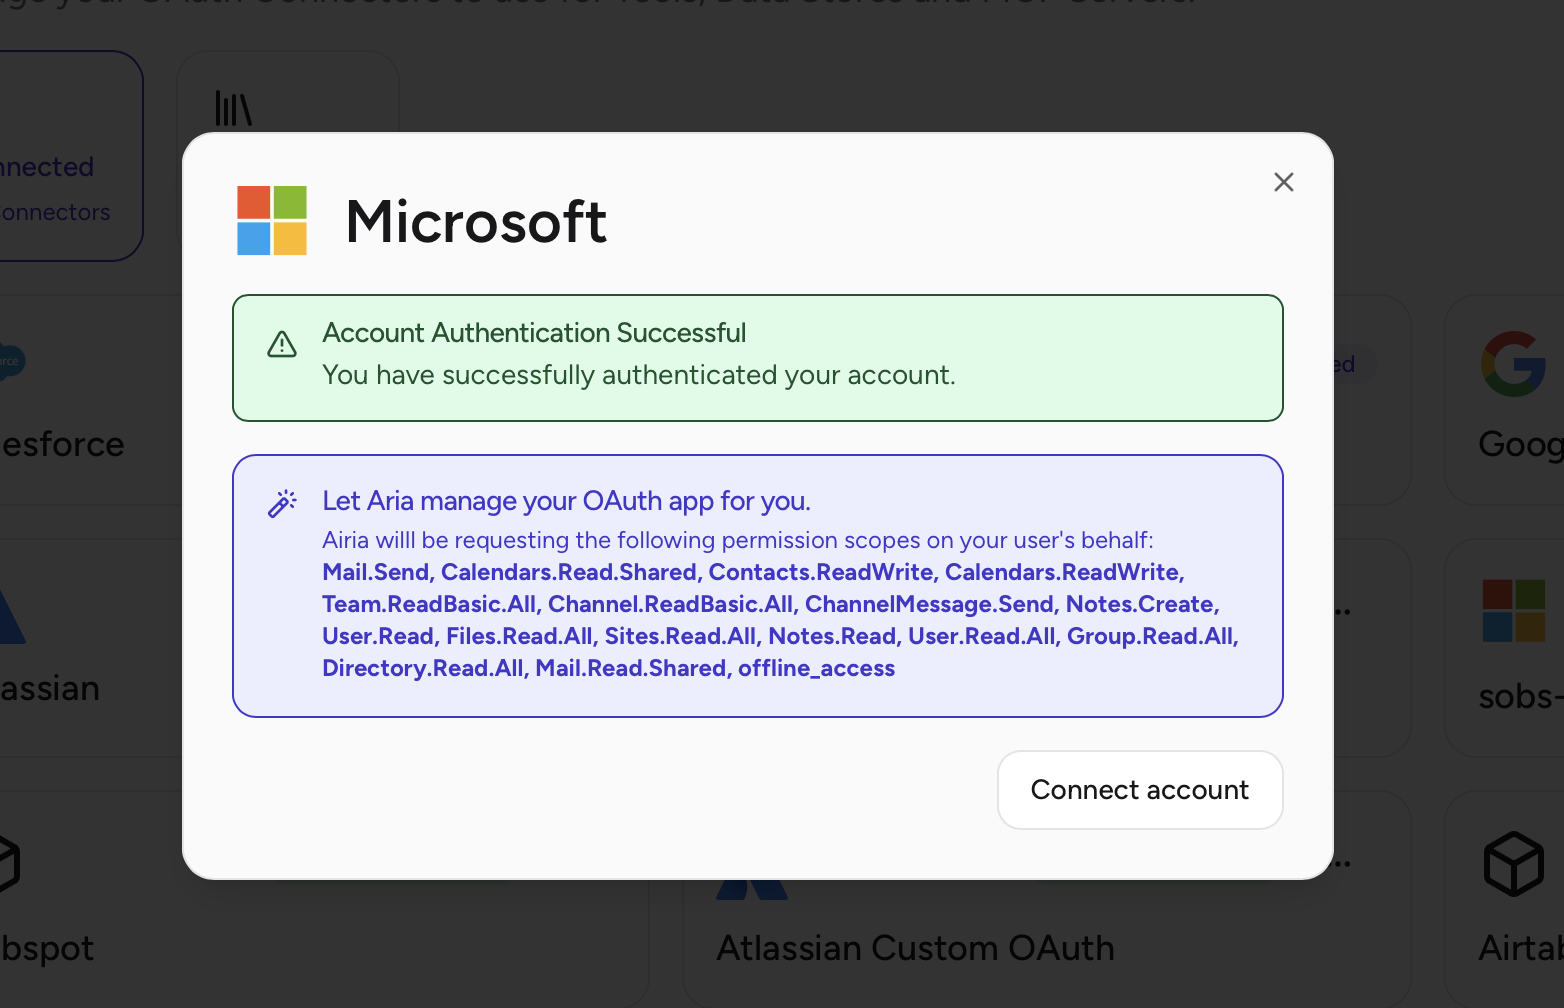 **First-Time Authentication**
The first user to authenticate will see the full consent screen listing all permissions. Subsequent users (after admin consent) will have a simplified experience.
***
## Additional Resources
* [Microsoft Entra ID Documentation](https://learn.microsoft.com/en-us/azure/active-directory/)
* [Microsoft Graph API Permissions Reference](https://learn.microsoft.com/en-us/graph/permissions-reference)
***
Need help? Contact Airia support or your IT administrator for assistance with Microsoft Entra ID configuration.
**First-Time Authentication**
The first user to authenticate will see the full consent screen listing all permissions. Subsequent users (after admin consent) will have a simplified experience.
***
## Additional Resources
* [Microsoft Entra ID Documentation](https://learn.microsoft.com/en-us/azure/active-directory/)
* [Microsoft Graph API Permissions Reference](https://learn.microsoft.com/en-us/graph/permissions-reference)
***
Need help? Contact Airia support or your IT administrator for assistance with Microsoft Entra ID configuration.