> ## Documentation Index
> Fetch the complete documentation index at: https://explore.airia.com/llms.txt
> Use this file to discover all available pages before exploring further.
# Setting Up Salesforce OAuth App
## Overview
This guide walks you through creating a Connected App in Salesforce for use with Airia. This enables secure integration with Salesforce Tools.
## Prerequisites
Before you begin, ensure you have:
* [ ] **Salesforce admin access** - You need permissions to create Connected Apps
* [ ] **Active Salesforce organization** - Any Salesforce edition (Professional, Enterprise, Unlimited, Developer)
* [ ] **Airia callback URL** - Available in the Airia platform OAuth configuration page
Connected Apps are available in all Salesforce editions. However, API access may be limited in some editions. Developer Edition provides free API access suitable for testing.
***
## Step 1: Access Salesforce Setup
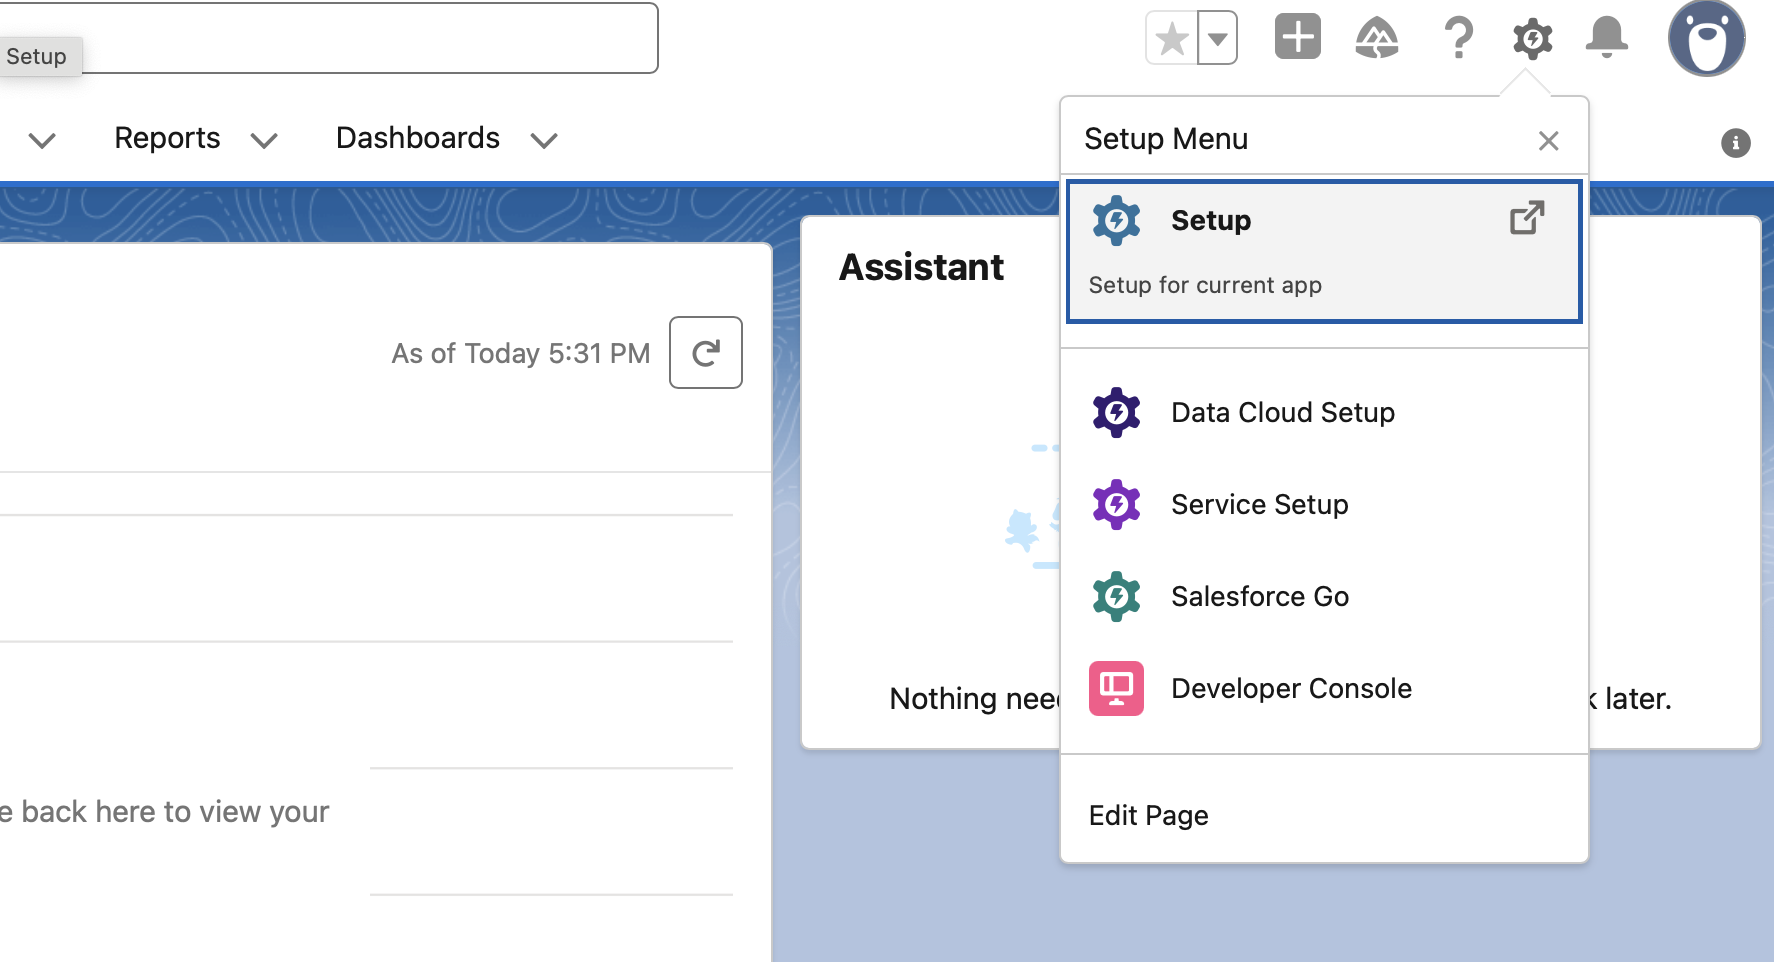
1. Log in to your Salesforce organization
2. Click the **gear icon** in the top-right corner
3. Select **Setup** from the dropdown
 ***
## Step 2: Navigate to External App Manager in settings
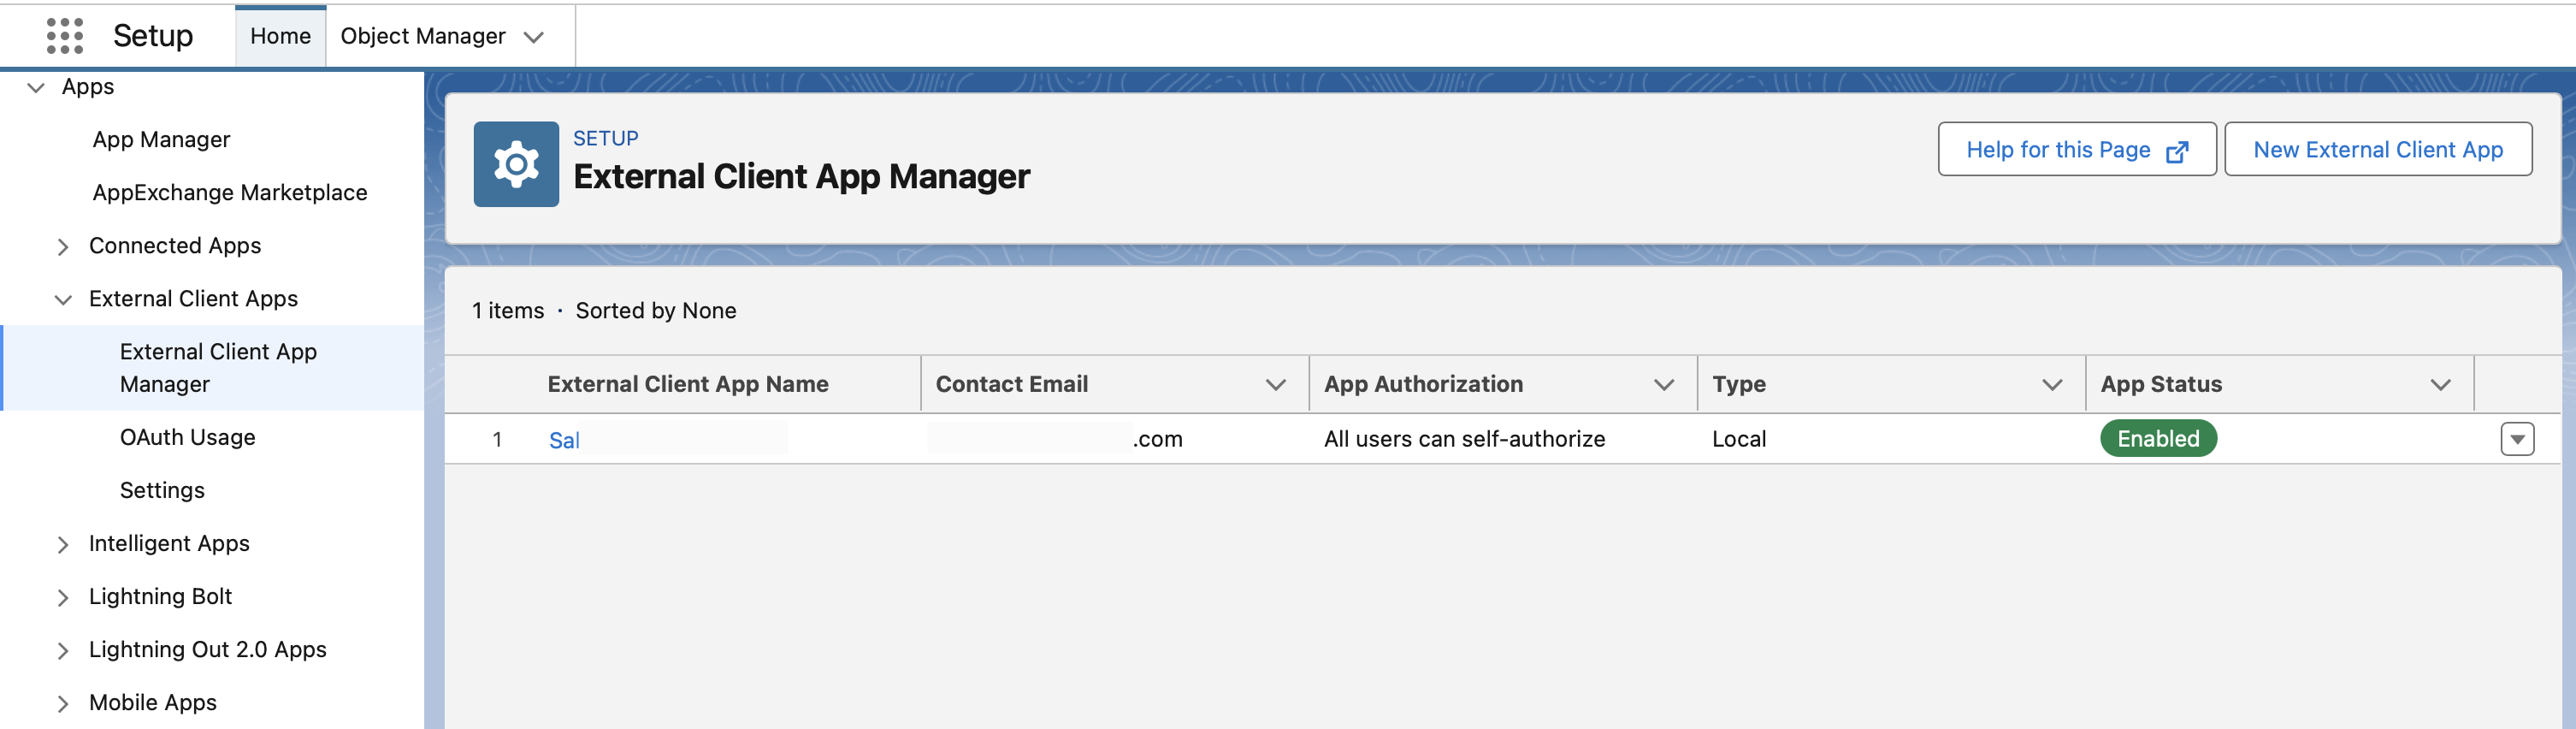
1. In the Setup Quick Find box (left sidebar search), type **"External Client App manager"**
***
## Step 2: Navigate to External App Manager in settings
1. In the Setup Quick Find box (left sidebar search), type **"External Client App manager"**
 ***
## Step 3: Create a New App
1. Click the **New External Client App** button in the top-right corner
***
## Step 4: Configure Basic Information
Fill out the Basic Information section:
1. **Client App Name**: Enter a descriptive name (e.g., "Airia OAuth Integration")
2. **API Name**: This will auto-populate based on the Connected App Name
3. **Contact Email**: Enter your email or a team/support email
***
## Step 5: Enable OAuth Settings
1. Check the box for **Enable OAuth Settings**
***
## Step 6: Configure OAuth Settings
### Callback URL
1. **Callback URL**: Enter your Airia callback URL as shown on the OAuth configuration page in Airia. This should default to `https://auth.airia.ai/OAuth/callback`.
### Selected OAuth Scopes
2. **Selected OAuth Scopes**: Select the following and move them to "Selected OAuth Scopes" using the **Add** button:
#### Recommended Scopes:
* **Access and manage your data (api)** - `api`
* **Perform requests on your behalf at any time (refresh\_token, offline\_access)** - `refresh_token` and `offline_access`
* **Full access (full)** - `full` - Provides full access to all data accessible by the user
* **Access Pardot services (pardot\_api)** - `pardot_api` - Required for Pardot integration (if applicable)
***
## Step 3: Create a New App
1. Click the **New External Client App** button in the top-right corner
***
## Step 4: Configure Basic Information
Fill out the Basic Information section:
1. **Client App Name**: Enter a descriptive name (e.g., "Airia OAuth Integration")
2. **API Name**: This will auto-populate based on the Connected App Name
3. **Contact Email**: Enter your email or a team/support email
***
## Step 5: Enable OAuth Settings
1. Check the box for **Enable OAuth Settings**
***
## Step 6: Configure OAuth Settings
### Callback URL
1. **Callback URL**: Enter your Airia callback URL as shown on the OAuth configuration page in Airia. This should default to `https://auth.airia.ai/OAuth/callback`.
### Selected OAuth Scopes
2. **Selected OAuth Scopes**: Select the following and move them to "Selected OAuth Scopes" using the **Add** button:
#### Recommended Scopes:
* **Access and manage your data (api)** - `api`
* **Perform requests on your behalf at any time (refresh\_token, offline\_access)** - `refresh_token` and `offline_access`
* **Full access (full)** - `full` - Provides full access to all data accessible by the user
* **Access Pardot services (pardot\_api)** - `pardot_api` - Required for Pardot integration (if applicable)
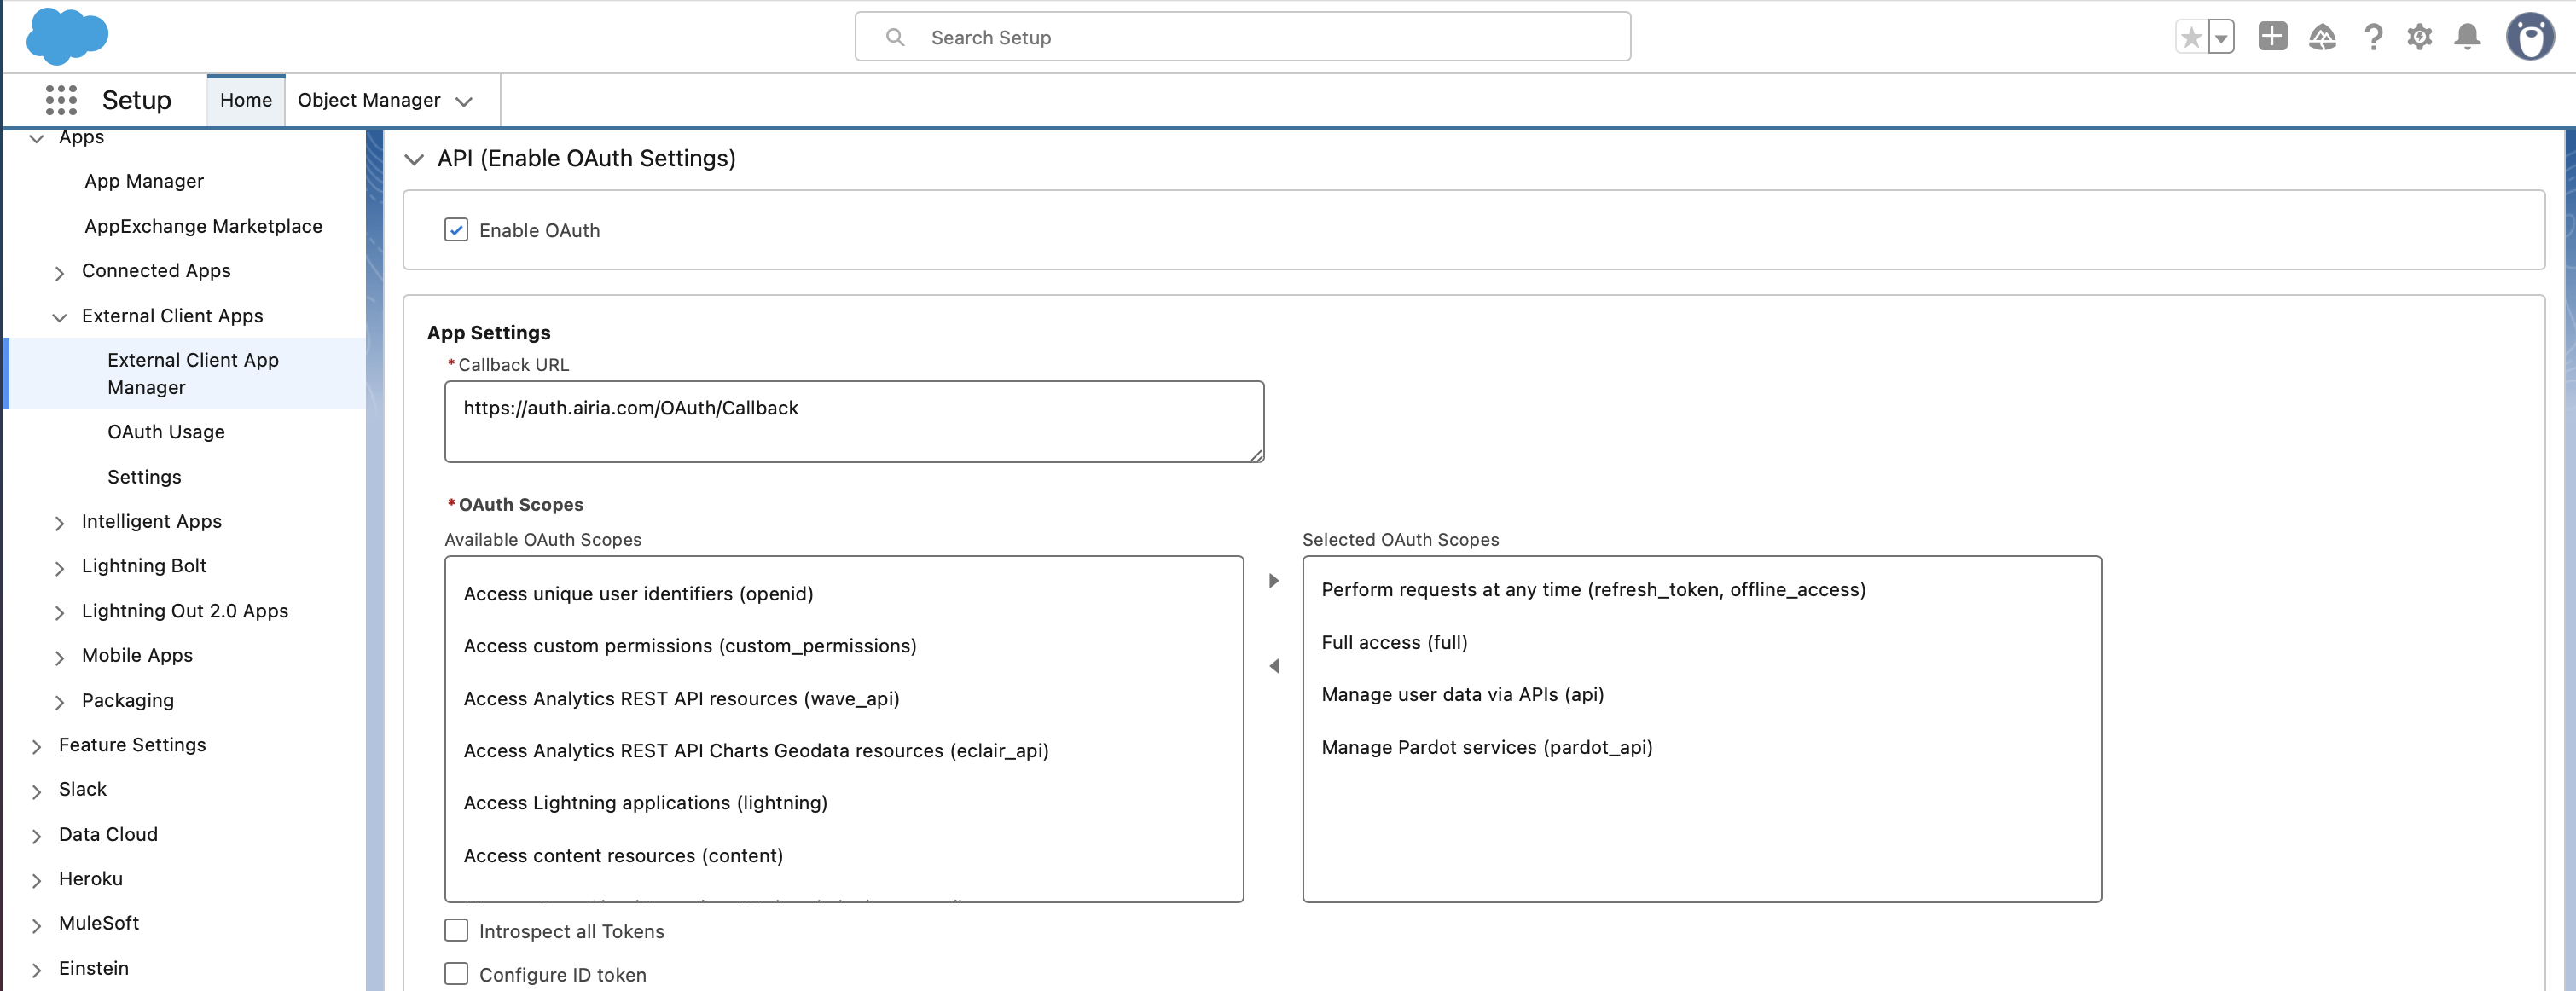 **About OAuth Scopes**
These are the recommended scopes that Airia uses by default. The `full` scope is comprehensive and includes most other scopes. You can choose more restrictive scopes if needed, though this may reduce functionality.
***
## Step 6: Security settings
Ensure the following options are checked on:
* Require secret for Web Server Flow
* Require secret for Refresh Token Flow
* Require Proof Key for Code Exchange (PKCE) extension for Supported Authorization Flows
## Step 7: Save the Connected App
1. Scroll to the bottom of the page
2. Click **Save**
3. You'll see a warning: **"It can take 2-10 minutes for your changes to take effect."**
4. Click **Continue**
***
## Step 8: Copy Your OAuth Credentials
After saving, you'll see the OAuth credentials on the Connected App detail page.
### Consumer Key (Client ID)
1. Under **API (Enable OAuth Settings)**, you'll see **Consumer Key**
2. Click the **Copy** button or select and copy the entire key
### Consumer Secret (Client Secret)
1. Under **Consumer Secret**, click **Click to reveal**
2. The consumer secret will be displayed
3. Click the **Copy** button or select and copy the entire secret
***
## Step 9: Determine Your Salesforce Instance URL
Your Salesforce instance URL determines which OAuth authorization endpoint to use:
1. **Live/Production**: `login.salesforce.com` (most common)
2. **Test/Sandbox**: `test.salesforce.com`
3. **Custom Domain**: `yourdomain.my.salesforce.com` (if your org uses a custom My Domain)
**How to Check Your Instance**
Look at your browser's address bar when logged into Salesforce to determine which type of instance you're using.
***
## Step 10: Configure OAuth in Airia
Now you'll enter these credentials into the Airia platform:
1. Log in to your Airia platform
2. Navigate to **Settings** → **Ecosystem** → **App Connections**
3. Select **Salesforce** as the provider
4. Enter your credentials:
* **Consumer Key / Client ID**: Paste the Consumer Key you copied
* **Consumer Secret / Client Secret**: Paste the Consumer Secret you copied
* **Instance URL / Domain**: Enter your Salesforce instance URL (e.g., `login.salesforce.com`)
5. The callback URL should be pre-filled and visible on the configuration page
6. Click **Save** or **Connect**
**About OAuth Scopes**
These are the recommended scopes that Airia uses by default. The `full` scope is comprehensive and includes most other scopes. You can choose more restrictive scopes if needed, though this may reduce functionality.
***
## Step 6: Security settings
Ensure the following options are checked on:
* Require secret for Web Server Flow
* Require secret for Refresh Token Flow
* Require Proof Key for Code Exchange (PKCE) extension for Supported Authorization Flows
## Step 7: Save the Connected App
1. Scroll to the bottom of the page
2. Click **Save**
3. You'll see a warning: **"It can take 2-10 minutes for your changes to take effect."**
4. Click **Continue**
***
## Step 8: Copy Your OAuth Credentials
After saving, you'll see the OAuth credentials on the Connected App detail page.
### Consumer Key (Client ID)
1. Under **API (Enable OAuth Settings)**, you'll see **Consumer Key**
2. Click the **Copy** button or select and copy the entire key
### Consumer Secret (Client Secret)
1. Under **Consumer Secret**, click **Click to reveal**
2. The consumer secret will be displayed
3. Click the **Copy** button or select and copy the entire secret
***
## Step 9: Determine Your Salesforce Instance URL
Your Salesforce instance URL determines which OAuth authorization endpoint to use:
1. **Live/Production**: `login.salesforce.com` (most common)
2. **Test/Sandbox**: `test.salesforce.com`
3. **Custom Domain**: `yourdomain.my.salesforce.com` (if your org uses a custom My Domain)
**How to Check Your Instance**
Look at your browser's address bar when logged into Salesforce to determine which type of instance you're using.
***
## Step 10: Configure OAuth in Airia
Now you'll enter these credentials into the Airia platform:
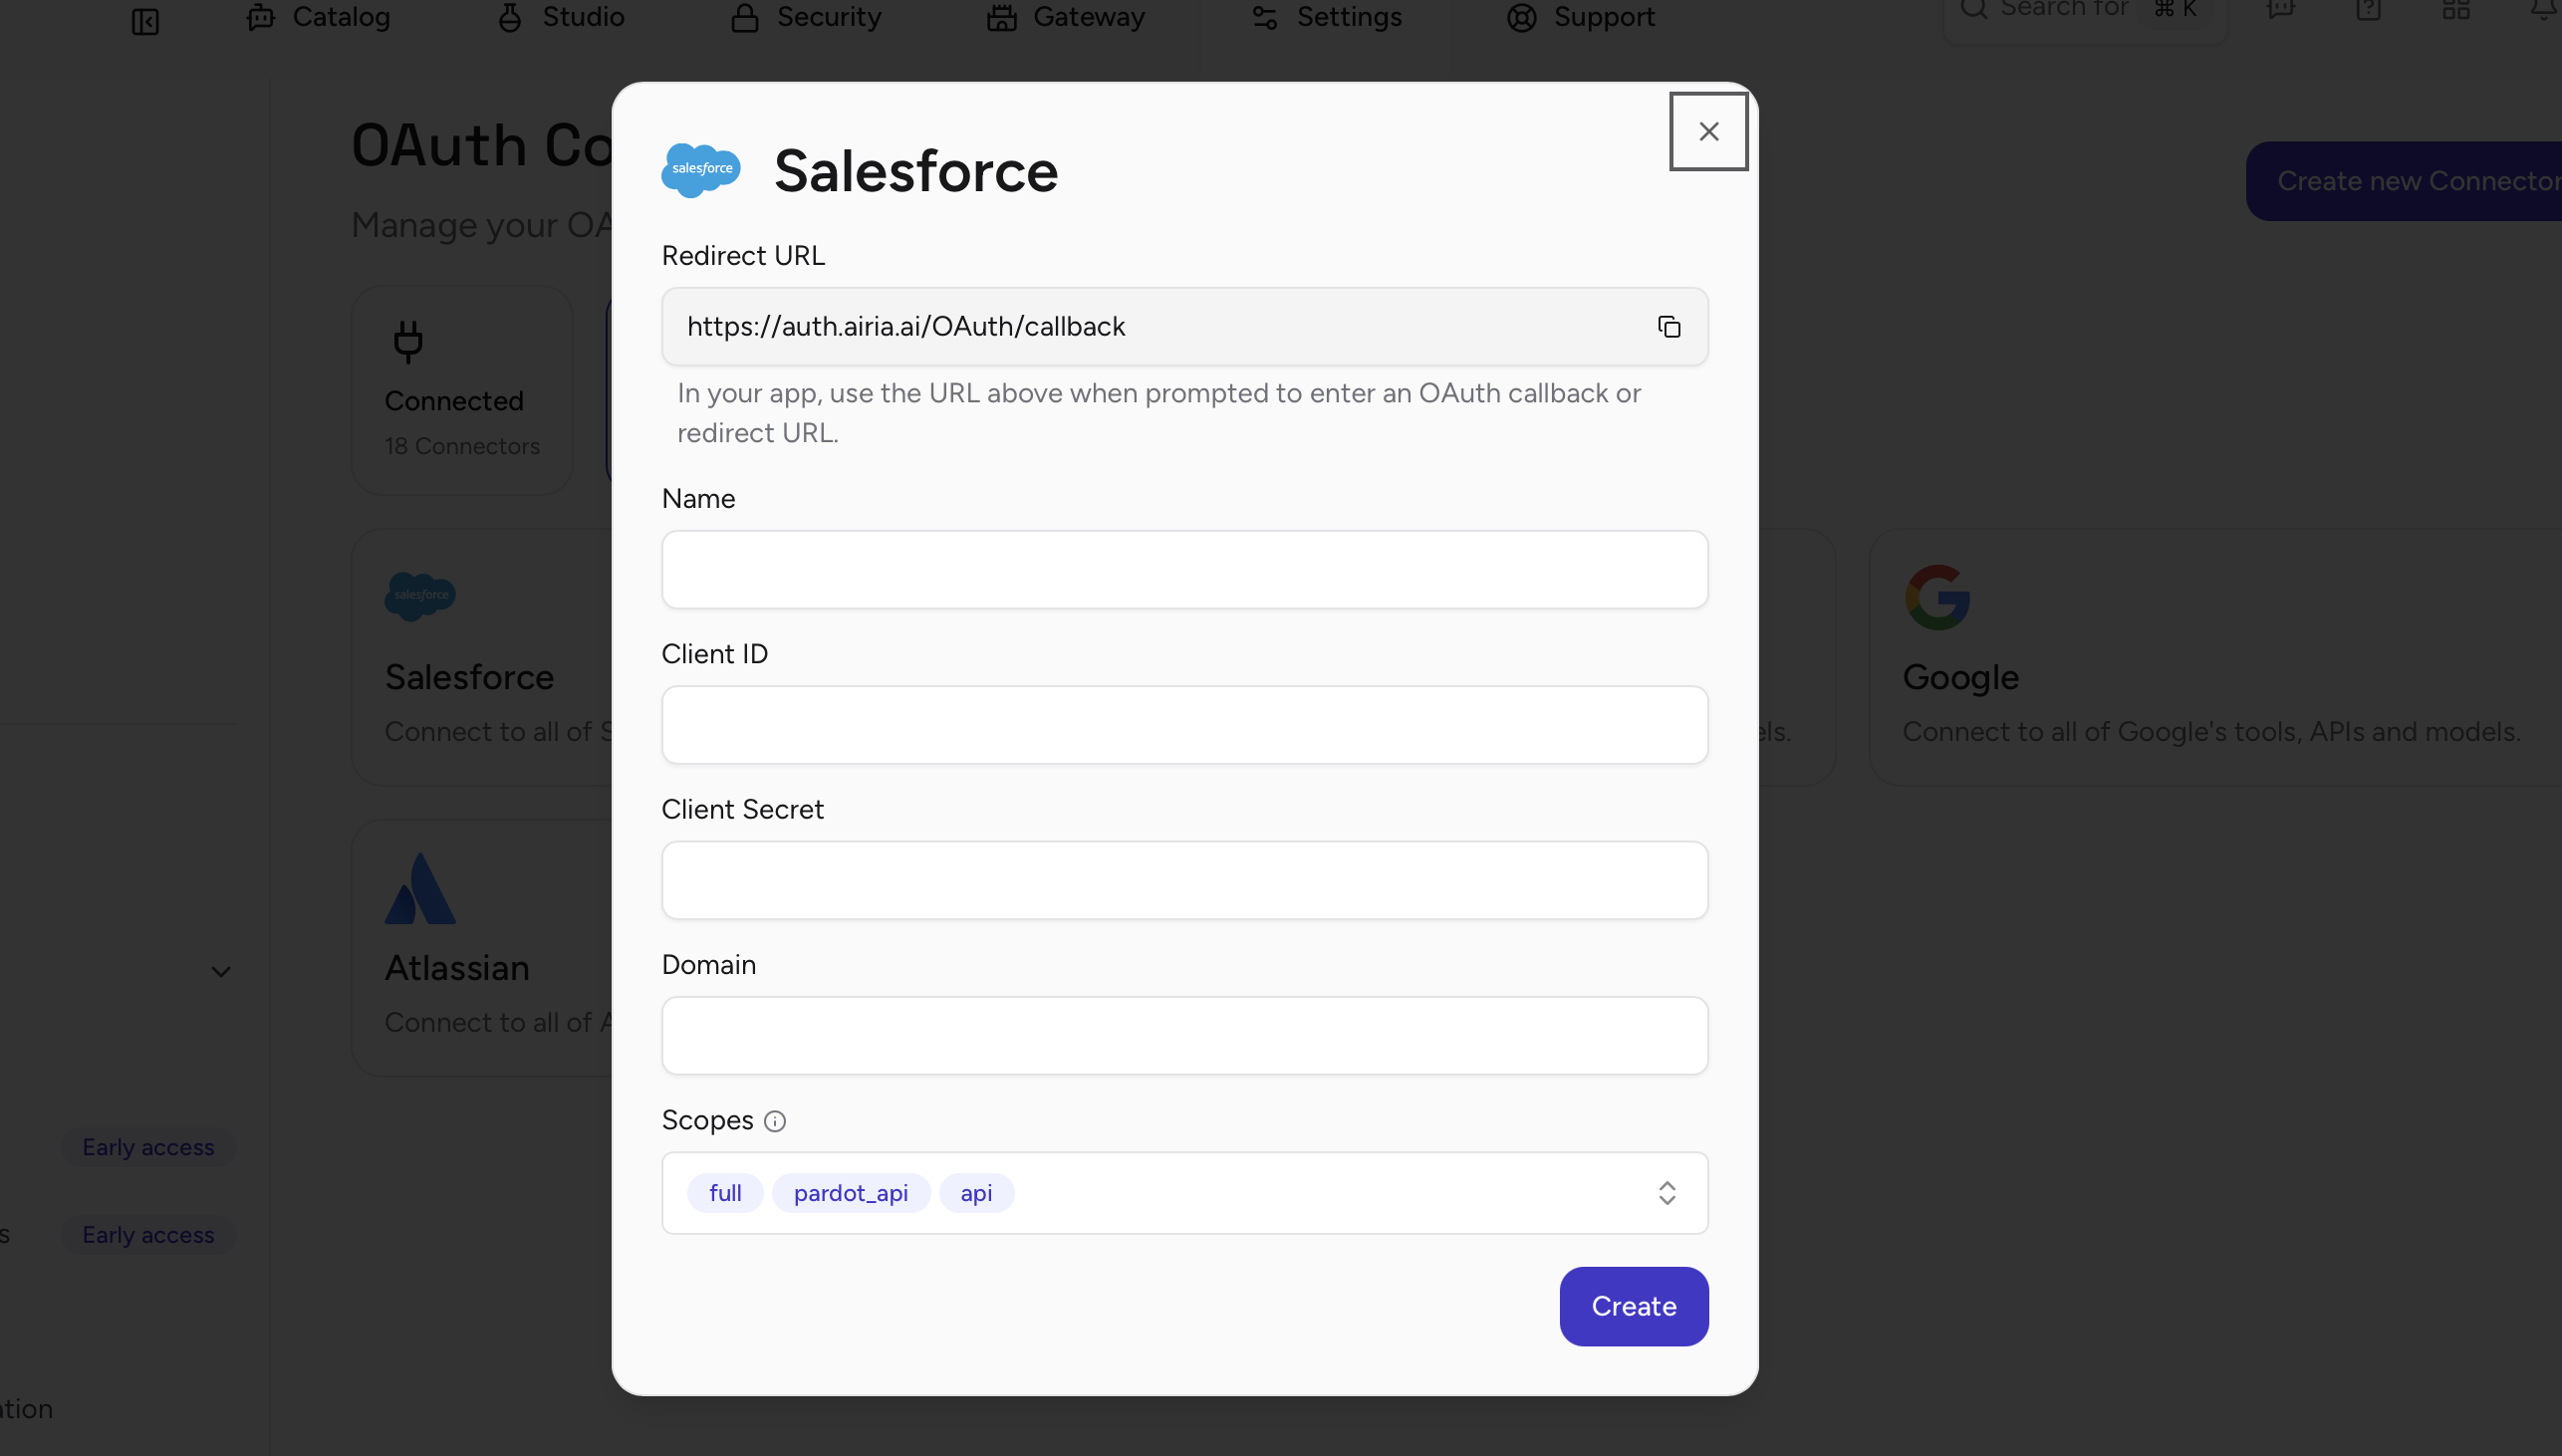
1. Log in to your Airia platform
2. Navigate to **Settings** → **Ecosystem** → **App Connections**
3. Select **Salesforce** as the provider
4. Enter your credentials:
* **Consumer Key / Client ID**: Paste the Consumer Key you copied
* **Consumer Secret / Client Secret**: Paste the Consumer Secret you copied
* **Instance URL / Domain**: Enter your Salesforce instance URL (e.g., `login.salesforce.com`)
5. The callback URL should be pre-filled and visible on the configuration page
6. Click **Save** or **Connect**
 ***
## Step 11: Test the Connection
1. After saving, click **Connect Account** in Airia
2. You'll be redirected to Salesforce's login page
3. Sign in with your Salesforce credentials (if not already logged in)
4. Review the OAuth permission screen
5. Click **Allow** to grant permissions
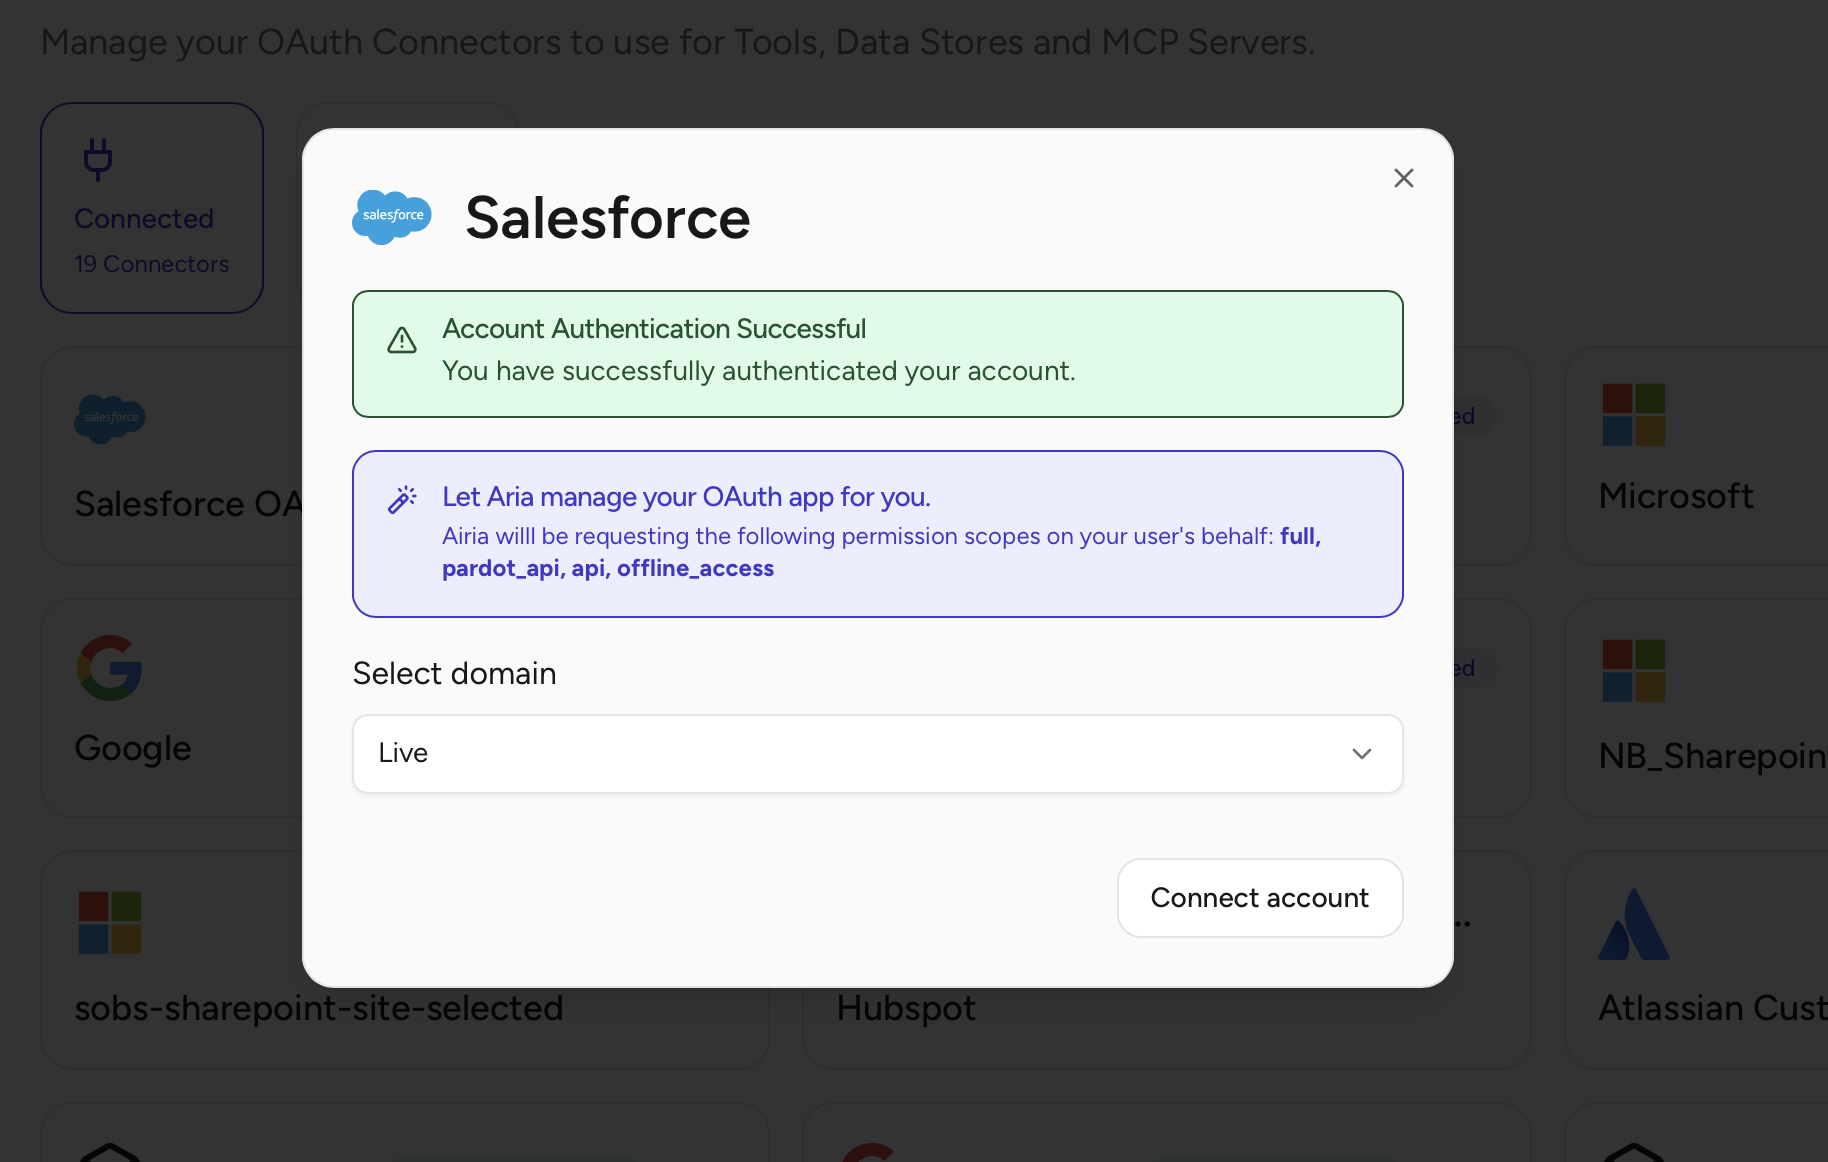
6. You should be redirected back to Airia with a success message
***
## Step 11: Test the Connection
1. After saving, click **Connect Account** in Airia
2. You'll be redirected to Salesforce's login page
3. Sign in with your Salesforce credentials (if not already logged in)
4. Review the OAuth permission screen
5. Click **Allow** to grant permissions
6. You should be redirected back to Airia with a success message
 Salesforce Connected App changes take 2-10 minutes to take effect. If authentication fails immediately after creation, wait a few minutes and try again.
***
## Additional Resources
* [Salesforce Connected Apps Documentation](https://help.salesforce.com/s/articleView?id=sf.connected_app_overview.htm)
* [OAuth Tokens and Scopes](https://help.salesforce.com/s/articleView?id=sf.remoteaccess_oauth_tokens_scopes.htm)
***
Need help? Contact Airia support or your Salesforce administrator for assistance with Connected App configuration.
Salesforce Connected App changes take 2-10 minutes to take effect. If authentication fails immediately after creation, wait a few minutes and try again.
***
## Additional Resources
* [Salesforce Connected Apps Documentation](https://help.salesforce.com/s/articleView?id=sf.connected_app_overview.htm)
* [OAuth Tokens and Scopes](https://help.salesforce.com/s/articleView?id=sf.remoteaccess_oauth_tokens_scopes.htm)
***
Need help? Contact Airia support or your Salesforce administrator for assistance with Connected App configuration.