> ## Documentation Index
> Fetch the complete documentation index at: https://explore.airia.com/llms.txt
> Use this file to discover all available pages before exploring further.
# SpecLink
SpecLink turns a hosted OpenAPI (Swagger) specification into a working set of MCP tools, without anyone having to write or maintain a custom MCP server. If a service you rely on publishes an OpenAPI spec but doesn't offer a remote MCP server of its own, SpecLink is usually the fastest way to make it available to your agents.
## Why It Matters
Most SaaS platforms and internal services describe their REST APIs with an OpenAPI spec, but far fewer of them ship an MCP server on top of it. Without SpecLink, connecting one of these APIs to your agents means waiting for the vendor to build MCP support, or building and hosting a translation layer yourself.
SpecLink removes that step. Point it at a spec and the base URL of the API it describes, and Airia reads the spec, generates a tool for each operation it defines, and keeps the connection ready to use, all from the Custom MCP Server tool you already use to add other servers.
## Setting It Up
SpecLink is one of the transport options in the Custom MCP Server tool. See [Custom MCP Servers](/mcps/admin-controls/custom-mcp-servers) for the rest of the wizard; this section covers what's different when you choose it.
1. Start a new custom server and fill in the **Basic Information** step as usual.
2. On the **Remote Configuration** step, set **Transport Type** to **Hosted YAML (OpenAPI spec)**.
3. Fill in the two URLs SpecLink needs:
| Field | Description |
| ------------------------- | ---------------------------------------------------------------------------------------------------------------- |
| **OpenAPI YAML URL** | Where your OpenAPI/Swagger spec is hosted. Must be an HTTPS URL. |
| **Upstream API Base URL** | The base URL of the actual API the spec describes, for example `https://api.example.com/v1`. Must also be HTTPS. |
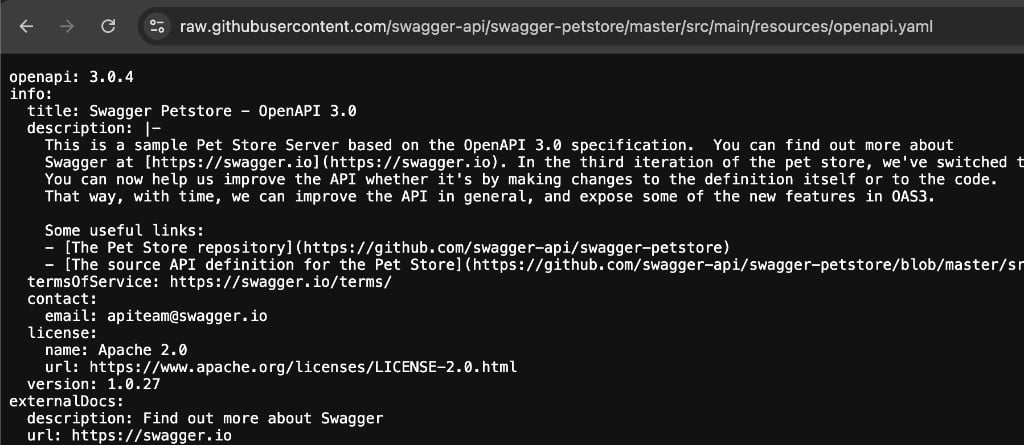
The OpenAPI YAML URL must link directly to the raw YAML (or JSON) document, not to a web page that displays or wraps it. For a spec hosted on GitHub, for example, use the `raw.githubusercontent.com` link rather than the `github.com/blob/...` page. Opening the URL in a browser should look like this, with the plain spec contents and nothing else:
 This URL is only used to fetch the spec itself. All of the tools SpecLink generates send their actual requests to the Upstream API Base URL.
4. Continue through **Authentication Method** and the rest of the wizard the same way you would for any other custom server. See [Custom MCP Servers](/mcps/admin-controls/custom-mcp-servers#authentication-method) for how to choose the right one; it depends on how the underlying API expects to be authenticated.
Custom authentication headers specifically for fetching the spec (separate from authenticating to the API itself) are coming in a future release.
## Testing Your Spec Before You Save
Before finishing the wizard, click **Test YAML spec** next to the OpenAPI YAML URL field. This fetches your spec, converts it the same way Airia would for a real connection, and shows you a preview of the tools it produces, so you can confirm everything looks right without creating the server first.
If your spec is hosted somewhere that requires authentication to read (for example a private repository), you can supply a credential just for this test. It's used once to fetch the spec and is never saved.
If the test fails, it tells you which stage it failed at:
| Stage | What It Means |
| -------------- | -------------------------------------------------------------------------------------------------------------------------------------------------------- |
| **Validation** | One of the URLs you entered isn't usable, for example it isn't reachable or points somewhere unsafe. |
| **Fetch** | Airia couldn't retrieve the spec from the OpenAPI YAML URL. A status code and a hint are included, for example an expired token or a missing permission. |
| **Parse** | The spec was retrieved, but couldn't be converted into tools. This usually means the file isn't a valid OpenAPI spec. |
On success, you'll see how many tools were found along with a preview of their names and descriptions.
## Privately Hosted Specs
If your OpenAPI spec itself lives somewhere that requires authentication to read, such as a private GitHub repository, Airia needs a credential to fetch it. Today this supports a GitHub personal access token.
You'll be prompted to provide this credential when you go to add the server to a Deployment or Gateway on the same step where you configure other credentials. If your spec is publicly readable, you can skip this entirely.
This credential is only used to read the spec file. It's separate from however the underlying API itself is authenticated, which you set up through the **custom server**'s normal **Authentication Method**.
This URL is only used to fetch the spec itself. All of the tools SpecLink generates send their actual requests to the Upstream API Base URL.
4. Continue through **Authentication Method** and the rest of the wizard the same way you would for any other custom server. See [Custom MCP Servers](/mcps/admin-controls/custom-mcp-servers#authentication-method) for how to choose the right one; it depends on how the underlying API expects to be authenticated.
Custom authentication headers specifically for fetching the spec (separate from authenticating to the API itself) are coming in a future release.
## Testing Your Spec Before You Save
Before finishing the wizard, click **Test YAML spec** next to the OpenAPI YAML URL field. This fetches your spec, converts it the same way Airia would for a real connection, and shows you a preview of the tools it produces, so you can confirm everything looks right without creating the server first.
If your spec is hosted somewhere that requires authentication to read (for example a private repository), you can supply a credential just for this test. It's used once to fetch the spec and is never saved.
If the test fails, it tells you which stage it failed at:
| Stage | What It Means |
| -------------- | -------------------------------------------------------------------------------------------------------------------------------------------------------- |
| **Validation** | One of the URLs you entered isn't usable, for example it isn't reachable or points somewhere unsafe. |
| **Fetch** | Airia couldn't retrieve the spec from the OpenAPI YAML URL. A status code and a hint are included, for example an expired token or a missing permission. |
| **Parse** | The spec was retrieved, but couldn't be converted into tools. This usually means the file isn't a valid OpenAPI spec. |
On success, you'll see how many tools were found along with a preview of their names and descriptions.
## Privately Hosted Specs
If your OpenAPI spec itself lives somewhere that requires authentication to read, such as a private GitHub repository, Airia needs a credential to fetch it. Today this supports a GitHub personal access token.
You'll be prompted to provide this credential when you go to add the server to a Deployment or Gateway on the same step where you configure other credentials. If your spec is publicly readable, you can skip this entirely.
This credential is only used to read the spec file. It's separate from however the underlying API itself is authenticated, which you set up through the **custom server**'s normal **Authentication Method**.